Dazzling Geode Cookies Recipe
Cookies That Sparkle Like Real Gemstones
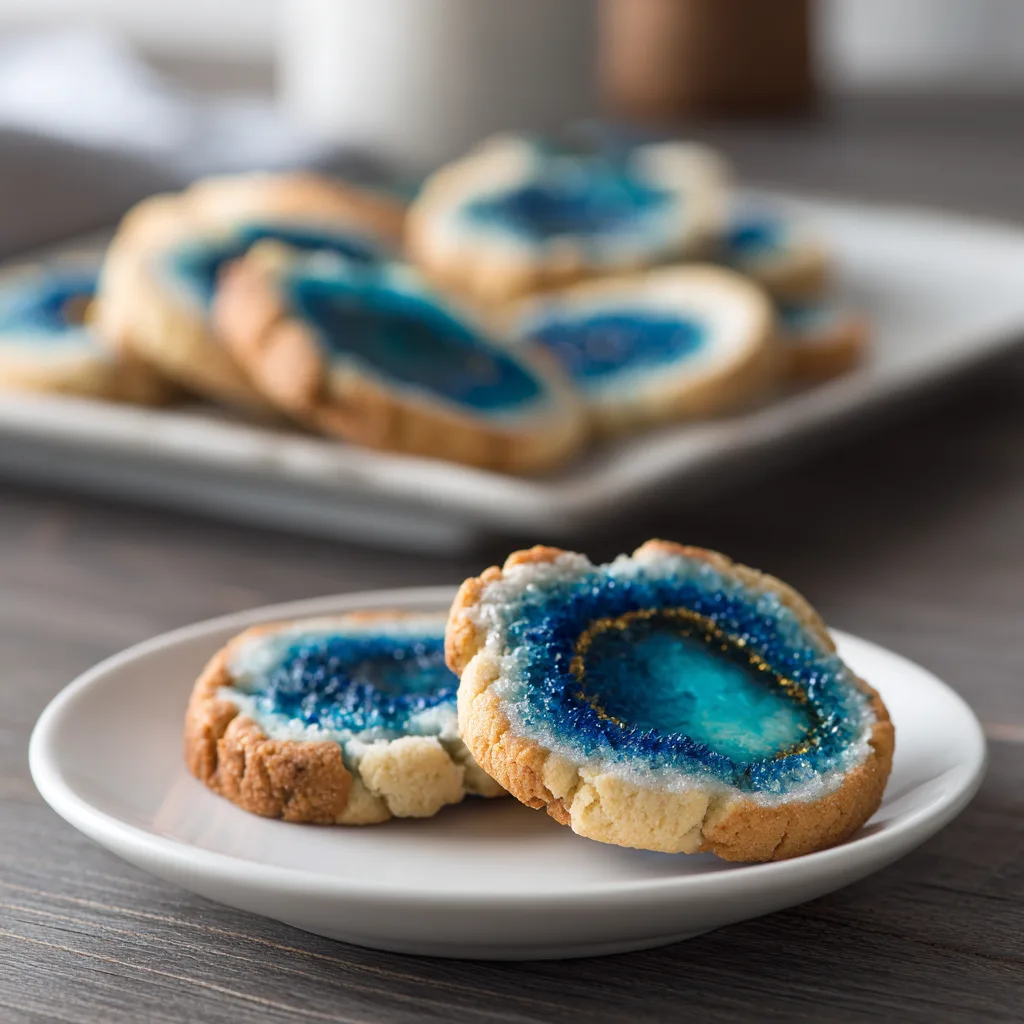
Some desserts simply taste good, while others make a statement. Dazzling Geode Cookies are the kind of dessert that instantly stops the room. They shimmer. They shine. They look like tiny edible treasures, like something you might find inside a jewelry box rather than on a cookie platter. These cookies are both dessert and art, and despite their breathtaking presentation, they are surprisingly achievable in any home kitchen.
The beauty of geode cookies lies in their illusion: we mimic the natural crystalline structure of geodes using rock candy, colored sugar, or isomalt shards. The cookie becomes the stone shell, while the center holds glittering sugar crystals that look as though they were grown underground for millennia. When trimmed with edible metallic paint, the finished cookie resembles polished gemstone slices — elegant, modern, and undeniably luxurious.
Whether you’re preparing treats for a bridal shower, birthday party, wedding spread, baby shower, holiday cookie exchange, gemstone-themed party, or simply want to be the person who brings the most stunning baked creation anyone has ever seen — this recipe will make you unforgettable.
What Makes Geode Cookies So Special?
Dazzling Geode Cookies are most celebrated for their visual appeal, but there are layers of appreciation to uncover when making them:
1. Creative Expression
No two geodes are the same — and neither are geode cookies. You can choose from endless color schemes:
- Amethyst Purple
- Rose Quartz Pink
- Turquoise Blue
- Emerald Green
- Citrine Yellow
- Black Onyx + Gold for an ultra-luxe look
This allows you to tailor these cookies to any event theme or personal aesthetic.
2. Unexpected Elegance
These cookies bring a level of sophistication rarely seen in homemade baking. They are “bakery showpiece” material.
3. A Conversation Piece
Every guest will admire them. Every guest will ask how you made them. Every guest will remember them.
4. Surprisingly Simple Techniques
While they look elaborate, the process is actually very manageable with clear steps:
- Bake cut-out cookies
- Carve or indent a center section
- Apply icing glue
- Add crushed sugar crystals
- Shade color gradients
- Paint edges in gold
You don’t need advanced piping skills — just a steady hand and a willingness to take your time.
Choosing Your Crystal Medium
| Option | Description | Pros | Cons |
|---|---|---|---|
| Rock Candy | Pre-crystallized sugar chunks | Easy, cheap, realistic sparkle | Can be large — must crush carefully |
| Colored Sanding Sugar | Fine sparkling sugar | Smooth transitions between shades | Less dramatic appearance |
| Isomalt Crystals | Professional sugar art medium | Highest clarity and sparkle | Requires heating + extra caution |
For most home bakers, rock candy + sanding sugar is the perfect balance.
Best Cookie Flavor Base
These cookies can be made using:
- Classic vanilla sugar cookie dough
- Shortbread
- Almond sugar dough
- Lemon sugar dough
- Gluten-free sugar cookie dough (if needed)
You want a dough that:
- Keeps sharp edges when baked
- Does not puff excessively
- Holds shape
The secret is chilling the dough before baking.

Tools & Supplies You Will Need
- Rolling pin
- Baking sheets
- Parchment paper or silicone baking mats
- Knife or cookie cutter with center cut-out option
- Food-safe art brush
- Edible gold or silver luster dust mixed with vodka or clear extract (for paint)
- Rock candy or colored sugar crystals
- Thick icing to use as adhesive (royal icing works best)
Ingredients
Cookie Dough
- 2 ¾ cups all-purpose flour
- 1 cup unsalted butter (softened)
- 1 cup granulated sugar
- 1 large egg
- 2 teaspoons pure vanilla extract
- ½ teaspoon almond extract (optional)
- ½ teaspoon salt
- 1 teaspoon baking powder
Decoration
- White royal icing (thick consistency)
- Rock candy crystals OR coarse sanding sugar (any colors you choose)
- Gel food coloring (matching your crystal theme)
- Edible gold luster dust + clear alcohol/extract for painting
- Optional: edible glitter, shimmer dust

Instructions
Make and Shape the Cookie Base
- Cream the butter and sugar together in a mixing bowl until light and fluffy.
- Add the egg, vanilla extract, and almond extract (if using). Mix until smooth.
- In another bowl, whisk flour, salt, and baking powder.
- Slowly mix dry ingredients into wet ingredients until the dough forms.
- Divide dough in half, shape into disks, wrap, and refrigerate 30 minutes.
- Roll dough ¼-inch thick on a lightly floured surface.
- Cut cookies into circles, ovals, or geode-like shapes.
- Use the tip of a knife to carve a natural uneven indentation in the center. This is where the crystal will sit.
- Transfer cookies to a lined baking sheet.
- Bake at 350°F (175°C) for 9–12 minutes, until edges are just barely golden.
- Cool completely before decorating.
Decorate the Geodes
- Attach crystals using a small dab of thick royal icing in the indented center.
- Press in rock candy pieces, starting with the darkest shade at the deepest point.
- Add lighter crystal pieces moving outward to create the geode gradient effect.
- Lightly brush edges of the crystal area with diluted gel coloring for depth.
- Mix edible gold dust with vodka/clear extract to make paint.
- Paint the cookie’s outer rim with gold, creating that signature geode rim.
- Allow cookies to dry 1–2 hours before stacking or packaging.
Storage & Serving
- Store in an airtight container for up to 1 week.
- Do not refrigerate — it causes sugar crystals to weep.
- Can be made up to 3 days ahead for events.
Flavor Variations to Try
| Theme | Crystal Colors | Cookie Flavor |
|---|---|---|
| Rose Quartz | pale pink + white | Vanilla + rose water |
| Amethyst | lilac + violet | Almond + vanilla |
| Emerald | deep green + gold | Pistachio cookie base |
| Midnight Galaxy | black + blue + silver | Dark chocolate cookie |
Gifting & Display Ideas
- Package individually in clear bags with gold ties
- Arrange on a tiered dessert stand
- Display under soft lighting to maximize sparkle
- Pair with champagne or tea service for elegance

Dazzling Geode Cookies
Ingredients
Equipment
Method
- Cream butter and sugar until fluffy.
- Add egg, vanilla, and almond extract.
- Mix flour, salt, and baking powder separately, then combine with wet ingredients.
- Chill dough for 30 minutes.
- Roll out dough and cut cookie shapes.
- Carve a natural geode indentation in the center.
- Bake at 350°F (175°C) for 9–12 minutes and cool.
- Apply royal icing and press in rock candy crystals.
- Paint edges with gold luster dust to finish.