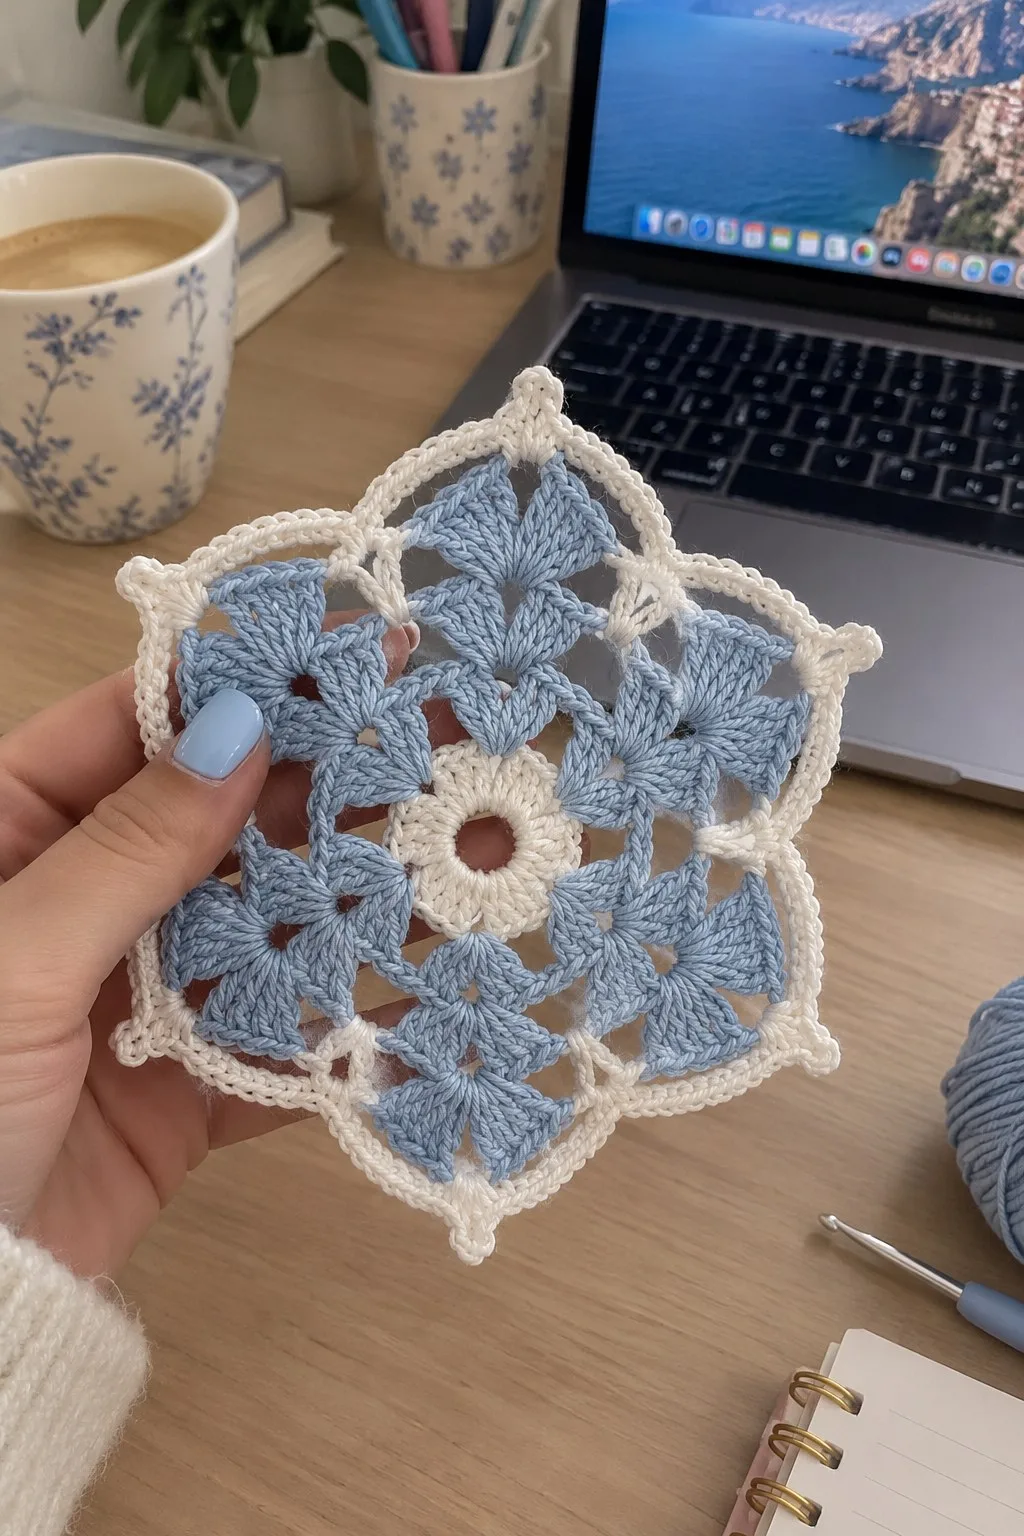
Create a delicate ice-blue snowflake medallion with a soft cream outline — a pretty motif perfect for coasters, medallions, or joined bedspread panels. The design features a small central flower, six airy petal clusters, and a scalloped star edge finished with tiny picot points. Written for an intermediate crocheter, this pattern uses basic cluster and picot techniques to create a crisp, lace-like snowflake effect.
About This Ice Blue Snowflake Medallion Pattern
This Ice Blue Snowflake Medallion is a delicate, floral-inspired motif worked in two soft colors: pale ice blue for the body and warm cream for the outline and picot points. The motif forms a six-point snowflake/star shape with textured cluster petals, openwork between the clusters for breathing space, and an elegant scalloped edge finished by tiny picots on each point. The finished piece looks beautiful as a single coaster, a medallion to frame in a hoop, or repeated to make a bedspread as shown in the photos.
The pattern uses simple cluster stitches and chain spaces to create the airy petal shapes and finishes with a crisp reverse single crochet border and picot tips for a defined snowflake silhouette. The directions include clear stitch counts, placement tips, and blocking advice to get that flat, even star shape.
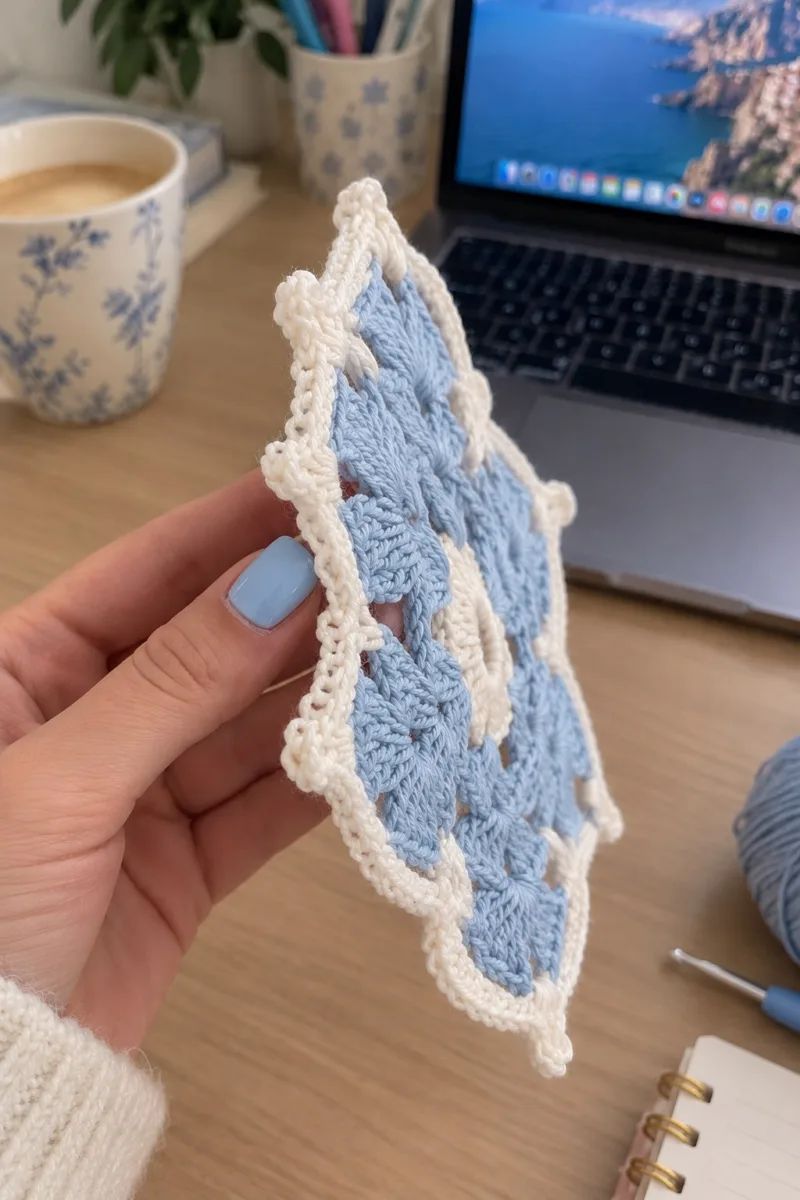
Why You'll Love This Ice Blue Snowflake Medallion Pattern
I love this pattern because it captures that nostalgic granny-squares-meet-snowflake vibe — the petal clusters feel cozy and the cream border gives the motif a beautiful crispness. The balance between openwork and dense clusters makes it both airy and structured, and I enjoy how each round builds towards a defined six-point star. It’s comforting, pretty, and versatile — perfect for small projects or joining into a larger, dreamy bedspread.
- Cozy Accent – A warm touch for your space that transforms ordinary corners into inviting nooks filled with handmade charm.
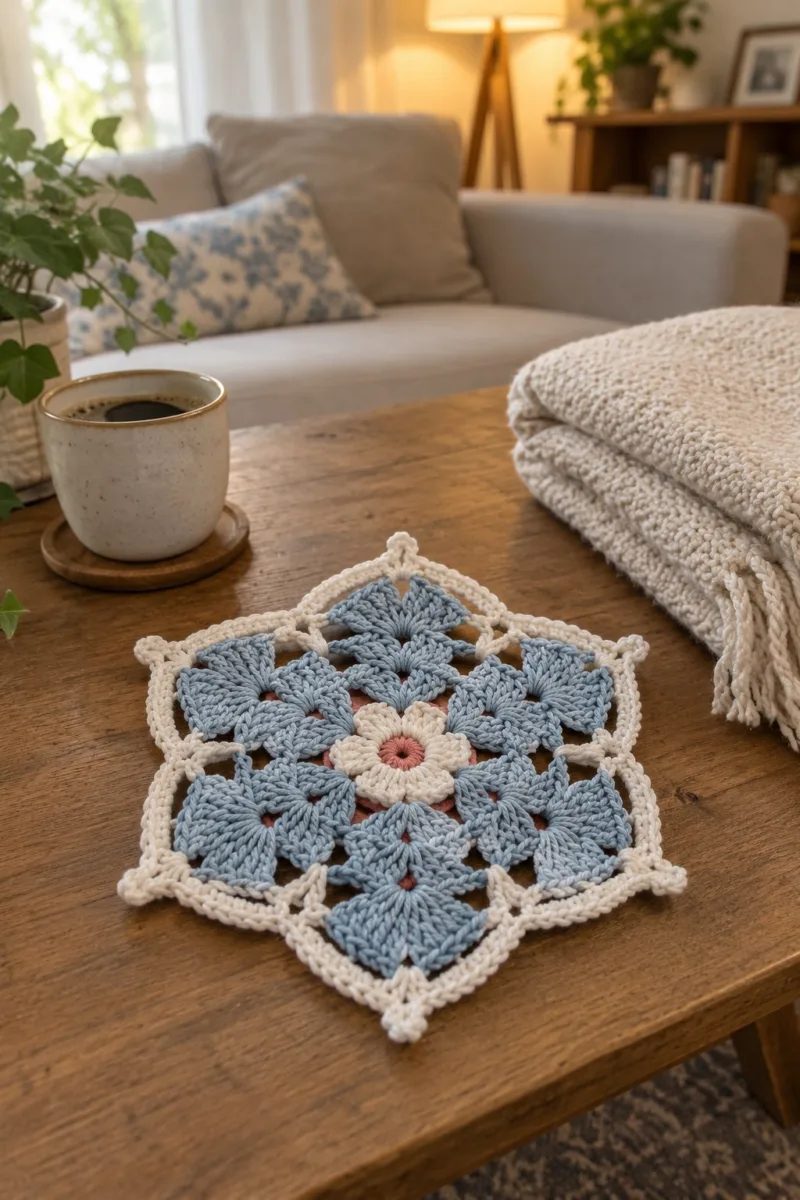
Switch Things Up
I absolutely love how this medallion balances open lacework and dense clusters — it makes it so easy to customize. Try swapping the ice blue for a deeper teal or a soft grey for a different mood. The cream border really helps the snowflake shape pop, so I usually keep a light contrasting color for the edge.
I like to change the size by swapping yarn weight: a lighter cotton with a 3.0mm hook gives a delicate doily, while a chunkier cotton and 4.0mm hook makes a bold coaster. You could also add an extra lace ring or two between rounds 30–36 to make each medallion larger for table runners or blankets.
I often add small custom touches like tiny beads at the picot tips or a subtle embroidered center for personalization. If making a spread, alternate two accent colors on the central rounds for a beautiful checkerboard effect when joined.
Materials Needed
Main Fabric
- DK/light worsted weight cotton or cotton-blend yarn (approx DK #3), about 50g in ice blue (main) for medallion bodies
- Cream/off-white DK yarn, approximately 30-40g for outer rounds, scallops and picot edging
- Optional small accent 10-15g in soft rose/pink if you prefer a tiny central contrast (photo shows a subtle rose center in one image)
Tools Required
- 3.5mm (E) crochet hook, or size to achieve gauge and crisp stitches
- 3.0mm (D) crochet hook (optional) for firmer edging
- DK/light worsted yarn as listed (cotton recommended for crisp blocking)
- Yarn needle for weaving ends
- Stitch markers (to mark round starts and point tips)
- Blocking pins and foam board or steam-blocking iron
- Scissors
- Tape measure or ruler
- Optional: small crochet hook to weave in ends neatly
The Free Pattern
0% complete
Notes & Techniques
- This medallion is worked in joined rounds with color changes at the end of specific rounds for a crisp contrast. The pattern uses 3-dc clusters to create petals; a 3-dc cluster means: yarn over, insert hook, yo pull through, yo pull through two loops (repeat for each of the 3 dcs) then yo and pull through all remaining loops on hook to close cluster. Count each 3-dc cluster as one unit when counting stitches. Work tightly enough so the granny clusters sit neatly without large holes.
Center
- Round 1: Make a magic ring. Ch3 (counts as first dc), 11 dc in ring. Join with sl st to top of ch3. (12 dc)
- Alternative: If you prefer a small hollow center, ch4 join with sl st to form ring and then work 12 dc into ring. Pull ring closed to make a small central eye.
- Round 2: Ch1, sc in same st, *ch3, skip 1 dc, sc in next dc; rep from * around to make 6 ch-3 loops. Join with sl st to first sc. (6 sc, 6 ch-3 loops)
- These ch-3 loops will be the base for the first set of petals. Keep tension even on chain loops so the clusters sit centered.
First Petal Round (petal foundation)
- Round 3: Change to ice blue yarn. Join with sl st in any ch-3 loop, ch1, (sc, ch2, sc) in same ch-3 loop to form a small picot-like base, *in next ch-3 loop work (3-dc-cl, ch2, 3-dc-cl) — meaning: 3-dc cluster, ch2, 3-dc cluster; rep from * around for each of 6 loops. Join with sl st to first sc of round. (6 petals, 12 clusters counted as units)
- Each petal sits in a ch-3 base; the ch-2 between the two 3-dc clusters creates an open V that gives the petal shape. Keep clusters worked into the chain-space only, not into stitches, for a lace look.
Petal Expansion Rounds
- Round 4: Ch3 (counts as dc), work 2 dc in same space as joining sl st (this creates the top of a new cluster), *ch1, skip to center ch-2 space between the 3-dc clusters of the same petal, work (3-dc-cl) into ch-2 space, ch1, in the next outer ch-2 space (between petals) work (3-dc-cl), rep from * around placing clusters so petals begin to touch at tips. Join with sl st to top of ch3. (18 cluster units equivalent across motif; total effective dc clusters = 18)
- This round builds two rings of cluster texture and begins to connect petals into a round. Keep track visually of six main petal groups — you will see small triangle gaps that will be closed in the next rounds.
- Round 5: Ch1, sc in same st, *ch4, skip 3 clusters, sc in next cluster top; rep from * around to create 6 large ch-4 loops between petal groups. Join with sl st. (6 sc, 6 ch-4 loops)
- These ch-4 loops form the airy open spaces that will turn into the six-pointed snowflake arms. Keep chains neat and slightly firm for structural support.
Secondary Cluster Shells
- Round 6: Change to cream for contrast. Join with sl st in any ch-4 loop, ch3 (counts as dc), work 11 more dc evenly around the loop (total 12 dc in loop). Join with sl st to top of ch3. Repeat in each ch-4 loop to create 6 small round shells (but join each shell to itself then move to the next loop). End round after completing all 6 shells and join back to first shell. (6 shells × 12 dc each)
- Work each small shell into the ch-4 loop for a round petal-cap effect. Do not fasten off; carry cream to next joining point if you prefer seamless color flow, or break yarn and rejoin for cleaner color change.
- Round 7: Ch1, sc in same st, *ch3, 3 sc in top of next shell (space made by joining), ch3, sc in next shell top; rep around to form little arches between shells. Join with sl st to first sc. (6 sc and 6 arch repeats)
- This round gives a decorative bridge between the small cream shells and the central petal body. If you are joining motifs later, this is a good round to leave a small loop to use for joining.
Third Round of Petal Clustering
- Round 8: Change back to ice blue. Join with sl st in any ch-3 arch, ch3 (counts as dc), work 2 dc in same arch, *[ch2, skip 1 sc, 3-dc-cl in next arch] repeat around making elongated petals. Work so each main petal now has three visible layers of clusters stacked (inner, middle, outer). Join to top of ch3. (6 main petals with 3 layers each)
- When changing colors, weave the tail inside the motif or clip and weave later. Carrying across too many stitches makes the wrong side messy; break yarn if you want the cleanest finish.
- Round 9: Ch1, sc in same st, *in next ch-2 space work (sc, ch3, sc) to create a pointed loop, sc in next top of cluster; rep around to create 6 pointed loops between petals. Join with sl st. (12 sc & 6 ch-3 loops)
- These pointed loops will help shape the six star points when you add outer rounds — keep the chains consistent size for symmetry.
Foundation for Snowflake Points
- Round 10: Change to cream. Join with sl st to any ch-3 point loop, ch1, sc in same loop, *ch6, sc in next ch-3 point loop; rep around to create 6 long ch-6 arches bridging petals. Join with sl st. (6 sc & 6 ch-6 arches)
- These long chain arches will be the base that you build tall pointed arms from. Keep chains taught but not tight so the arms can be worked into cleanly.
- Round 11: Ch3, 2 dc in same sc (counts as 3-dc cluster), in next chain-6 arch work (3 dc, ch3, 3 dc) into the center of arch; sc into the bridge sc between arches; rep around so each arch becomes a tall, triangular arm made of 3dc-ch3-3dc. Join with sl st to top of ch3. (6 arms)
- When working clusters into chain arches, space the clusters evenly so the two 3-dc groups sit symmetric on each side of the ch-3 center. This gives the arm a neat triangular silhouette.
Reinforcing Arm Shape
- Round 12: Ch1, sc in same st, *ch4, sc in center ch-3 space of next arm (over the ch3 space), rep around to make 6 ch-4 stabilizer loops across each arm. Join with sl st. (6 stabilizer loops)
- These stabilizer loops make the arms less floppy and provide a place to anchor the scalloped edge later. If a firmer arm is desired, use smaller hook for subsequent rounds.
- Round 13: Change to ice blue. In each stabilizer loop work: (sc, hdc, 5 dc, hdc, sc) to create a shallow scallop overlaying the arm. Join and fasten off color if you prefer clean join. This adds body to the arms and begins a scalloped outline. (6 scallops)
- If you used a continuous color carry, avoid pulling the carried yarn too tight across the back; leave a small slack to prevent distortion of the scallop on the front.
Outer Star Formation
- Round 14: Join cream into the space between scallops at the base of each arm with sl st, ch4 (counts as tr), 3 tr in same space, *ch2, skip to outer tip of scallop and work (5 tr) centered over scallop, ch2, in the valley between scallops work 3 tr; rep around to create tall trebles that form the sharp star arms. Join to top of initial ch4. (6 star points made of tall tr groups)
- Tall trebles will lean slightly; to keep them upright, work evenly and avoid twisting. Blocking will help them stand crisp.
- Round 15: Ch1, sc in same st, *ch5, sc between next two tall tr groups; rep around to form airy scallop-work between star arms. Join with sl st. (6 sc and 6 ch-5 loops)
- These chains will be the decorative negative space that appears between each star arm when motif is blocked flat.
First Edging Sequence (sc rounds)
- Round 16: Change to ice blue. Join with sl st at base of any star arm, ch1, 1 sc in same st, *work 1 sc in each treble across the group of trebles making the tip and down the other side; when you reach valley, work (sc, ch3, sc) in valley to create a small loop; rep around, ending with sc at joining. Count: approximately 120 sc total (varies slightly by tension; keep even distribution).
- This long sc round creates a solid band around the motif and gives a base for the decorative reverse single crochet (crab stitch) that follows. If your stitch count is off by a few sts, adjust by adding or skipping small groups of sc evenly across the motif.
- Round 17: Work 1 round in BLO: ch1, 1 sc in each st BLO around to create a raised ridge. Join with sl st. (same stitch count as previous round)
- Using BLO here creates a neat ridge which helps define the snowflake outline. If you prefer a flatter medallion, work sc through both loops instead.
- Round 18: Ch1, sc in same st, *[skip next sc, 5 dc shell in next sc, skip next sc, sc in next sc] repeat around to work scallops along the outer band. You should produce 12 shallow scallops evenly spaced. Join with sl st. (12 scallops)
- These scallops will be the base for the final pointed picots at each star tip. Place them evenly so each of the six main points has two small scallops leading into it.
Picot Tip Formation (detailed)
- Round 19: Switch to cream for picot contrast. Join in the center stitch of a scallop: ch1, sc in same st, *ch5, skip 2 sts, sc in next st (this creates small ch-5 loops on the scallop crowns); rep around making 12 ch-5 loops. Join. (12 ch-5 loops)
- These ch-5 loops give enough room to add a small point and a picot. Keep chains firm so the final picot sits upright when blocked.
- Round 20: In each ch-5 loop work: (sc, hdc, 3 dc, picot, 3 dc, hdc, sc) — to form a small pointed projection with a picot at the tip. Work around and join. You will have 12 small projections with picots. (12 projections)
- The picot at the center of each projection is the defining little point that makes the snowflake glitter. Use ch2 sl st picot if you prefer a smaller tip.
- Round 21: Ch1, sc in same st, *ch3, skip to next projection and sc in base to secure points; rep around forming small chain-bar joins between projections. Join and fasten off if desired. This gives a delicate openwork chain between the small projections. (12 sc and 12 ch-3 chains)
- At this point the motif has its six main points defined and twelve smaller tip projections. The next rounds will reinforce the border and create a final crisp rim using reverse sc and additional picots.
Decorative Ridge & Tightening Rounds
- Round 22: Join ice blue (or keep cream for contrast) and work: ch1, 1 sc in each stitch and in each ch-space around to even out the edge. Join with sl st. Count expected: 144 sc (approx; adjust evenly if necessary for even layout).
- If your stitch count differs slightly, distribute extra or fewer sc evenly across the 12 small projections so the border remains balanced. The exact number can vary a little with personal tension.
- Round 23: Work reverse single crochet (crab stitch) in same color around: sl st into next st, *crab (reverse sc) 6 times across the face of each scallop, then 2 crab across projection base; rep around to form a twisted rope edge. Join with sl st. (same # stitches as previous round)
- Reverse single crochet gives a lovely twisted cord edge that makes the motif look finished and professional. Keep tension slightly looser than regular sc if the crab stitch pulls too tight.
- Round 24: Working in cream, join at the base of any of the 6 main star points and ch1, sc in same, *ch7, sc at center valley between star points; rep around to create 6 large ch-7 loops forming outer framework for final points. Join. (6 ch-7 loops)
- These large outer loops will receive long picot-tipped points that emphasize the snowflake outline. Use consistent chain length so points are symmetrical.
Long Point Caps
- Round 25: In each ch-7 loop work: (sc, hdc, 7 dc, picot, 7 dc, hdc, sc) to create long prominent arms with a central picot. Work around and join. You now have 6 long arms with picot tips. (6 long arms)
- These long arms are the most visible snowflake points. Use a slightly smaller hook or a firmer hand if you want them to stand more firmly outwards after blocking.
- Round 26: Ch1, sc in same st, *work 3 sc across the outer 7-dc group (evenly spaced), ch3, sc in valley between arms; rep around to form small connecting ridges between arms. Join. (approx 90 sc overall)
- These connector sc rounds reinforce the arms and prevent flaring. They also create a surface to tidy ends and secure edges for joining motifs if you intend to assemble a blanket.
Fine Edge & Micro Picots
- Round 27: Change to ice blue. Work one round of sc in BLO across this round to create a final raised ridge: ch1, sc BLO in each st around, join with sl st. (same stitch count)
- One round in BLO again gives depth and a professional finish to the border. This is especially nice on cotton yarns to enhance stitch definition.
- Round 28: Switch to cream. In each outermost stitch work: (sc, picot, sc) — the picot is ch3, sl st in third ch (or ch2 for smaller) to create a tiny bead between the reverse sc ridges. Work around and join. (approx 90 tiny picots)
- These tiny picots add delicate sparkle and final detail. Use a small hooked needle or thread to pull small picots into shape before blocking.
Decorative Tall Loops (optional variation)
- Round 29: If you want an additional lacy halo, join ice blue in any valley and ch1, *sc, ch9, sc in next valley; rep around to create a lacy halo. Join with sl st. (6 ch-9 loops)
- This optional round increases the motif diameter and gives a floating lace halo perfect for coasters that also serve as doilies. If making bedspread panels, this gives additional join points.
- Round 30: In each ch-9 loop: work (sc, hdc, 9 dc, hdc, sc) and join. This creates an extra ornamental ring. Fasten off and weave in ends carefully. (6 ornamental scallops)
- Weave ends on the wrong side following the curve of stitches to make them invisible. Trim close once secure.
Reinforcement & Blocking Prep
- Round 31: Optional final reinforcement: using cream and 3.0mm hook, work a very loose sc round around the very outer edge (working into back loops or top loops only) to even out any irregularities. This round should not add many stitches — work evenly and join. Fasten off and weave in ends. (Evened outer edge)
- After finishing, wet block or steam block the motif flat: pin the six points to a blocking mat, adjust symmetry, and allow to dry fully. This step is crucial to make the snowflake flat and even.
Joining Notes (if making a bedspread)
- Round 32: When joining motifs into a bedspread, work Round 22 as a join round: instead of finishing sc around, use mattress stitch/join-as-you-go: work sc up to the join point, sl st into the corresponding stitch of the adjoining motif, ch1 and continue. Join motifs at the 6 long arm bases for a hex-joined layout. (join at 6 seam points)
- Use the join-as-you-go method to avoid bulky seams. Block each motif before joining — this keeps the join flat and consistent in tension.
Variation Rounds (to expand motif diameter)
- Round 33: Variation A (lace extension): Join ice blue and ch1, sc around in each st and ch-space for one even round to prepare for a lacy overlay. Join with sl st. (increased stitch count based on previous round)
- Round 34: Work ch5 arches between groups: *sc, ch5, skip 3 sts, sc; rep around to create a ring of arches. Join. (number of arches = approx 36)
- Interactive variations like these let you create larger medallions for table runners or bedspreads. Keep color changes consistent for a cohesive look.
- Round 35: Overlay each ch5 arch with (sc, hdc, 5 dc, hdc, sc) in cream to make a secondary scallop ring. Join and fasten off. (approx 36 small scallops)
- For larger spreads, repeat these expansion rounds or add more lacy rings until desired size is reached. Remember to block each motif after finishing to maintain shape before joining.
Small Detail Rounds (micro shaping)
- Round 36: Optional micro-edge: Work 1 round of slip stitches around outermost picots to lock them in place; insert hook from front to back so slip stitches hug the picot base. Join and weave ends. (locks picots)
- This micro-edge reduces fraying and gives a neat underside for joining pieces later.
- Round 37: Work decorative knots: using a tapestry needle, weave a short length of contrasting thread through the base of each main arm and tie small decorative overhand knots on the wrong side for subtle texture. Secure and trim ends. (6 knots)
- These small, optional sewn details are purely decorative and add a handmade touch reminiscent of vintage doilies.
Final Finish Rounds
- Round 38: Final inspection round: pick a matching yarn and with small 3.0mm hook, work a tidy slip-stitch round around the very edge going into each front loop — this makes a neat framed rim. Fasten off and weave ends securely. (final tidy rim)
- Make sure all tails are woven at least 4 cm into the fabric and trimmed. Press lightly with steam after blocking if yarn allows, to set stitches.
- Round 39: Optional beadwork: With a needle and matching thread add a tiny seed bead at the tip of each main picot if desired. Sew through bead and into picot base, knot securely on the wrong side. (6 beads if applied)
- Beads are optional and add a delicate sparkle — suitable for decorative items only (not for toys used by small children).
Blocking & Care
- Round 40: Info :
- Wet-block the finished medallion by soaking in lukewarm water and a small amount of wool wash, gently squeeze out excess water, pin to blocking mat with symmetric points pinned evenly, and allow to dry fully. For cotton yarns, steam gently to relax fibers and set points. This will flatten the motif and open the lacework for optimal look.
- Store flat to preserve shape. Hand-wash gently when needed.
Assembly Instructions
- If joining medallions into a bedspread, arrange motifs on a flat surface in the desired layout (hex or grid). Block each motif first for uniform shape and size.
- Use join-as-you-go or mattress stitch across corresponding arms: when working the joining round, replace the sc in the valley with sl st into the adjoining motif's corresponding stitch to create a flat seam.
- To attach a single medallion as a coaster or frame piece, weave in all ends on the wrong side and trim. Add optional backing felt or thin interfacing if you need a stiffer coaster.
- When sewing motifs together, match the six long arms carefully and pin with rust-proof pins at the tip and valleys before final sewing to keep symmetry.
- If adding beads or buttons to the picot tips, secure each bead with a small knot on the wrong side and cover with a drop of fabric glue for extra security.
- For hanging as a decoration, stitch a small loop of matching yarn at the back center of one star arm using a tapestry needle, then knot securely and hide the tail by weaving into nearby stitches.
Common Mistakes & How to Fix Them
- Skipping stitch markers at round starts can cause misaligned points and uneven shaping; always mark the first stitch of each round.
- Carrying unused color across large open spaces creates visible strands on the wrong side; break and rejoin yarn when changing color for clarity.
- Working chains too loosely in chain-spaces will make points sag; keep chain tension slightly firm for crisp spaces.
- Not blocking the finished motif will cause the scallops and picots to curl instead of lying flat; always steam or wet block before joining.
- Using inconsistent cluster technique (different tensions on cluster dc) makes petals uneven; practice a couple of sample clusters first.
- Forgetting to count cluster groups as single units causes stitch count errors in subsequent rounds; record counts at the end of each round.
Important Notes
- Use stitch markers consistently at the beginning of each round to avoid counting errors and maintain proper shaping
- Block each motif flat and pin all points symmetrically to ensure the six arms remain even for joining
- When changing color, break yarn at the end of a round and rejoin to avoid carrying long floats across the wrong side
- Work clusters with consistent tension — practice a sample cluster to match tension across petals
- Weave in ends at least 4 cm into the wrong side, following stitch paths to make them invisible
- If joining into a bedspread, keep a record of the number of motifs and their placement to maintain a balanced color pattern
- Use a slightly smaller hook for edging rounds for a crisper, more defined border
- For cotton yarns, steam-blocking is usually safe — avoid direct iron heat on acrylics
This Ice Blue Snowflake Medallion brings handmade charm to your home with delicate petals, crisp cream edging, and tiny picot tips — a perfect cozy accent for coasters, hoop art, or joined blankets. Each motif becomes a little winter dream when blocked and finished with care 🧶❄️. Enjoy the slow, meditative process of crafting these motifs — they join beautifully into larger heirloom spreads or stand alone as pretty little gifts 🌸✨.
Crochet Abbreviations
- mr
- magic ring
- ch
- chain
- sl st
- slip stitch
- sc
- single crochet
- hdc
- half double crochet
- dc
- double crochet
- tr
- treble (UK: tr, US: dc depending on notation) — here tr = US treble
- dtr
- double treble
- dc-cl
- double crochet cluster (see notes)
- 3-dc-cl
- cluster of 3 double crochets worked together (counts as 1 cluster)
- picot
- ch 3, sl st in 3rd ch from hook (or ch 2 sl st depending on desired size)
- inc
- increase (2 sts in same st)
- dec
- decrease (invisible or normal as preferred)
- BLO
- back loops only
- FLO
- front loops only
- st
- stitch
- rep
- repeat
- ( )
- work instructions in brackets as directed
- x
- times
You Ask, We Answer
What is the finished size of this medallion?
Using DK cotton and a 3.5mm hook, the finished medallion measures approximately 13-15 cm (5-6 inches) across from tip to tip. Using thicker yarn or a larger hook will increase the diameter proportionally.
Can I use different yarn weights for this pattern?
Yes, you can use lighter or heavier yarns. Adjust your hook size accordingly and remember that stitch definition and blocking behavior will change; try a sample motif first to verify the look and gauge.
Should I join motifs before or after blocking?
Block each motif before joining. Blocking ensures consistent shape and size so that seam lines match cleanly and the finished spread lies flat.
Do I have to use safety techniques or add beads?
Keep the motif bead-free if it will be used by small children. If using beads for decor, sew them securely and consider applying fabric glue for extra safety.
How much yarn will I need for a bedspread made of these motifs?
A king/queen-size bedspread of motifs will require a considerable amount; plan around 40–60 motifs depending on layout and motif size. Each motif uses ~50g of main color and ~30–40g of contrasting color; multiply accordingly and add extra for joining and edging.
Can I make the motif reversible?
To make it reversible, avoid carrying colors across the back and use join-as-you-go carefully; a reversible motif may require alternative placement of joins and more careful tail-weaving to keep both sides neat.
What hook size will give crisp edges and defined picots?
A 3.0–3.5 mm hook works well for DK cotton. For crisper picots and lower-diameter motifs, go down one hook size and tighten tension slightly.
How do I prevent the points from curling?
Blocking is key: pin each point outward evenly and steam or wet block until completely dry. If points persistently curl, add one round of single crochet around the edge to weight and stabilize them.