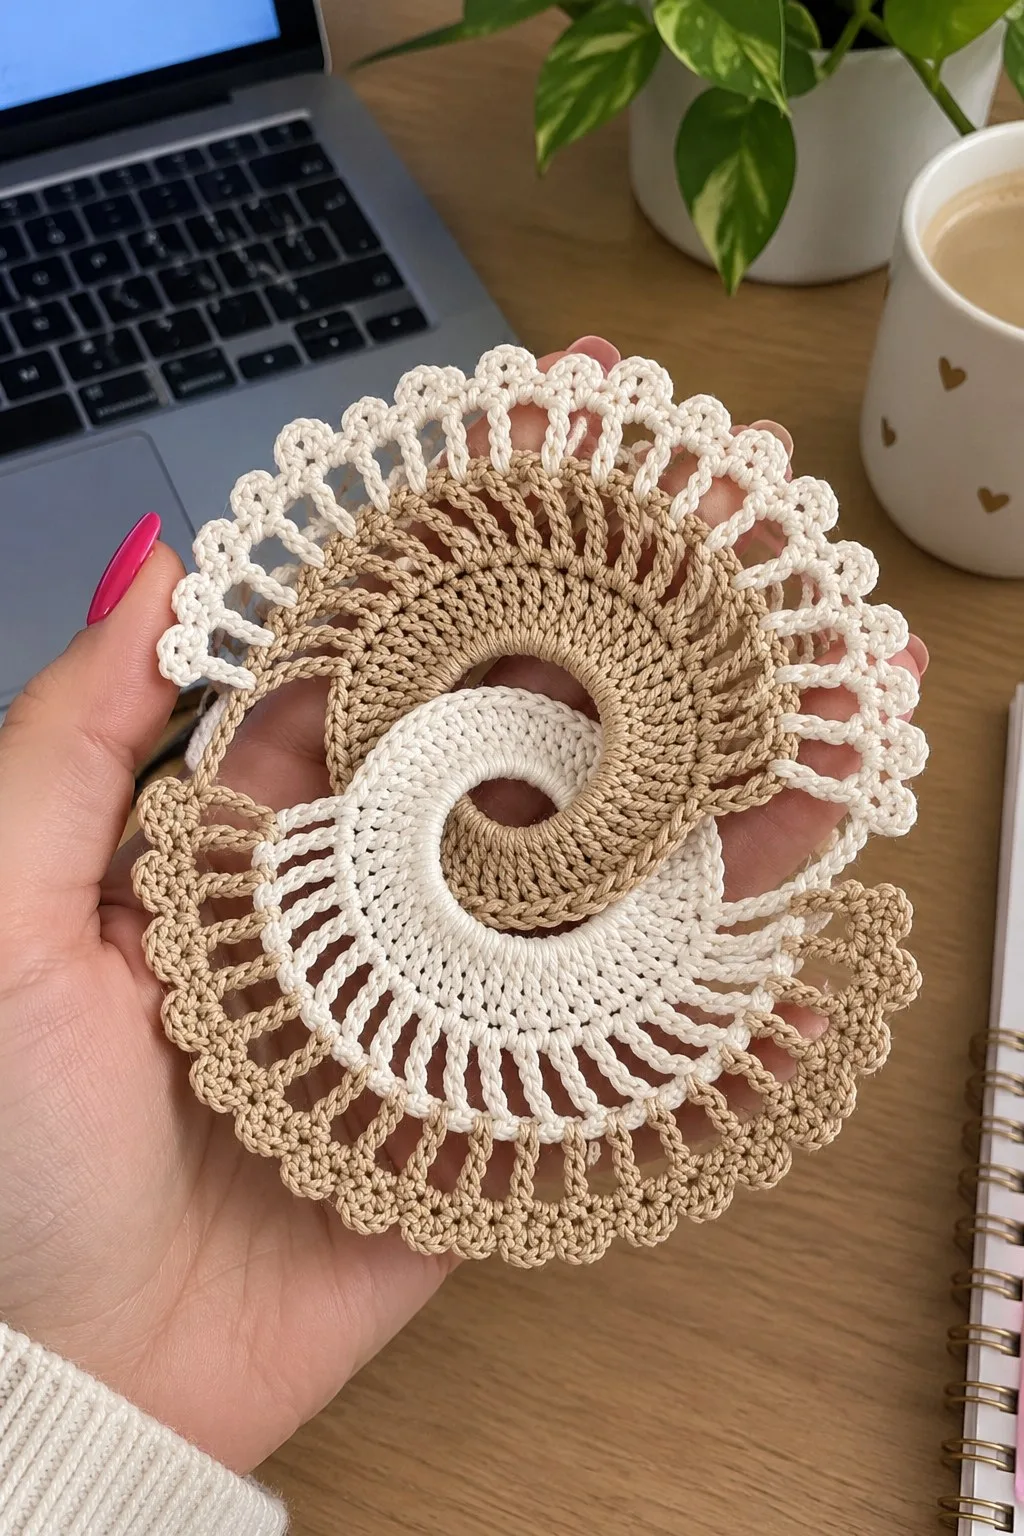
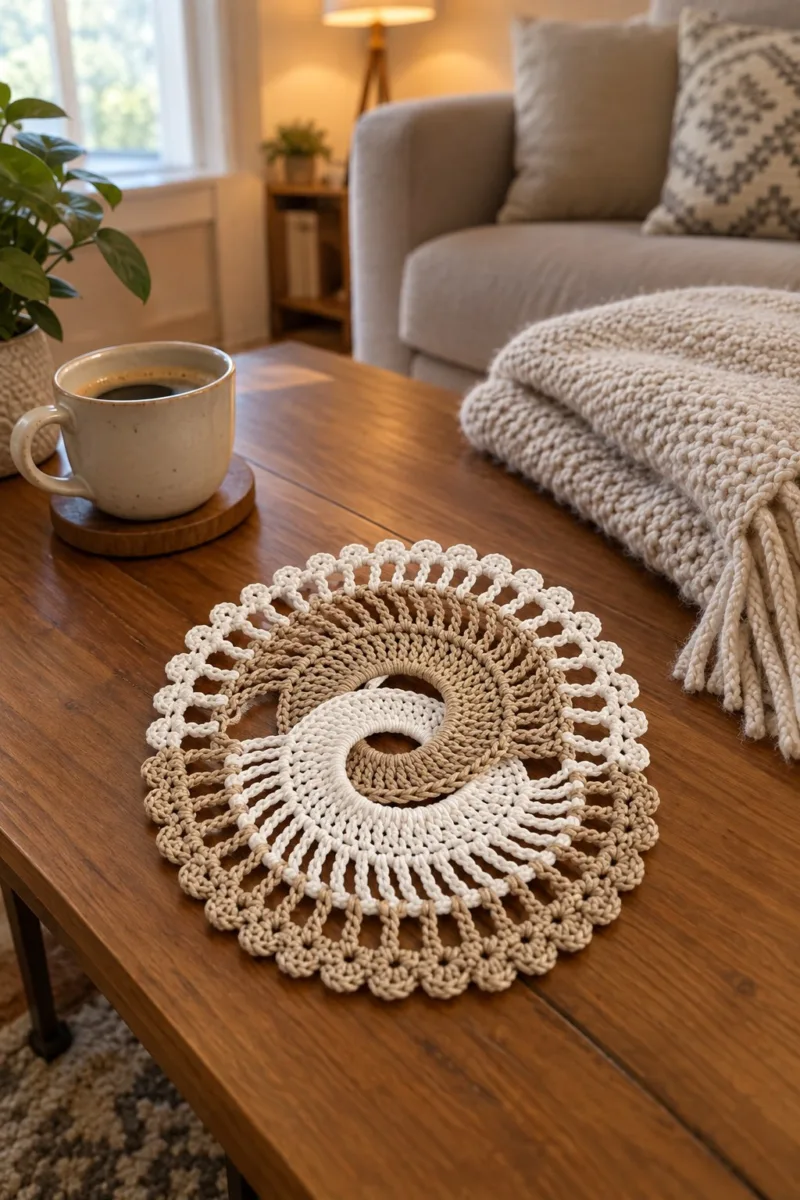
A delicate boho-inspired spiral doily that combines a twin-colored swirl with openwork bars and a scalloped picot edge. Worked flat in two interlocking spirals (warm sand and soft cream), it creates a hypnotic S-shape perfect for tabletops or wall art.
The project uses fine cotton or cord yarn and emphasizes texture with back-loop ribs and decorative loops. Make several for a placemat set or stitch them together for a larger table centerpiece.
About This Boho Circle Spiral Granny Square Pattern
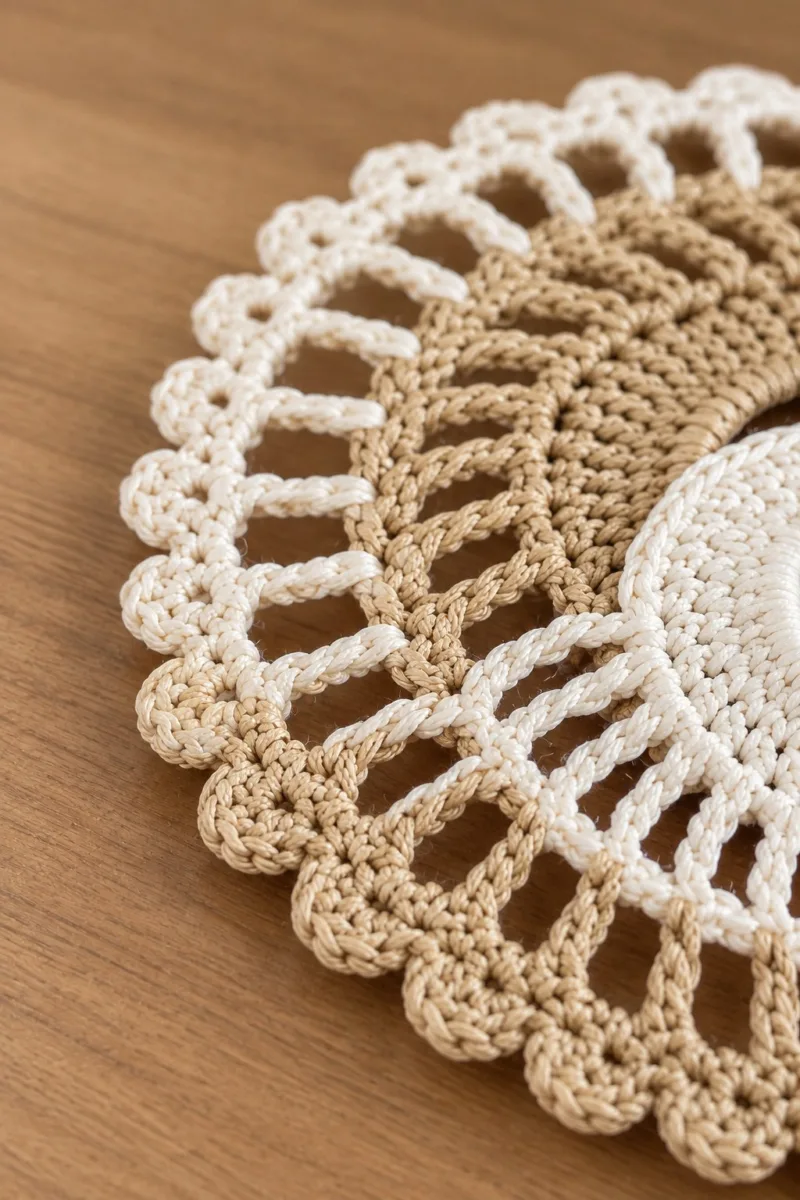
This pattern recreates the boho circle spiral shown in the photos—a pair of interlocking curved discs in cream and warm golden tan, finished with delicate vertical loop bars and a scalloped picot edge. The design is worked flat in rounds using a fine cotton or cord-like yarn, with careful spacing to form the S-shaped spiral and airy openwork. The finished piece lies flat when blocked and makes a beautiful coaster, small placemat, or decorative motif. This pattern breaks the project into logical sections so you can follow along step-by-step.
The piece is constructed as two concentric spiral discs that are later linked with tall chain bars and finished with a rounded scallop edge. The contrast of dense central rounds and lacy outer rounds gives a modern boho look.
Why You'll Love This Boho Circle Spiral Granny Square Pattern
I love this pattern because it balances structure and airiness — the tight spiral centers give the motif weight while the tall chain bars and scalloped edge feel light and decorative. I also enjoy the simple color play of cream and warm golden tan, which looks elegant and calming on a wooden table. Making one of these feels like creating a small piece of textile art that’s both meditative to stitch and wonderfully rewarding to display.
- Cozy Accent – A warm touch for your space that transforms ordinary corners into inviting nooks filled with handmade charm.
Switch Things Up
I absolutely love how easily this pattern adapts — you can change the color pairing, increase chain heights, or swap shell sizes to completely alter the look while keeping the same construction. Using richer autumnal tones or a single color ombre will give the spiral a different mood.
I often make smaller versions as coasters by using thinner thread and a smaller hook, or larger versions for placemats by choosing thicker cord and lengthening the outer loops. I also like adding subtle embroidery in the shells for a tiny pop of color or metallic thread for a festive touch.
Don’t be afraid to experiment: change ch12 to ch10 or ch14, swap 5-sc shells for 3-sc shells, or add a delicate picot row. Each small change will give your piece a fresh personality while preserving the beautiful spiral structure.
Materials Needed
Main Fabric
- Cotton cord or mercerized cotton, sport/light DK-equivalent (approx. 3-4 ply effect). Approximately 120-140g in warm golden tan (main spiral)
- Cotton cord or mercerized cotton, same weight, approx. 100-120g in cream (secondary spiral)
- Small leftover amounts (10-20g) in contrast color if you want a third accent for the scallop edge
Tools Required
- 2.5mm – 3.5mm crochet hook depending on yarn thickness and desired tightness (use 3.0mm recommended for cord-like cotton shown)
- Cotton/cord yarn in two colors (warm tan and cream) as listed above
- Tapestry/yarn needle for weaving ends
- Blocking pins and foam pad or starch for finishing
- Scissors
- Stitch markers (4+ helpful for spacing loop anchors)
- Tape measure or ruler for checking final diameter
- Optional: small row counter or notepad to track rounds
The Free Pattern
0% complete
Materials & Gauge
- Use cotton mercerized cord or lightweight cotton thread. With a 3.0mm hook a finished single-disc round of 16 rounds (dense center) will be approximately 9-10cm across. Final combined spiral with outer scallops will be approximately 20-23cm depending on yarn and blocking. Work tightly enough that the center rounds are solid but allow long chain bars to remain flexible.
Notes Before You Begin
- This pattern is worked in separate parts: first the white/cream center spiral disc, then the tan spiral disc, then bridging loop rounds that link them together, and finally the outer scalloped edge. I recommend keeping tails long for color joins and weaving them in after blocking. Use stitch markers to mark cardinal points for even loop placement.
Center Spiral (Cream)
- Round 1: 6 sc in magic ring (6)
- Round 2: 6 inc (12)
- Round 3: (1 sc, 1 inc) × 6 (18)
- Round 4: (2 sc, 1 inc) × 6 (24)
- Round 5: (3 sc, 1 inc) × 6 (30)
- Round 6: (4 sc, 1 inc) × 6 (36)
- For a perfectly flat circle, check after round 6 that the disk is lying flat. If it begins to ruffle, slow the rate of increases on the next rounds; if cupping, increase earlier. This center is intended to be quite tight compared to outer openwork.
- Round 7: (5 sc, 1 inc) × 6 (42)
- Round 8: (6 sc, 1 inc) × 6 (48)
- Round 9: (7 sc, 1 inc) × 6 (54)
- Round 10: (8 sc, 1 inc) × 6 (60)
- Maintain consistent tension; these inner rounds will later be partially covered by the tan spiral. Weave in the tail temporarily or leave it to help join later.
- Round 11: (9 sc, 1 inc) × 6 (66)
- Round 12: (10 sc, 1 inc) × 6 (72)
- Round 13: (11 sc, 1 inc) × 6 (78)
- Round 14: (12 sc, 1 inc) × 6 (84)
- At this stage the cream disc is reaching a size that will form the inner curve of the S-spiral. Count stitches to confirm you have 84. If you prefer a slightly smaller inner spiral, stop increases one round earlier.
- Round 15: (13 sc, 1 inc) × 6 (90)
- Round 16: (14 sc, 1 inc) × 6 (96)
- Round 17-20: 1 sc in each st (96)
- If your stitch count at round 16 is 96 you will use this as the base circumference for arranging 24 tall chain bars later (96 ÷ 24 = anchor every 4th st). Use markers at every 12th stitch now to mark quarter points for future alignment.
Transition Join for Inner Spiral
- Fasten off cream and set aside OR leave attached if you prefer to carry color. The cream disc will sit as one half of the S-spiral. We will now make the tan spiral disc that interlocks visually; it will be worked separately and partially overlapped to create the swirl effect.
Inner Spiral (Warm Tan)
- Round 21: With warm tan, 6 sc in mr (6)
- Round 22: 6 inc (12)
- Round 23: (1 sc, 1 inc) × 6 (18)
- Round 24: (2 sc, 1 inc) × 6 (24)
- Round 25: (3 sc, 1 inc) × 6 (30)
- The tan spiral will mirror the cream disc in size so that the two S-halves nest visually. Work increases to the same broad circumference, keeping the stitches similar tension to cream to match gauge.
- Round 26: (4 sc, 1 inc) × 6 (36)
- Round 27: (5 sc, 1 inc) × 6 (42)
- Round 28: (6 sc, 1 inc) × 6 (48)
- Round 29: (7 sc, 1 inc) × 6 (54)
- To create an interlocking look, when you reach round 30-36 plan which quadrant will slightly overlap the cream disc; place a marker at that quadrant so you can align this tan disc when joining later.
- Round 30: (8 sc, 1 inc) × 6 (60)
- Round 31: (9 sc, 1 inc) × 6 (66)
- Round 32: (10 sc, 1 inc) × 6 (72)
- Round 33: (11 sc, 1 inc) × 6 (78)
- Keep the tan disc slightly snug so when placed next to cream it doesn’t create a gap. If you prefer the tan spiral to sit on top, leave a longer tail for whip stitch joining later.
- Round 34: (12 sc, 1 inc) × 6 (84)
- Round 35: (13 sc, 1 inc) × 6 (90)
- Round 36: (14 sc, 1 inc) × 6 (96)
- Round 37-40: 1 sc in each st (96)
- Fasten off leaving a 20-30cm tail for seaming if you will overlay the tan spiral onto the cream. Alternatively, leave both attached and plan to link with the bridging loops which will hold both discs in their S formation.
Positioning & Planning the Spiral Connection
- Lay both discs on a flat surface and orient them into an S shape: the cream disc inner curve paired opposite the tan disc to form a continuous spiral. Using pins or small markers, find the points around the outer round of each disc that correspond to quarter markings. We will create 24 tall chain bars that will anchor into the outer round stitches of both discs, alternating cream and tan so the S-shape links visually.
Bridging Bars Round (Long Chain Loops)
- We will make 24 tall loop anchors. Each loop will bridge two stitches on the same disc (creating a vertical bar) and later will be reinforced with single crochet around the top of the chain. For 96 stitches per round, anchor a loop every 4th stitch (96 ÷ 24 = 4). Place markers at each anchor point on both discs to preserve alignment.
- Round 41: Join tan at one anchor point on the tan disc by sl st, ch 12, sk 3 sts, sl st in next st (this forms the first tall loop). Continue around: (ch 12, sk 3, sl st in next) × 24 (24 loops formed)
- Keep chain tension relaxed so loops are even. If ch12 is too tall or too short depending on yarn, adjust to ch10–ch14 to visually match the height in the photo. The exact loop height is a stylistic choice.
- Round 42: Rotate to cream disc anchor point that visually aligns with the tan loops; join cream at its first anchor and repeat the same loop formation (ch 12, sk 3, sl st) × 24 (now two sets of loops exist, one on each disc)
- These loops will remain as tall open bars giving the motif its airy ribs. Now we will reinforce the top of each loop by working a round of sc into the chains to create neat vertical bars.
- Round 43: With tan, working into the top of each ch-12 loop: (sl st into 4th ch from hook to join at loop top if needed), sc around each loop evenly: [sc, hdc, 3 dc, hdc, sc] across the top of each tan loop to form a little decorative ladder top. Repeat for 24 loops (each loop produces 7 sts when worked as shell: 24 × 7 = 168 sts across loop tops)
- This decorative stitch across loop tops creates a richer rib. Adjust the combination of sc/hdc/dc to keep counts similar across all loops; the aim is to create a uniform band across loop tops rather than an exact arithmetic match to the original 96 circumference.
- Round 44: With cream, work same sc/hdc/dc shell across each cream loop top so both sets of loop tops have a mirrored decorative band. Work consistently to match the tan loop band height.
- These two matching bands visually link the discs and begin to create the ribbed surface seen in the photos. If you prefer a simpler look, just sc around top of each loop evenly instead of shells.
Linking the Two Spirals Visually
- Round 45: With tan, join to the inner edge where the tan and cream curves should touch. Using the long tail from the tan disc, whip stitch or mattress stitch the inner curves together across 6–10 stitches to create a slight overlap in the S junction. Secure and weave tail.
- This small seam makes the two halves read as a continuous spiral rather than two separate circles. Be subtle — only a few small stitches are needed. Alternatively, you can leave them unsewn and rely on the bridging bars and outer edge to hold shape.
- Round 46: With cream, mirror the same small stitch-join on the opposite quadrant so the S feels balanced. Take care not to pull too tightly and distort the discs.
- Pin the joined area and check the visual flow before finishing tails. Blocking later will help relax any minor distortions from seaming.
Outer Lattice Transition Rounds
- Round 47: With tan, ch 1, sc evenly across the last worked round (the loop-top band), placing 1 sc in each shell center and 2 sc in shell spaces as needed to reach an even count — aim for approximately 168 sc across the band to create a solid base for the outer lattice.
- Round 48: 1 sc in each st BLO for 1 full round (168)
- Working in the BLO creates a subtle ridge that highlights the transition to the open lattice. This ridge is visible in the motif as a defined border before the tall open loops.
- Round 49: Ch 6 (counts as tr + ch3), *skip 3 sts, tr into next st, ch 3; rep from * around to create a spaced lattice of tall picot-like arches. Join to top of starting ch with sl st. (Repeat until round is complete; count should match the number of anchored arches—approx 56 arches)
- These arches form the scaffold for final loops and scallops. If your count differs, maintain visual spacing rather than strict count — aim for uniform loop spacing around the full circumference.
- Round 50: 1 sc in each tr and in each ch-space around (approx 168—adjust locally to keep spacing even)
- This round flattens the arches and prepares an even base for the vertical open bars that will make the S-shaped ribs between the two spirals.
Vertical Open Bars Rounds
- Round 51: With cream, ch 10, skip required number of sts to align with previous markers, sl st in anchor stitch; repeat around to create tall open bars at slightly narrower spacing than earlier loops (aim 48 bars, anchored every 3–4 sts depending on spacing).
- These bars will be the tall ribs seen radiating outward in the photo. Adjust ch length to make them visually match the previous loops in height and proportion.
- Round 52: With tan, work a round of sc into the top of each cream bar (work 7 sts evenly across the top of each chain: sc, hdc, 3 dc, hdc, sc). Repeat for all bars to create decorative ladder tops. This will yield approx 48 × 7 = 336 sts across top — this large number is intentional to create a fuller outer scaffolding.
- Large stitch counts occur when you add multi-stitch tops to many bars. This is fine — we are building a broad platform for the scalloped edge. If counts feel too big, reduce the number of bars or the size of each decorative top.
- Round 53: 1 sc in each st around (adjust to match the current total count; keep even tension)
- Round 54: 1 sc in each st BLO (same count as R53)
- These two rounds create a sturdy platform before the scalloped edge so your shells will sit evenly and not pull the motif inward.
Scalloped Picot Edge Foundation
- Round 55: With tan, *skip 2 sts, 5 sc in next st (shell), skip 2 sts, sl st in next st; rep from * around forming shells spaced evenly. Count will depend on how many shells fit — aim for between 28–36 shells around depending on your earlier counts.
- The shells will become the visible scallops at the motif edge. Keep each 5-sc shell tight and consistent; if your shells are flaring, use hdc instead of sc for the outermost stitches to make a gentler curve.
- Round 56: With cream, in the top of each shell: sl st into the shell center, ch 3, 3 dc in same point, ch 3, sl st into next shell center — this creates little looped picot arches above each shell. Repeat across all shells.
- Round 57: Return to tan and work 1 sc into the base of each picot loop and 2 sc across shell centers to secure and slightly tighten the scallop edge.
- Work slowly across the scallops to ensure each picot sits centrally on the shell. Use pins to shape the scallops during blocking if needed.
Finishing Edge Rounds (Refinement)
- Round 58: 1 sc around entire edge, placing 3 sc inside each shell center to even out spacing (final stitch count will equal sum of shells × approx 5–7, adjust as needed)
- Round 59: 1 sc in each st BLO for a subtle rope-edge finish (same count as R58)
- Round 60: Fasten off neatly, leaving a tail. Weave tail through backside to hide it. Repeat any mirrored reinforcing stitches on the opposite spiral area if necessary to keep the S-shape balanced.
- After the scallop, the motif should lay flat. If one side lifts slightly, re-check the join between the two spirals and add a couple of small whip stitches behind the top band to settle the curve.
Decorative Rounds (Optional Embellishments)
- Round 61: Optional: With a third accent color, embroider small surface chains or tiny stars into the outer shells. Use a yarn needle and 2-strand embroidery stitches.
- Round 62: Optional: Add a second pass of picot dots on every other shell: (sl st, ch 3, sl st) in alternating shells to create a dotted scallop effect.
- Embellishments should be light so they don’t weigh the edge down. Test one or two shells before committing to a full round.
Blocking & Final Shaping
- Round 63: Info :
- Wet-block the finished motif onto a foam pad, pinning each scallop evenly and stretching only as much as desired. Use mild starch spray to help hold the shape if making a placemat. Allow to dry fully before removing pins. After blocking, weave in all ends on the back with a tapestry needle and trim close.
- Round 64: Info :
- If you plan to make a set, use the pinned first motif as a template for spacing and loop heights to keep the collection uniform.
Troubleshooting & Tweak Rounds
- Round 65: Info :
- If one side of the S is too pronounced, remove a couple of join stitches at the inner junction and resew with a looser tension. If the outer scallop is too small, add an extra round of shells (repeat R55–R59 with adjusted counts).
- Round 66: Info :
- To make a larger motif, use thicker cord and increase the ch lengths for open bars; double the number of loop anchors (e.g., from 24 to 36) and recalculate spacing (total circumference ÷ anchors = anchor spacing).
Alternate Construction (Single Combined Spiral)
- Round 67: Info :
- If you prefer to make the spiral as one continuous piece instead of two discs, begin with tan center and periodically skip joining rounds on one side while increasing on the other, then switch color and mirror increases to form the double-spiral. This approach is advanced and requires careful counting to maintain flatness.
- Round 68: Info :
- Always sample one small spiral section before attempting the combined method so you are comfortable with directional increases and shaping.
Final Checks and Care
- Round 69: Info :
- Gently hand-wash cotton motifs and re-block if they soften unevenly. Avoid machine washing if you’ve used starch or strong blocking to maintain the crisp scallop edge.
- Store flat to avoid creasing; stacking motifs with tissue paper will protect delicate picnic sets.
Assembly Instructions
- Lay both cream and tan discs flat and position them into the desired S-shape. Pin through the outer rounds at the inner junctions to mark the overlap points before joining.
- Using the long tail from the tan disc, secure the inner curve by whip stitching across 6–10 tiny stitches, keeping tension light so the discs lie flat and form a continuous spiral.
- Create the tall chain bars by anchoring every 4th stitch around each disc. Use stitch markers to ensure even spacing. Reinforce the top of each bar by working shells (sc/hdc/dc) into the chain tops.
- After completing outer loop bands, work a round of sc in the BLO to form a ridge that will act as the base for the scalloped shells. Pin shells during blocking to achieve consistent scallop size.
- Weave in all tails neatly on the backside using a tapestry needle, following fiber direction to make the ends invisible. Trim close after securely weaving several centimeters.
- Block the completed motif by pinning it to a foam pad, shaping each scallop and bar evenly. Spray lightly and allow to dry fully; starch if you want extra stiffness for placemats.
- If making several motifs, join them with slip stitches or mattress stitch through the outer loops to make a larger runner or tablepiece.
- Reinforce any join points with an extra securing stitch or two on the backside if the piece will see frequent handling or be used as a functional placemat.
Common Mistakes & How to Fix Them
- Skipping stitch markers at round starts can cause misaligned spiral growth and uneven bar placement; always mark the first stitch of each round
- Inconsistent tension when switching to long chains creates uneven loop heights; practice even chain tension before attaching to previous round
- Joining colors without a tidy tail weave leads to visible bumps; carry or weave ends neatly and secure a few stitches
- Placing chain bars too close together will make the edge crowded; count stitches and anchor bars at regular even intervals
- Using the wrong hook size for cord-weight yarn makes motifs stiff or floppy; check gauge and choose a hook that allows smooth, dense rounds
- Not blocking the finished motif will leave it slightly cupped; gentle wet-blocking or starching will flatten and set the shape
- Rushing the scalloped picot edge causes gaps or uneven shells; work slowly and keep the base anchors consistent
- Failing to count increases correctly in spiral sections will break the smooth flat growth; verify math after each increase round
Important Notes
- Use stitch markers consistently at the beginning of each round to avoid counting errors and maintain proper shaping
- Work the long chain loops with consistent, relaxed tension; too tight will shrink the loop height and too loose will droop
- Block the piece after finishing to flatten and set the S-shaped spiral and scallop edge
- When adding shells and picots, make small sample tests to confirm they sit neatly on your chosen yarn weight
- Weave in ends securely and hide them on the reverse side to keep the front clean and decorative
- If the motif cups or ruffles, remove a recent increase round or add a small evening round of sc to flatten
- Measure anchor spacing before making all loops; consistent spacing creates a balanced lattice
- For a sturdier placemat, use slightly thicker cord and a smaller hook than recommended for the yarn to make denser rounds
This boho spiral motif is a delightful mix of structure and lace — a perfect afternoon project to add handmade charm to your table or wall. The layered spirals, airy vertical bars, and scalloped edge combine into a beautiful decorative piece that looks handmade and sophisticated. Try making a set in complementary neutrals for a warm, textured centerpiece. 🧶🌿 Enjoy the meditative rhythm of the long chains and the satisfying snap of neat scallops as you stitch! ✨
Crochet Abbreviations
- mr
- magic ring
- ch
- chain
- sc
- single crochet
- hdc
- half double crochet
- dc
- double crochet
- tr
- treble (tr) crochet (US)
- sl st
- slip stitch
- inc
- increase (2 stitches in same stitch)
- dec
- decrease (single crochet decrease)
- BLO
- back loops only
- FLO
- front loops only
- st(s)
- stitch(es)
- rep
- repeat
- ( )
- work instructions in brackets as directed
- ×
- times
You Ask, We Answer
What is the finished size of this motif?
Using the recommended cotton cord and a 3.0mm hook, the finished motif measures approximately 20-23cm (8-9") across after blocking. Thicker yarn or larger hooks will increase size proportionally.
Can I use a different yarn weight?
Yes. You can use thicker cord or thread to change the scale. Adjust your hook accordingly and re-calculate loop and shell sizes; thicker yarn will require fewer rounds to reach the same visual size.
How do I keep the loop bars even?
Use a stitch marker or pin at every Nth stitch (e.g., every 4th stitch) and practice steady chain tension. Blocking will also help even out minor differences.
Should I join the two discs permanently?
It's optional. A few discreet whip stitches at the inner junctions are enough to make the S read as a single piece. Alternatively, rely on the bridging bars and outer edge if you prefer no sewing.
How much blocking is required?
Light wet-blocking is usually sufficient. For a crisp placemat, a light starch can be applied before pinning. Allow to dry completely while pinned to maintain shape.
Can I make a larger runner from multiple motifs?
Absolutely. Make multiple motifs and join them by slip-stitching through outer loop bands or by mattress stitching along the scalloped edges for a seamless runner.
What if my stitch count doesn’t match exactly?
Minor variations are fine for decorative motifs. For larger discrepancies, re-count previous rounds and adjust by adding or skipping a small number of stitches in the transition rounds to distribute increases evenly.
Are there alternatives for the scalloped edge?
Yes. Replace the 5-sc shells with smaller 3-sc shells or a picot-only border for a more delicate finish. Experiment on a small sample first.