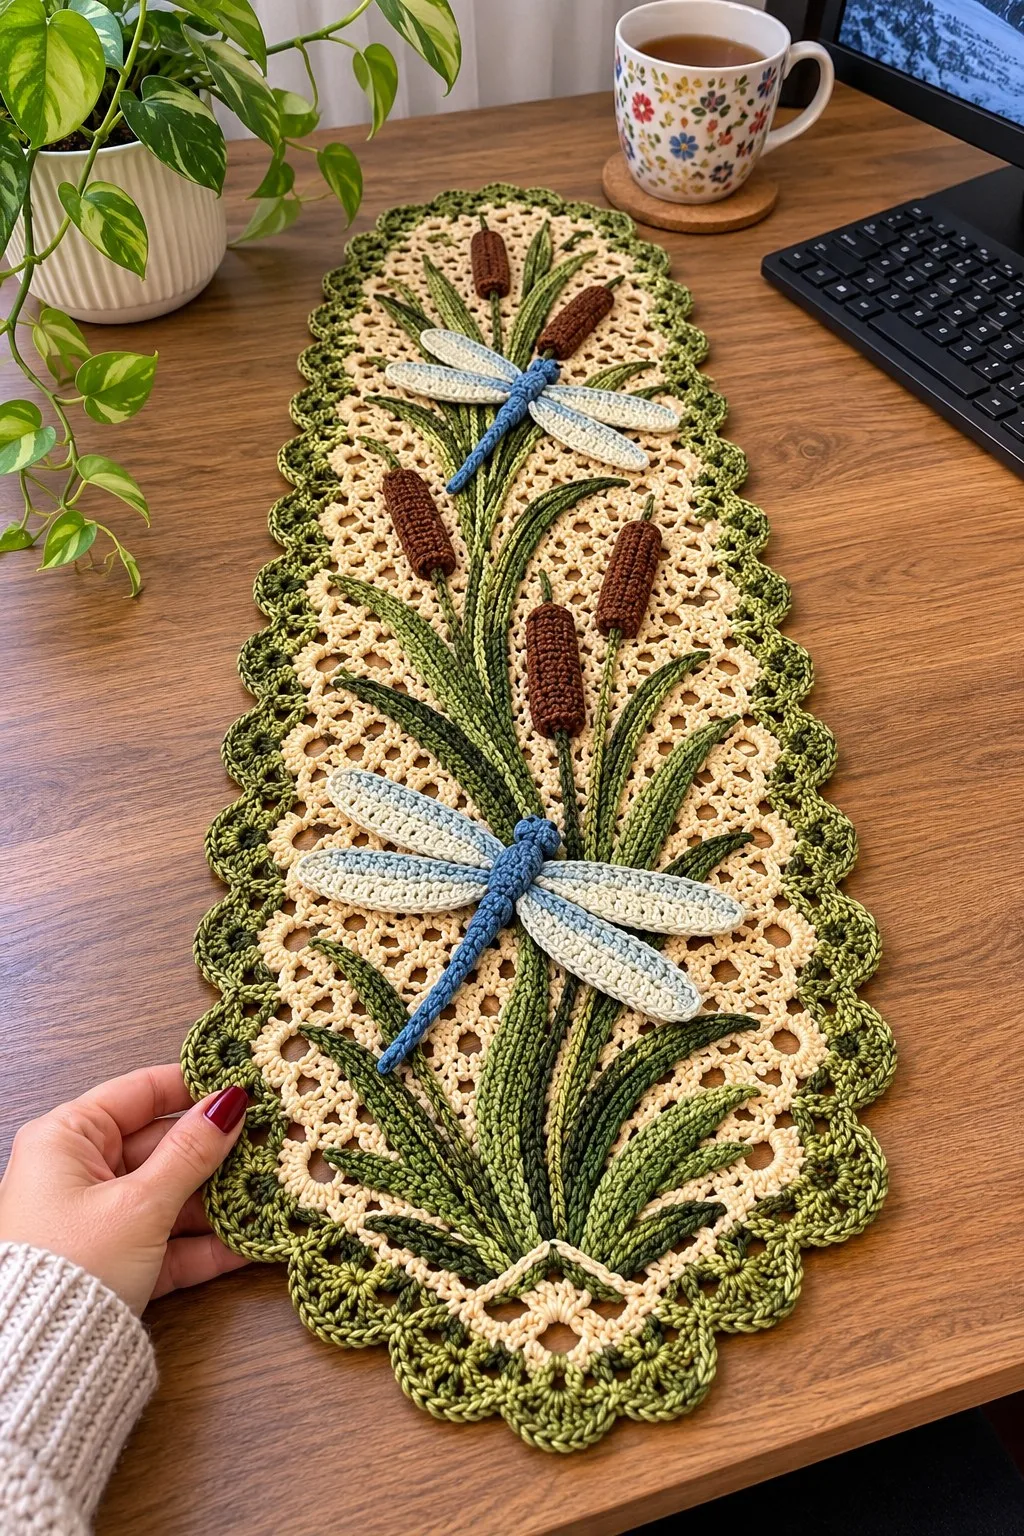
Create a charming dragonfly and cattail table runner that brings botanical elegance to your tabletop. This runner features a delicate cream openwork mesh background, layered green raised leaves, textured brown cattails and two sculpted blue dragonflies with dimension and detail.
The scalloped green border and tonal variegated greens give a hand-dyed look. Detailed step-by-step instructions guide you through every round, color change and assembly for a stunning finished piece.
About This Dragonfly and Cattail Table Runner Pattern
This pattern recreates the pictured dragonfly-and-cattail runner: a long oval/rectangular openwork panel in cream with layered, raised braided leaves in multiple greens, brown textured cattails, and two three-dimensional dragonflies in soft blues. The runner has a scalloped green border and uses surface/raised crochet to attach the botanical motifs for a realistic layered look. Suitable for a dining table, coffee table or sideboard as a decorative accent.
The design uses worsted weight cotton or cotton-blend yarn for structure and stitch definition. Motifs are crocheted separately and sewn or surface-crocheted onto the mesh base for precise placement and depth.
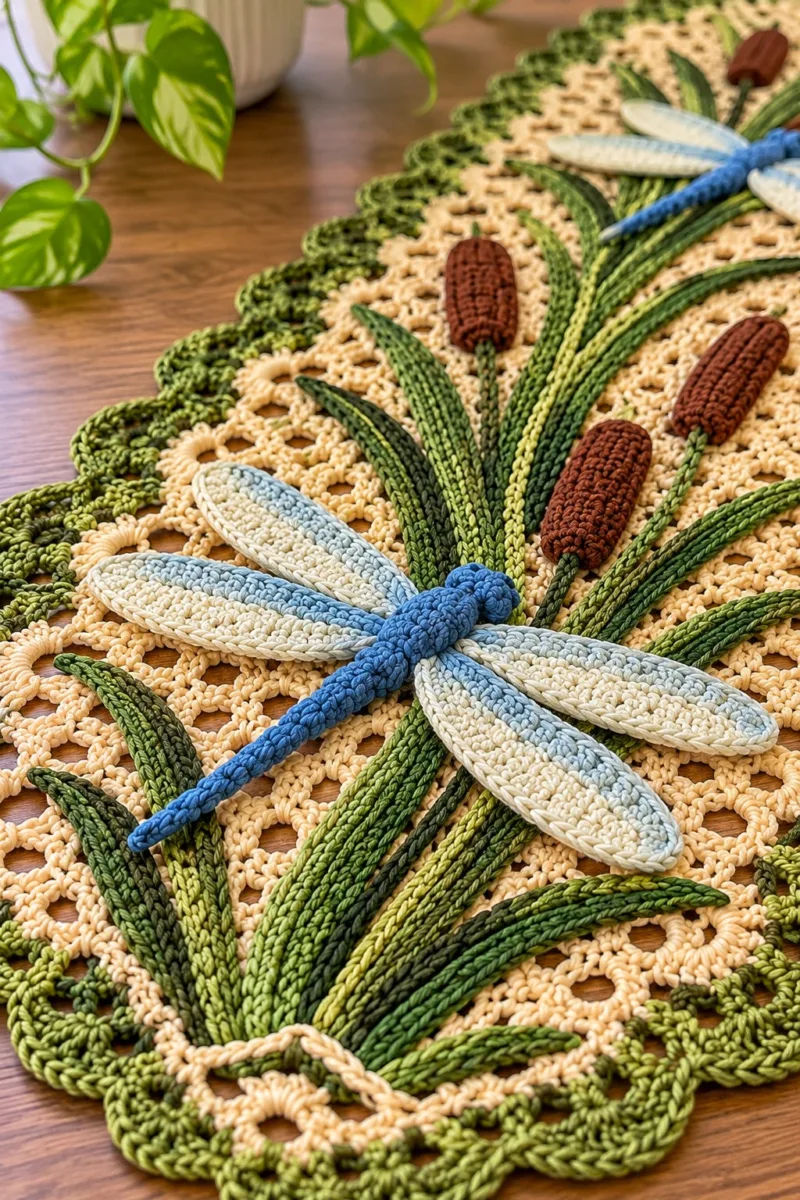
Why You'll Love This Dragonfly and Cattail Table Runner Pattern
I love this pattern because it combines classic lace mesh with sculptural botanical motifs — the raised leaves and three-dimensional cattails give lovely texture, while the dragonflies add personality. The layered greens and subtle shading make it feel like a little wetlands scene you can place anywhere in the home. I also enjoy that the motifs are made separately, so you can shift placement and customize colors easily.
- Cozy Accent – A warm touch for your space that transforms ordinary corners into inviting nooks filled with handmade charm.
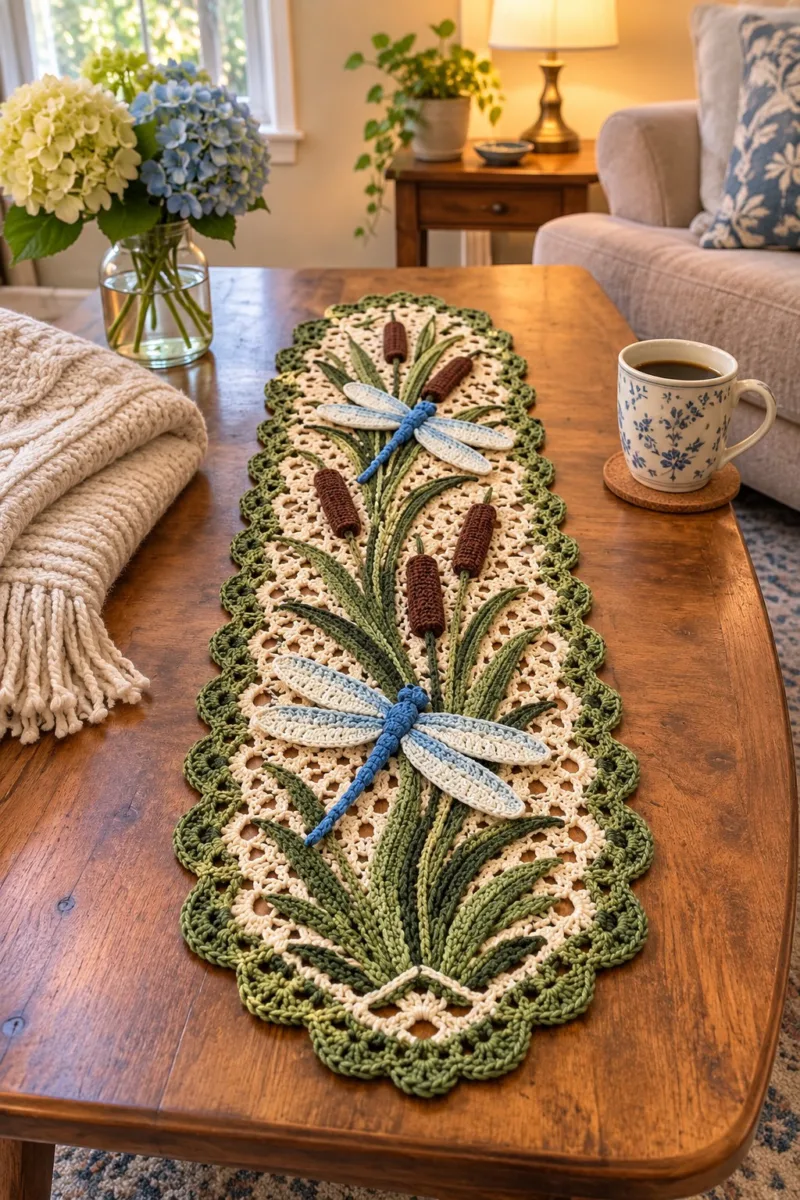
Switch Things Up
I absolutely love how versatile this runner is — you can easily adapt it to different seasons by changing colors. Swap the blue dragonflies for autumn oranges or deep burgundy beetles for a fall-themed table, or choose pastel wings for spring. You can also omit stuffing in the dragonfly bodies for a flatter applique look that slides under plates more easily.
I like to play with yarn texture: a matte cotton gives a crisp, vintage feeling, while a mercerized cotton or cotton-blend with a slight sheen makes the dragonflies and cattails gleam. If you prefer a more rustic look, use a linen blend for the mesh and wool-blend for the cords.
Adjust the runner scale by changing the foundation chain and repeating mesh rows: thicker yarn and a larger hook will create a bolder statement runner, while thinner yarn and smaller hooks make a delicate runner perfect for a side table or dresser. I encourage you to experiment with color placement; moving a single light leaf to the opposite side can completely change the visual balance.
Materials Needed
Main Fabric
- Worsted weight cotton or cotton-blend yarn (#4) approximately 200-250g in main cream/antique white (background)
- 150-200g variegated olive to forest green for leaves and border (accent)
- 60-80g dark brown for cattails (accent)
- 50-70g mid-blue variegated for dragonfly body and pale blue-to-cream for wing accents
- Small amounts (10-15g each) of light green and dark green for leaf tonal variation, and sky blue for wing shading
Tools Required
- 4.0 mm (G) crochet hook for main work
- 3.5 mm (E) hook for tighter motif work and dragonfly body
- 3.0 mm (C) hook for delicate detail and cattail base (optional)
- Yarn needle for sewing motifs and weaving ends
- Scissors
- Stitch markers (at least 6)
- Blocking board or towels and rust-proof pins
- Optional: small amount of polyester stuffing for cattails and dragonfly body (very light)
- Optional: sewing pins for temporary placement before final stitching
- Optional: fabric glue for very secure small points (use sparingly)
The Free Pattern
0% complete
Main Mesh Panel
- Round 1: With cream yarn, ch 60, join with sl st to form a ring taking care not to twist chain (60 ch around). Note: This runner is worked flat in rows later; we start by creating an even base chain width. If you prefer a longer runner increase chain by multiples of 6 plus 4.
- Chain length determines final runner width. The pictured runner is approximately 10-11 inches wide; adjust chain to your desired width keeping pattern multiples in mind. For consistent tension use a smaller hook for the foundation chain if your chains are loose.
- Row 1: Row turning ch 3 (counts as dc), dc in 4th ch from hook, *ch1, sk 1 ch, dc in next ch* across to last ch, dc in last ch. Turn. (Approximately 60 dc and ch1 spaces depending on chain adjustment)
- Row 2: Ch4 (counts as tr), *sk next ch1 space, tr in next dc, ch1* across, ending with tr into top of turning ch. Turn. This row begins to open the mesh.
- Row 3: Ch3, dc into each tr across working into top of each tr and into ch1 spaces as dc clusters: *dc, ch1, dc* into each ch1 space. Turn.
- We are establishing a simple openwork mesh built from alternating dc rows and tr rows with ch1 spaces to create crocheted "holes" that echo the floral mesh shown. Maintain even tension; use pins at ends to keep rows straight while working.
- Rows 4-20: Repeat Rows 2-3 alternating: Row A (tr row): ch4, tr in each dc across with ch1 spacing; Row B (dc row): ch3, dc in each tr and ch1 across. After 17 repeats the fabric becomes open and lacy. End after Row 20 and do not fasten off. (This gives a central panel length; adjust repeat count for runner length.)
- At this stage the main mesh should lie flat. If your mesh curves, wet block and pin flat before continuing. The holes will accommodate the base of leaves and stems later when you surface-crochet or sew motifs on.
- Rows 21-30: Continue alternating Row A and Row B to desired length of the central panel. The pictured runner uses a total of 30-34 worked rows for the central mesh before beginning edge shaping. Keep the same stitch count across rows.
- Measure frequently. For a table length shown (approx 34-36 inches long in photo), repeat mesh rows until reaching desired runner center length. You will later add scalloped borders which add approximately 1.25-1.75 inch to each side.
Corner/End Fan Base & Shaping
- Round 1: At either short end of the runner, work a shaping row to create the semi-oval ends. Working across the end row of the mesh, ch1, sc evenly along the edge into sides of stitches to create a stable border; work approximately 60 sc evenly spaced around the end chain/edge, placing 3 sc in corner points to shape a rounded end. Join with sl st. Turn work to begin scallops.
- Round 2: Ch2, *sk 1 sc, 5 dc in next sp (fan), sk1 sc, sl st into next sc* repeat around the end creating fans spaced evenly. Join with sl st. This begins the scalloped end shape seen in the photos.
- Round 3: Slip into center of each 5-dc fan, ch3, 2 dc, ch1, 3 dc in same fan, sl st to close fan. This makes fuller scallops. Fasten off and repeat at other end.
- Make sure scallops are symmetrical on both ends. The edges are worked later along long sides as scalloped edging to match ends, so keep counts of fans you create in end shaping for alignment.
Long Side Border Setup
- Round 1: With cream yarn, join at a long side corner with sc. Work sc evenly along long side edge into the side of each row (weave hook under both loops of rows) placing 1 sc per row space. At each end, work 3 sc into the corner scallop to turn the edge. Continue along opposite long side. Join with sl st.
- Round 2: Ch1, sc in same st, *ch3, sk 2 sc, sc in next sc* along side to create small picot-like open spaces. This frames the side and preps for scallop rounds. Join and fasten off cream. (Maintain even spacing; count pockets to align scallops.)
- Using cream for one round keeps the central openwork cohesive. We will switch to variegated greens for the scalloped outer edge to echo the grass border in photos.
Scalloped Outer Border (Green)
- Round 1: With variegated green yarn and larger 4.0mm hook, join in any side ch3 space with sl st. Ch3 (counts as dc), 11 dc in same ch3 space (12 dc total fan), sk next ch3 space, sl st to next ch3 space; *12 dc in next ch3 space, sl st to next ch3 space* repeat around entire runner edge including ends to create large scallop shells. Join with sl st to top of beg ch3. (Number of shells will equal number of side ch3 spaces we created; on pictured runner approximately 28 scallops around perimeter total.)
- Round 2: Sl st to center of each green shell, ch3, (2 dc, ch2, 3 dc) in shell center to create puffed shell; sl st to base between shells. Continue around. Join. Fasten off. This creates the raised scalloped rope seen around the runner photo.
- Adjust fan dc counts to make larger or smaller scallops. If your shells pucker, use a slightly larger hook on the shell round only and then block flat to shape.
Braided Raised Leaf Base (Multiple Rows, long stitches)
- The prominent raised leaves are made using long chain loops worked as foundation chains then crocheted back with sc or hdc to create a braided cord appearance. We create several sets of leaf "braids" and then fan them into leaf shapes with turned stitches. Make leaf braids in three shades of green for depth.
- Leaf Braids – Set A Round 1: Using dark olive variegated yarn, ch 60. Work back along chains: starting in 2nd ch from hook, sc in each ch across to make a sturdy cord (60 sc). Fasten off leaving long tail for sewing. This creates one long braided leaf base cord.
- These cords will be steamed and slightly stretched and then sewn along the mesh to create clusters. Make 6-8 cords per leaf cluster using a mix of dark and lighter greens and varying lengths (40-70 ch) to mimic the photo layout.
- Leaf Braids – Set A Round 2: For a narrower cord, ch 48 and work hdc back across (48 hdc). Make 4 cords in medium green and 4 cords in light green for layered depth. Vary lengths to create natural leaf flaring.
- Make a total of approximately 12-14 braided cords for the runner, some short for small leaves at ends, some long for central height. Cords are attached by sewing into the mesh holes and then shaped into leaves by flattening and whipping small stitches along the edges.
- Leaf Fan Formation Round 1: To form a leaf from a cord: fold cord in half with point facing out, attach the folded end to mesh with a small whip stitch at the mesh hole, then run a lengthwise line of small slip stitches along the cord center to flatten and shape. At the tip, secure with tight sl st and hidden thread.
- Leaf Fan Formation Round 2: For each leaf cluster, arrange 4-6 cords in a fan, layering darkest at back and lightest on top. Baste pins hold arrangement. Sew each cord at 3-4 evenly spaced points through mesh to anchor leaf curvature. Repeat to create 3 main clusters and smaller accent clusters as pictured. Fasten and weave ends to back.
- Use blocking and light steam to coax cords flat and leaf-like before final stitching. If cords twist, wet and pin them flat until dry so they remain pressed into leaf shapes.
Narrow Raised Leaves (Slender Leaves, Worked in BLO)
- Round 1: With medium green yarn, ch 36. Work back: sc in 2nd ch, sc across to end (35 sc). This creates a narrow strap. Optional: work sc in BLO across the returning row to create a ridge. Fasten off. Make 8-12 of these for asymmetric detailing on either side of center clusters.
- Round 2: To form a curved leaf, fold strap lengthwise and sew a running stitch along one side pulling slightly to shape curve. Secure tip with a few small stitches. Attach to mesh with small stitches through both layers for neat seam.
- These narrow leaves sit atop the braided cords and give the pictured tapered blade look. Use darker shade on back and lighter on front for highlight. Seams should be small and discreet on the back.
- Round 3: Alternate making a thinner strap in darker green with a ch 28 and sc back, and a wider strap with ch 44 and hdc back; mix shapes to mirror the organic leaf groupings in the photos.
- Make all leaves slightly longer than desired and trim or fold tips when placing, this allows consistent shaping and reduces risk of a too-short leaf later on.
Cattails / Bulrushes (Make 5)
- Each cattail is a small textured tube with a thin stem. Cattails are worked in brown for the seed head and dark green for the stem. They are lightly stuffed for shape. Make 4-5 cattails of varied lengths.
- Cattail Round 1: With dark brown yarn and 3.5mm hook, mr, ch1, 6 sc in MR (6). (Begin closed tube)
- Cattail Round 2: Inc in each st around (12).
- Cattail Round 3: (1 sc, inc) x6 (18).
- Cattail Rounds 4-8: 1 sc in each st around (18). Work even for 5 rounds to create tube length.
- These rounds define the compact cattail bulk. Stuff very lightly after round 6; cattails should be firm but not bulbous. Use just a pinch of fiberfill.
- Cattail Round 9: (1 sc, dec) x6 (12).
- Cattail Round 10: 1 sc in each st around (12) for 2 rounds to maintain shape.
- Cattail Round 11: (1 sc, dec) x4 (8).
- Cattail Round 12: Work in brown for 2 more rounds 1 sc in each (8). Fasten off leaving long tail for sewing.
- Stem Round 1: Using dark green, ch 40 (or desired stem length). Sl st in 2nd ch and across to create a slim cord (39 sl st). Fold and sew seam lengthwise to strengthen. Attach stem to cattail top with secure whip stitches and hide tail inside the cattail opening.
- Create stems of varying lengths so cattails are staggered. Sew stems to the mesh by anchoring the base of the cattail and then running a few stitches into the mesh to secure the stem. Place cattails in groups of 2-3 along central axis like in the photos.
Dragonfly Wings (Make 4 wings for 2 dragonflies)
- Each dragonfly has four elongated oval wings made with a lightweight airy technique; wings are worked flat in rounds using pale blue and cream for a gently shaded effect. Use 3.5mm hook for crisp edges.
- Wing Round 1: With pale blue yarn, ch 16, sc in 2nd ch from hook and across (15 sc). Do not fasten off.
- Wing Round 2: Ch1, turn, 2 sc in first st, sc in next 13 sts, 2 sc in last st (17 sc).
- Wing Round 3: Ch1, turn, (sc in next 2, 2 sc in next) across to last 2 sts, sc in last 2 (22 sc).
- Wing Round 4: Ch1, turn, sc in each st across (22 sc). At the end of this row we will curve the tip by working into ends of row stitches around the short end: sc 6 into end chain space to round tip, then sc across the opposite side of starting chain to mirror the oval. Continue to finish the first wing round completely in the round resulting in an oval wing approx 36-40 sts perimeter.
- For a tapered slender wing, work fewer increase rounds; for broader wings, add another increase round (increase evenly by 6 across to preserve shape). Color change to cream yarn at the last round for a subtle shaded border: attach cream yarn before the final round and work sc in cream all around.
- Wing Round 5: Work in cream: sc in each st around, sl st to join, fasten off and weave in ends. Make 4 wings total: 2 larger upper wings (use ch 18 starting chain and one extra increase round) and 2 slightly smaller lower wings (use ch 14 beginning and fewer increases) to match pictured proportions.
- Wing Shaping Info: Lightly steam-block wings flat to shape and set airy, then pin to desired curve. If you want stiffer wings, work a round of hdc in BLO to create a ridge and add slight structure.
Dragonfly Body (Make 2)
- Each dragonfly body is worked in a cylindrical spiral with bright mid-blue variegated yarn. The pictured dragonflies are slightly stuffed for weight and dimension; stuff lightly to retain slender shape.
- Body Round 1: With mid-blue and 3.5mm hook, mr, ch1, 6 sc in MR (6).
- Body Round 2: Inc in each st around (12).
- Body Round 3: (1 sc, inc) x6 (18).
- Body Round 4: (2 sc, inc) x6 (24).
- Body Round 5-8: 1 sc in each st around (24) for 4 rounds to establish mid-body length.
- At this point you may stuff lightly; use only a tiny pinch of fiberfill to keep the body slender. Overstuffing will make the body look too thick compared to wings.
- Body Round 9: (2 sc, dec) x6 (18).
- Body Round 10: (1 sc, dec) x6 (12).
- Body Round 11: 1 sc in each st around (12) for 2 rounds to taper the tail.
- Body Round 12: (1 sc, dec) x4 (8). Fasten off leaving long tail for sewing to wings and mesh.
- Create a slightly larger head by working an additional 2 rounds of inc at the beg of the body if you prefer a pronounced head segment. Finish by stitching the body to wings with mattress or ladder stitch wrapping yarn over center to mimic thorax segmentation visible in the photos.
Dragonfly Assembly (Body + Wings)
- Round 1: Place two larger upper wings and two smaller lower wings in overlapping arrangement on either side of the body center. Pin in place through mesh if desired. Using the long tail of the body, sew through the middle of each wing at their centers using small, neat whip stitches. Wrap extra yarn around body center in 4-6 passes to create the segmented thorax bulge (see photo). Tie securely and weave ends to back.
- Adjust wing angle for natural pose. You can secure wing tips to mesh very lightly with a single stitch to prevent shifting if the runner will be moved frequently.
Small Accent Leaves and Veins (Surface Crochet & Embroidery)
- Round 1: Using dark green and a 3.5mm hook, work surface slip stitch veins: insert hook into mesh hole where a leaf will emerge, pull up a loop and then work a line of sl sts along the path you wish the stem to take. End by securing and weaving tail. Make 12-16 surface veins to echo the natural grass lines in the photo.
- Surface crochet allows for subtle raised lines without bulky cords. Use two parallel lines for larger leaves to simulate central ribbing. Keep sl sts snug but not too tight to avoid puckering around holes.
- Round 2: For leaf edges, work a row of sc around the sewn cord leaves to secure them to the mesh. Insert hook under cord edge and then into mesh holes to stitch at 1/2 inch intervals. This secures leaf curvature and prevents cord lifting.
- If desired, use embroidery yarn or stranded cotton to add tiny stitches for texture on cattails and along leaf ribs for an organic look.
Final Blocking and Finishing
- Once all motifs are sewn in place, wet-block your entire runner. Lay on a flat blocking surface, arrange scallops and leaves symmetrically, pin edges and motifs into precise shapes and allow to dry completely. This step is essential for a flat, even finish.
- Round 1: Weave in all ends using a yarn needle, trim close to work. Inspect back of runner and tidy any exposed tails or knots.
- Round 2: Optional: Apply tiny dots of fabric glue to the underside of dragonfly thorax to help hold it in place for display-only runners (avoid glue if runner will be laundered).
- Label your runner with yarn and hook details and care instructions if giving as a gift. Recommended care: hand wash cold, reshape while damp, dry flat; avoid machine agitation to preserve motifs.
Assembly Instructions
- Place the mesh panel flat and block it to exact final dimensions before attaching motifs. Pin down major motif placements (dragonflies and main leaf clusters) using rust-proof pins to match layout shown in photos before you sew anything permanently.
- Attach braided leaf cords by sewing the folded end into mesh holes near the runner centerline, then stitch down the cord at 3-5 points along its length so it fans naturally; anchor cords with small tidy stitches so they do not shift.
- Position cattails in clusters (2-3 per grouping) spaced along the runner center. Sew the cattail base to the mesh by stitching through the bottom of the tube and into the mesh holes. Secure the stem by sewing it along the mesh surface with small stitches hidden on the back side.
- Sew dragonfly body to the mesh by positioning the body across the leaf clusters and attaching with small ladder stitches through the body rounds and mesh holes. Stitch each wing center to the body with several tight stitches and wrap extra yarn across the thorax for segmentation detail.
- After all pieces are sewn, tack the wing tips and leaf tips with a single invisible stitch into the mesh to prevent catching when moving the runner. Keep these stitches small and few to maintain a natural, floating look for wings.
- Once all attachments are complete, perform a final light blocking: pin scallops, arrange leaves, and steam-block wings and cords. Remove pins only when fully dry. Weave in all tails on the back of the runner and trim closely.
Common Mistakes & How to Fix Them
- Skipping stitch markers at round starts can cause misaligned scallops and wavy edges; always mark the first stitch of each round.
- Not blocking the mesh base causes motifs to sit unevenly; always wet-block the main panel before attaching appliques.
- Changing colors without securing tails neatly results in messy backs; weave in ends or carry yarn inside chains where possible.
- Overstuffing cattails or dragonfly body makes motifs lumpy; stuff lightly and press evenly to keep shape smooth.
- Ignoring stitch counts on increase/decrease rounds creates mismatched scallops and asymmetrical edges; recount after each round if unsure.
- Sewing motifs without pinning can warp the mesh; pin and baste motifs first, check placement, then securely sew with small stitches.
Important Notes
- Use stitch markers or locking clips to mark the beginning of each long side and each end scallop to maintain symmetry while working around the perimeter.
- Work motifs separately and pin them in place before sewing; this makes it easy to change their placement and correct proportions.
- When stuffing cattails and dragonfly body, use extremely small amounts of stuffing; overfilling causes lumps that are difficult to hide.
- For a flat runner, block the mesh before adding heavy motifs—blocking after adding motifs can change placements and distort shapes.
- Carry unused yarn inside long edge work only when neat and only if it will not show on the right side; otherwise weave ends in at motif joins.
- To keep seams invisible use matching thinner yarn or doubled strand of embroidery thread when sewing small motifs down; this reduces bulk and visible stitches.
- If your scallop edge puckers, steam-block while stretching edges gently to align shells; adjust by adding or removing a dc in strategically placed shells for correction.
- Always secure final knots by weaving tails back through 4-6 stitches and trimming close to the fabric to avoid unraveling during laundering.
This dragonfly and cattail table runner is a joyful blend of lace, texture and three-dimensional botanical detail — perfect for bringing a garden-fresh accent to any table 🌿. The layered greens and soft blue dragonflies make it a versatile piece for seasonal decor or everyday charm. Each motif is made separately, so the runner is both approachable and endlessly customizable to your favorite color palette 🧶. Enjoy the slow, satisfying process of bringing each tiny leaf and cattail to life — your finished runner will be a beautiful, handmade centerpiece. 🪴✨
Crochet Abbreviations
- ch
- chain
- sc
- single crochet
- hdc
- half double crochet
- dc
- double crochet
- tr
- treble (UK tr = treble)
- sl st
- slip stitch
- st(s)
- stitch(es)
- sp
- space
- sk
- skip
- inc
- increase (2 sc in same st)
- dec
- invisible decrease (sc2tog)
- BLO
- back loops only
- FLO
- front loops only
- rep
- repeat
- ( )
- work instructions in brackets as directed
- beg
- beginning
- tog
- together
- yo
- yarn over
You Ask, We Answer
What is the finished size of this runner?
Using the recommended yarn and hook, the finished runner measures approximately 11 inches wide by 34-36 inches long. Adjust chain length and mesh repeats to customize width and length; border scallops add about 1.25 to 1.75 inches to width and length.
Can I use different yarn weights?
Yes — but be aware that using a thicker yarn (bulky) will scale up the pattern and change drape and motif proportions. Use an appropriately larger hook and adjust motif sizes and counts. For a tighter, more delicate look, use a fingering or sport weight yarn with a smaller hook and increase motif counts.
Do I need stuffing for cattails and dragonfly bodies?
Only a tiny pinch of polyester fiberfill is needed to give a slight three-dimensional shape; overstuffing will make motifs too bulky. Many crocheters prefer to leave dragonfly bodies unstuffed and simply shape with stitches for a flatter applique effect.
How should I care for the finished runner?
Hand wash cold and reshape while damp, then lay flat to dry. Avoid machine washing and tumble drying to maintain motif shape. If needed, lightly steam flat to restore crisp scallops and wings.
Can I make motifs removable for storage?
Yes. Sew motifs with a few long-loop stitches or attach with small buttons or snaps hidden on the back so motifs can be removed for separate washing or rearrangement. Alternatively, use a small amount of Velcro or tiny snaps sewn into the mesh backing for removable placement.
How many motifs will I need?
For the pictured runner you will make 2 dragonflies, about 12-14 braided cords for leaves, 8-10 narrow strap leaves, and 4-5 cattails. Exact numbers depend on the width and length of your runner and your composition preferences.
What stitches give the raised leaf effect?
Raised leaves are achieved by crocheting long foundation chains, working them back into cords (sc or hdc), and sewing them into fanned leaf shapes; surface slip-stitching adds veins and definition. Working some straps in BLO creates subtle ridges as well.
How do I prevent motifs from shifting after sewing?
Sew motifs down at multiple anchor points and tack wing tips lightly to the mesh. For permanent fixtures, use small tight stitches and weave ends fully; for removable motifs, use fewer anchor points or hidden snaps.