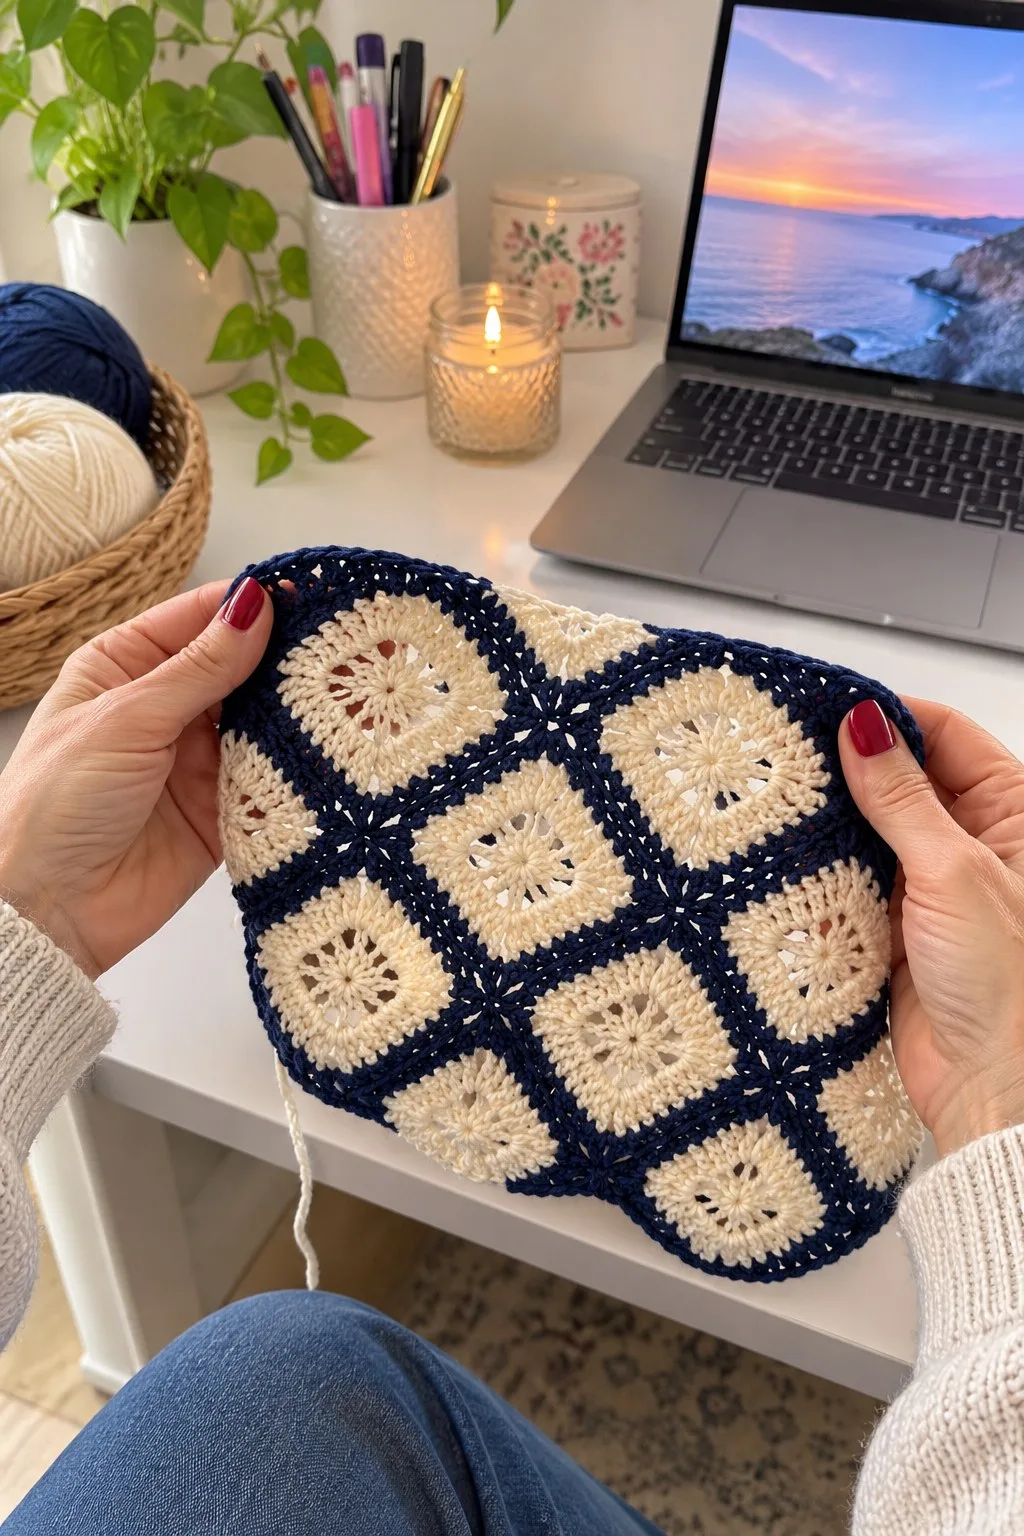
A lacy diamond-lattice granny square bedspread worked in two contrasting colors — creamy ecru squares framed by deep navy lattice. The pattern uses a sunburst-style center and a join-as-you-go diagonal join to create the elegant diamond effect. Clear round-by-round instructions, finishing techniques, and multiple joining and edging options make this ideal for an intermediate crocheter looking to create a classic bedspread or throw.
About This Diamond Lattice Granny Square Bedspread Pattern
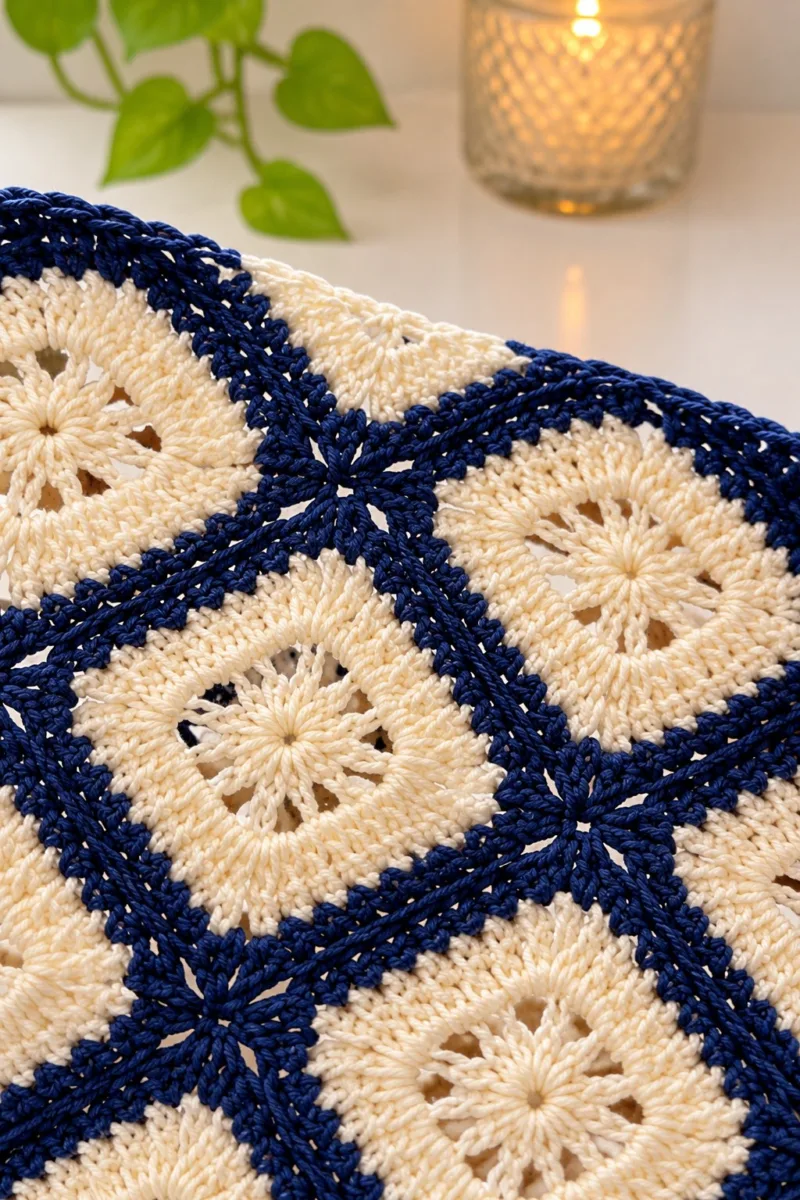
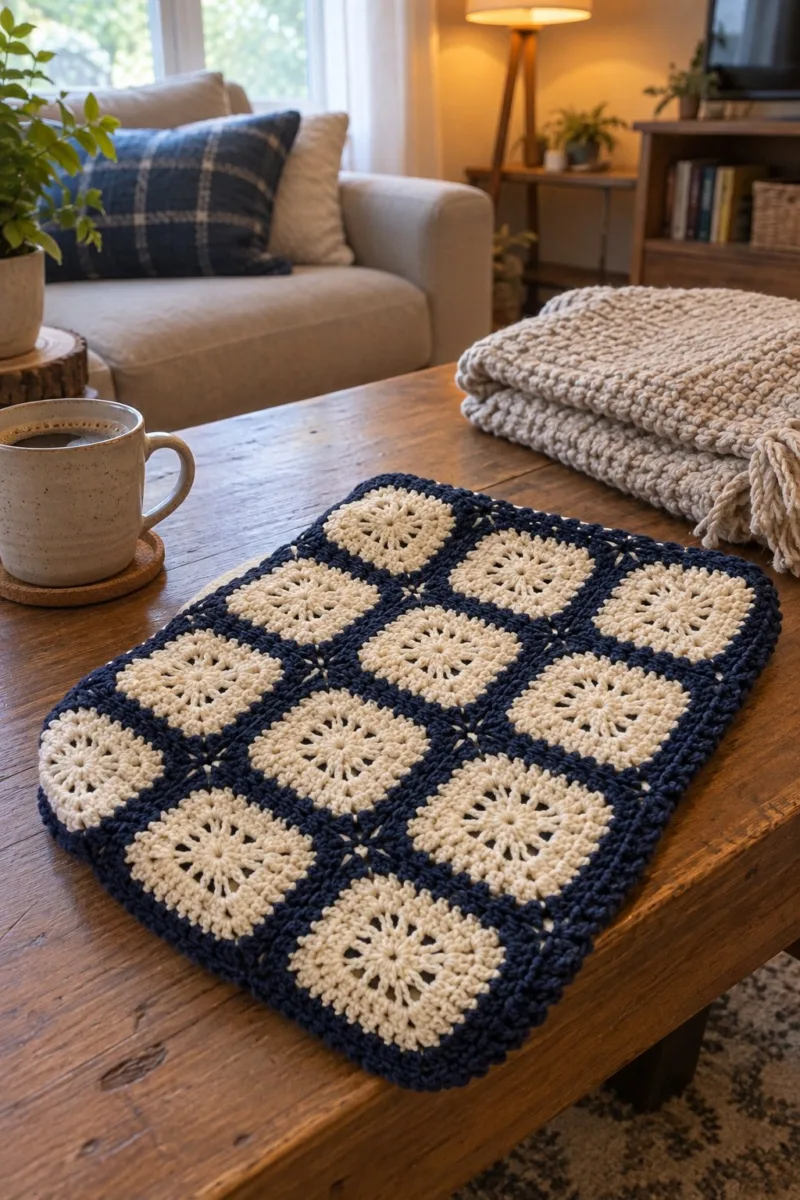
This pattern recreates the lacy diamond-lattice bedspread shown: cream sunburst-centered granny motifs joined on the diagonal with a deep navy lattice that becomes the dominant frame. The motifs are textured with puff/double cluster rounds to create that delicate star-in-square look. The join-as-you-go lattice forms crossing X-shaped joins between four motifs, producing distinct diamond-shaped negative space.
The pattern includes multiple joining methods (join-as-you-go and whip-join), a 6-round decorative border, and instructions to size the spread to any bed by adjusting motif counts. Detailed Info tips are provided throughout for tension, blocking and finishing.
Why You'll Love This Diamond Lattice Granny Square Bedspread Pattern
I love this design because the contrast between the creamy centers and the navy lattice is timeless and calming. The sunburst motif adds delicate texture and the diagonal join gives a sophisticated, tailored look without complicated colorwork. Working the join-as-you-go rows feels gratifying as the blanket grows quickly into a beautiful diamond grid.
- Cozy Accent – A warm touch for your space that transforms ordinary corners into inviting nooks filled with handmade charm.
Switch Things Up
I absolutely love how this diamond lattice pattern lets you play with contrast and texture. You can switch colors to suit your decor — a pastel main color with a darker lattice gives a soft graphic look, or use bright brights for a modern take.
I often change the border: a narrow MC accent row breaks the strong lattice well; alternatively a wide shell border in MC softens the edge for a cozy, farmhouse feel. You can also scale the motif size by changing hook size or yarn weight to create cushions, baby blankets, or king-size spreads.
For a personal touch, try embroidered initials on a single motif or add fringe on two opposite edges for a bohemian vibe. The construction is forgiving, so I encourage you to experiment and make it your own!
Materials Needed
Main Fabric
- Worsted weight yarn (#4), approximately 1400-1600g in main color (Cream/Ecru) for motifs to cover a queen-size bed (adjust for smaller sizes)
- Worsted weight yarn (#4), approximately 500-700g in contrast color (Navy) for lattice and border
- Small amounts (50-80g) in a third accent color if you choose to add a decorative picot or binding (optional)
Tools Required
- 4.5mm (7) crochet hook for main work (or size to obtain correct gauge)
- 4.0mm (G) crochet hook for tighter lattice rows (optional)
- Yarn needle for weaving ends and sewing
- Stitch markers (at least 6) to mark round starts and corner points
- Scissors
- Measuring tape or ruler
- Blocking pins and blocking mat or spray/wet blocking supplies
- Optional: Sewing pins for positioning motifs when joining
- Optional: Blocking wires for straight edges
The Free Pattern
0% complete
Overview
- This bedspread is built from a repeat motif we will call the Sunburst Square. Each motif finishes approximately 4.5-5in (11.5-12.5cm) using worsted weight yarn and a 4.5mm hook. The diamond lattice is worked in contrast color by joining motifs on the diagonal using a join-as-you-go technique; a final multi-row border finishes the piece. The pattern gives instructions for motif construction, two joining methods, a multi-round lattice/border, finishing tips and blocking.
- Gauge (unstretched): One motif = approx 4.5in square. To make a bedspread, plan motif counts: baby (6×6), throw (8×10), twin (10×12), queen (12×14), king (14×16). Adjust motif counts and yarn amounts accordingly.
Motif (Sunburst Square) – Make X
- Materials: Use main color (MC) for motifs (Cream/Ecru). A motif uses roughly 18-25g of MC. Use contrast color (CC) for lattice later.
- Stitch note: Puff stitch: yo, insert hook, pull up loop (repeat yo and pull up once more for a tall puff) until there are 6 loops on hook, yo and draw through all loops, ch1 to close (counts as puff). Adjust loops per puff for desired height.
- Round 1: mr, ch3 (counts as dc), (dc in ring, ch2) x7, join with sl st to top of ch3. (8 dc, 8 ch2) – This creates an 8-pointed star base.
- Round 2: Ch3, dc in same sp, ch1, *puff in next ch2 sp, ch1, dc, ch1* repeat from * to * around for all 8 ch2 spaces, join with sl st to top of ch3. (8 dc, 8 puffs, ch1 between groups)
- Round 3: Ch3, (2 dc in same sp), ch2, (3 dc in next puff top), ch2, *3 dc in next ch1 gap, ch2, 3 dc in next puff top, ch2* repeat to create four corner groups. Join with sl st. (Total: 4 corner 3-dc groups and side 3-dc groups; count will vary but form square geometry)
- The goal of rounds 1-3 is to create a central star and begin shaping into a loose square. Keep tension relaxed on puff stitches so the center opens; flatten motif occasionally to check symmetry.
- Round 4: Ch3, 2dc in same st, *ch1, 3dc in next space (along side), ch1, (3dc, ch2, 3dc) in corner ch2 sp* repeat around; join. After this round you should see a recognizable square with four corners of (3dc, ch2, 3dc).
- Round 5: Change if desired: continue MC. Ch3, (2 dc, ch1, 3 dc) in each side space to broaden sides, in corners work (3 dc, ch2, 3 dc). Join. Stitch count by side: 9 dc per side (approx). This round begins to even up side lengths.
- Round 6: Ch3, 1 dc in each dc along sides, at corner (3 dc, ch2, 3 dc) repeat. Work evenly around to maintain a flat square. (Approximately 36-40 dc total depending on exact layout)
- Round 7: Work 1 sc in each dc around to tighten edge: ch1, sc in same st, sc in each st and sc in ch spaces, sc across. Join with sl st. (Count equals previous st count)
- If a more lacy interior is desired, substitute round 6 with a row of shell stitches (2dc, ch1, 2dc) in side spaces. The photo uses close-packed stitches for a solid cream square with an airy center star.
- Round 8: Ch2, hdc in each stitch around to prepare the motif for a neat join. Work evenly and place two hdc in each corner to maintain square shape. Join with sl st. (hdc count equals prior dc count)
- Round 9: Fasten off MC leaving a 6-8in tail if you plan to join using whip stitch later; if using join-as-you-go, do not fasten off — carry yarn forward. Lay motif flat and measure center to ensure motif measures approx 4.5in.
- Make a gauge swatch of 3×3 motifs blocked to determine final motif size. Blocking will widen and regularize motifs; plan motif counts accordingly. If motifs are larger/smaller than target, change hook size.
- Round 10: Optional decorative round (MC): sl st to an even point, ch3 (counts as dc), 2 dc in same st, *ch1, 3 dc in next 3-st side group, repeat around; finish and fasten off. This creates a soft raised rim that contrasts with lattice later.
- Make as many motifs as needed for your chosen layout. Example for a throw: 8×10 = 80 motifs. For queen: 12×14 = 168 motifs. Make a few extra motifs for margin and replacements.
Join-as-you-go (Diagonal Lattice Join)
- The bedspread uses a diagonal lattice join in the contrast color (CC). When joining, you will join motifs so that CC lines run diagonally across the blanket forming an X where four motifs meet. This section explains joining one new motif to the existing blanket edge and how to create the lattice ribs.
- Round 11: With CC, attach with sl st at the midpoint of any side (choose an hdc or sc from Round 8 as anchor), ch1, sc in same st, ch2 (this ch2 will form lattice spacing). Work sc across side until you reach the corner group; maintain a single ch2 at regular midpoints to form openings.
- Round 12: At corner: (sc in corner dc, ch2, sc in next corner dc) — this anchors the lattice at corners. Continue sc across next side to adjacent motif join points. When you come to a side that borders an already-placed motif, join by replacing the sc into the corresponding stitch of the adjacent motif using sl st or sc to pick up both loops (see join notes).
- Work joining on the WS of the new motif so that CC rib appears on the RS. Use stitch markers to mark the three points where the X intersection will occur (midpoint of each side and the corner) before joining to keep tension even.
- Round 13: Continue around new motif working sc rows in CC that match the thickness of one or two stitches per rib. At each side intersection with an existing motif, make a 'cross join' by inserting hook through the new motif and the corresponding rs loop of existing motif, then sc through both loops to create a tight crossing point. Repeat on all sides that meet existing motifs.
- Round 14: When a new motif is being married to two existing motifs at once (corner of a 2-row section), work the crossing join in the sequence: sc into new motif, insert hook under both loops of adjacent motif A, draw up loop, insert hook under both loops of adjacent motif B and pull through and complete sc to join all three motifs at a single point. This creates the X-shaped junction where four motifs will meet after the fourth one is added.
- Keep CC tension looser than MC to avoid cinching motifs inwards. The lattice should bridge motifs gently; if ribs pull, redo using one less stitch per rib (sc instead of hdc) or use a slightly larger hook for CC rounds.
- Round 15: After joining a motif on two adjacent sides, continue to work sc across remaining sides unjoined so you can join them later as you add surrounding motifs. Fasten off CC if you are not attaching immediately to the rest of the blanket.
- Round 16: Repeat for each motif row, working diagonally so every new motif connects into two existing motifs (left and above, or right and above), creating diamond-shaped open negative spaces. The lattice ribs are formed where two CC rounds (from two adjacent motifs) adjoin; they will be tightened in subsequent CC rounds forming a bold navy grid.
- Round 17: When joining motifs in the center of a grid (three existing neighbors), use the multi-point join technique: sc through new motif stitch, sc through adjacent motif A, sc through adjacent motif B, sc through adjacent motif C, and finish sc in new motif — this secures the new motif firmly at the X intersection.
- If join-as-you-go feels complex, use the alternate whip-join method described in the Assembly section. The join-as-you-go gives a seamless lattice with neat X-intersections replicating the photo's look.
Lattice Rib Building Rounds (Contrast Color Deepening)
- Round 18: Once a full panel (for example one bed width) is joined, we will add two CC reinforcement rounds to build a chunky ribbed lattice. Attach CC at any join point with sl st, ch2, hdc in same st, hdc in each sc across the rib line, in corner work (hdc, ch2, hdc) to maintain shape; join with sl st. This adds thickness and a solid network of navy ribs. (hdc count equals number of sc across the rib)
- Round 19: Ch2, BLO hdc in each stitch around the entire blanket to create a raised ridge on the RS. Place 2 hdc in each corner to prevent curling. Work evenly and count to ensure you land at corners precisely. Join and fasten off if desired. This creates the bold navy lattice lines and highlighted X intersections visible in the photo.
- Work these reinforcing CC rounds using a slightly larger hook (e.g., 5.0mm) if you want puffier ribs. This is optional but helps the contrast color dominate visually as in the image.
- Round 20: Optional second reinforcement: repeat Round 18 in CC one row deeper (hdc or dc depending on thickness desired). When adding a second CC round, work in FLO or BLO to add textural interest and a channelled ribbed effect.
- Round 21: Info : Check intersections: at the X where four motifs meet, you should have a neat star-shaped point formed by your CC joins. If it looks loose, add a small slip stitch through the crossing point and the underlying motif centers to flatten and anchor it.
- Round 22: Work a tidy sc round in CC around the entire blanket, placing sc into each visible stitch and making sure to smooth corners with 3 sc in each outer corner to square the blanket shape. Join and fasten off.
- At this stage we recommend pinning the blanket to a blocking mat to square corners and set lattice intersections prior to final edging. Lightly spray or steam block depending on fiber content. Cotton will need gentle wet blocking; acrylic may be steam blocked lightly. Pin to size and let dry fully.
Decorative Border (6 rounds)
- Round 23: Attach CC to any edge st with sl st, ch1, sc evenly around working 1 sc in each st along the edge and 3 sc in each outer corner. Join with sl st. (sc count = perimeter in sts)
- Round 24: Ch2, hdc in each st around, placing 2 hdc in corner scs for turn. Join. (hdc count equals previous sc count plus corner increases)
- Round 25: Ch3 (counts as dc), dc in each st around working evenly and ensuring corners have (dc, ch2, dc) for square corners. Join with sl st. This row adds height and frames the lattice visually.
- Try this decorative idea: work the next round in MC to echo the cream squares and soften the strong border. The photo shows a bold navy border but a thin cream accent near the edge can add balance.
- Round 26: Switch to MC (optional): ch1, sc in each st around to provide a thin accent line between the navy border and final edging. Join and fasten off if using MC then reattach CC for final round.
- Round 27: Final decorative round in CC: ch4 (counts as tr), *skip 2 sts, (sc, ch2, sc) in next st (picot-like loop), ch1, tr in next st* repeat around to form a scalloped openwork edge. At corners work (sc, ch2, sc) in corner st and continue pattern. Join and fasten off. Weave ends neatly to the back.
- Alternative edging: Work a row of crab stitch (reverse sc) in CC for a twisted rope-like finish, or a shell border in MC for softer look. Choose an edging that complements your home decor and the blanket's weight.
Alternate Join Method: Whip Join (if not JAYGO)
- Round 28: Lay two motifs RS together with the joining edges aligned. Using CC and a yarn needle, whip stitch through matching hdc/sc loops from RS, pulling gently to create a flat seam. Repeat along each side to assemble the blanket grid. This method gives a slightly raised seam compared to JAYGO but is easier to control for beginners.
- Round 29: For diagonal lattice effect using whip join: make sure to join motifs in a diamond layout so the whip seams form an X when four motifs meet. Sew seams on the RS to show the navy seam lines as a visible rib.
- When whip-joining, leave tails long (6-8in) at intervals and use them to secure intersections from WS by weaving them into both seam edges. This reduces the need for additional CC reinforcement rounds.
Assembly & Layout Guidance
- Round 30: Plan layout on the floor: lay motifs in a diamond orientation so squares read as diamonds framed by navy ribs. For the pictured bedspread the motif grid is set so that navy ribs run diagonally from corner to corner of the bed creating diamond negative spaces in navy.
- Round 31: Tip: Assemble in strips (rows along diagonal) and then join strips together; this is easier than adding one motif at a time across the bed. Pin strips together before joining to maintain alignment.
- For a queen bed, aim for 12 (across) x 14 (down) motifs with slight overlap depending on border — this gives approx 12×14 x 4.5in = ~54in x 63in before border. Add border to reach desired overhang.
- Round 32: If you want the diamonds larger, substitute a thicker yarn for MC or pick a larger hook; the lattice effect scales proportionally. Keep CC rounds consistent so ribs remain visually even.
Blocking & Finishing
- Round 33: Block assembled panels flat. Pin motifs at corners and lattice intersections ensuring ribs are straight. Lightly spray or wet and pin to size. Allow to dry completely. This sets the lattice and opens the star centers uniformly.
- Round 34: After blocking, trim stray fibers and weave all tails at least 1in into fabric along the CC ribs so they are hidden from RS. Knot tails only when necessary and bury ends to prevent unraveling.
- Round 35: Optional weight: If you prefer a heavier drape, add a narrow fabric lining sewn to the WS with small running stitches. This is optional and changes the look to a more bedspread style rather than a lightweight throw.
- Label finished piece with yarn brand and hook used so you can reproduce size later. Keep extra motifs for repairs.
Troubleshooting & Tips (Info Rounds)
- Round 36: Info :
- Edge waves: If edges ripple after joining, relax tension of join rows, block more aggressively, or add an extra sc round in CC to even the perimeter.
- Corners: Add an extra sc or hdc in corner groups as needed to maintain 90-degree corners. Test on a 3×3 block before committing to full blanket.
- Yarn substitutions: For a lighter breathable spread, use a DK cotton-blend and a 4.0mm hook; increase motif counts. For a chunkier cozy throw, use aran yarn and a 5.5mm hook and reduce motif count for same coverage.
- Color transitions: If you want a softer join, work the first CC round in a mid-tone (third color) then switch to deep navy for the subsequent rib-building rounds.
Decorative Variations
- Round 37: Variation 1 – central medallion: After the motifs are assembled, embroider a simple star or small running stitch in MC across motif centers for added texture and a handmade feel.
- Round 38: Variation 2 – fringe: Add a fringe in CC or MC to two opposite edges using 3-strand loops folded, spaced every 1in. Knot securely and trim to desired length for a boho look.
- Try adding a narrow linen-colored binding for an heirloom-style finish. Sew binding to WS and turn to RS, hand-stitching invisibly with ladder stitch.
Yarn & Care Recommendations
- Round 39: Info :
- Care depends on yarn fiber. For cotton: gentle machine wash warm on delicate and dry flat. For acrylic: gentle machine wash and tumble low. Always test care instructions on a spare motif before washing the whole piece.
- Storage: store folded in breathable cotton bag to avoid discoloration. Avoid hanging heavy spreads which may stretch ribs over time.
Full Row-by-Row Stitch Map Summary (for reference)
- Round 40: Motif R1: mr,(dc,ch2)x8 join
- Round 41: Motif R2: puffs in ch2 spaces, dc between puffs
- Round 42: Motif R3: form corner 3dc,ch2,3dc groups
- Round 43: Motif R4: fill sides with 3dc groups, keep ch2 corners
- Round 44: Motif R5: even out sides with dc and ch1 spacing
- Round 45: Motif R6: sc round to tighten edge
- Round 46: Motif R7: hdc round to prep for join
- Round 47: JAYGO R1 (CC): sc across side, join to adjacent motifs with sc/sl st
- Round 48: JAYGO R2 (CC): reinforce rib with hdc/dc for thickness
- Round 49: Rib R3 (CC): BLO hdc round to create raised rib
- Round 50: Border R1 (CC): sc around perimeter
- Round 51: Border R2 (CC): hdc round
- Round 52: Border R3 (CC): dc round with corner ch2
- Round 53: Border R4 (MC optional): sc accent round
- Round 54: Border R5 (CC): scallop or picot finishing round
- Round 55: Finishing: weave ends, block, optional lining
- This stitch map is provided as a quick visual reference while you work. Keep a printed copy to track motif counts and rows completed.
Advanced Detailed Rounds for Larger Bedspread Stitching (extended guidance)
- Round 56: When assembling large spreads, build in panels of 4-6 motif columns then join panels. This reduces handling and keeps rows straight. Sew panels together with CC using flat seams that line up lattice ribs precisely.
- Round 57: If seams shift, wet-block joined panels separately then re-join along the blocked edges using whip stitch; this preserves the lattice continuity across the join.
- Round 58: Info :
- Round 59: For very large spreads consider adding reinforcement plies inside the ribs: work a crocheted chain-based tape behind the rib lines on the WS, sewing it into place to stiffen ribs and prevent sagging.
- Round 60: Edge reinforcement: after border rounds, add a final hidden mattress stitch line on WS along perimeter to keep border flat.
- All counts above are proportional to motif counts — keep track of st counts at seam intersections and adjust local increases to maintain square geometry.
Final Quality Check
- Round 61: Inspect every X intersection from RS: each should have a neat star-like meeting point. From WS ensure all tails are woven in at least 1in and knots are buried inside CC ribs.
- Round 62: Check edges and corners: all four corners of the spread should be square and not rounded or puckered. If corner dips are present, add a small wedge of sc or hdc in MC on WS then re-block.
- Round 63: Label and photograph your finished piece for records — note yarn brand, hook sizes, motif counts and care instructions for future replication.
- Keep leftover yarn in a sealed bag with pattern notes and any spare motifs for repairs. Handmade blankets are future heirlooms, and an extra motif can save re-making a section later.
- Round 64: Optional: Add small embroidered running stitches across motif centers using stranded cotton for a subtle folk-inspired detail. Secure each stitch with small knots on WS only.
- If you wish to convert this into a cushion cover or smaller home pieces, the exact same motifs can be worked to smaller counts: 3×3 cushion front, 4×4 lapghan etc. Adjust borders accordingly.
- Round 65: Maintenance tip: if CC begins to fuzz with use, gently trim with small scissors and re-block. Pilling can be reduced by using wool or a blend instead of pure acrylic for CC ribs.
- Congratulations: following these rounds and tips will produce a diamond-lattice granny square bedspread similar to the pictured design. Enjoy the assembly and the visual payoff when the lattice lines come together into crisp diamonds.
Assembly Instructions
- Attach motifs into strips: assemble motifs into diagonal strips first. Pin 6-8 motifs in a strip (depending on bed size), then join them by working the join-as-you-go or whip-join method along their long edges.
- Join strips together: align strip edges so lattice ribs meet. Use CC to join strip edges by working sc through both motifs at each stitch for a flat seam; check that X-intersections align.
- Reinforce ribs: after all strips are joined, work two reinforcement rounds in CC across the entire bedspread to thicken the lattice and ensure consistent rib width.
- Work final border: attach CC and work sc, hdc, and dc rounds as described; add MC accent row if desired and finish with a decorative scallop or crab stitch.
- Block the entire bedspread flat: pin to desired final dimensions, paying attention to corner angles and straight lattice lines. Allow to dry fully before removing pins.
- Weave and secure ends: weave in tails for at least 1in along CC ribs and in the WS of the blanket; secure intermittent intersections with small knots on the WS if necessary.
Common Mistakes & How to Fix Them
- Skipping stitch markers at round starts can cause misaligned motif corners and uneven joins; always mark your first stitch of each round.
- Using inconsistent tension between motifs creates wavy edges; block motifs or adjust hook size to match gauge before joining.
- Joining motifs too tightly will distort the square shape and close the lacy openings; join with a relaxed tension so motifs sit flat.
- Waiting to block until the entire blanket is assembled makes shaping harder; block several sample motifs first to set size and final gauge.
- Not weaving in ends securely near lattice intersections leads to unsightly bumps; bury tails across the lattice lines and knot when necessary.
- Changing yarn brands or dye lots without checking gauge will change motif size; always swatch a 3×3 motif block to confirm fit.
Important Notes
- Use stitch markers consistently at the beginning of each round and at corner points to avoid counting errors and maintain square shaping.
- Stuff motifs lightly when blocking by pinning gently to open lacy centers and keep puff stitches defined; do not overstretch.
- When using join-as-you-go, join on the wrong side so the ribs appear on the right side as shown in the photo.
- Maintain consistent tension across motifs; make a 3×3 swatch and block it to check motif size before committing to the full bedspread.
- Weave in ends along CC ribs so they are hidden on the right side and avoid knots that can create lumps.
- Keep a small bundle of extra motifs and yarn for repairs and to test any future alterations to the border or lattice.
This diamond lattice bedspread combines lacy sunburst centers with a bold navy lattice for a beautiful contrast and heirloom feel. As you join motifs and watch the diamond pattern emerge, you’ll see how individual squares transform into an elegant whole. The step-by-step approach makes the project manageable, and the final blocked spread is truly rewarding to drape over a bed or sofa. 🧶 Cozy up with this timeless design and enjoy the meditative rhythm of making. ✨
Crochet Abbreviations
- mr
- magic ring
- ch
- chain
- sc
- single crochet
- hdc
- half double crochet
- dc
- double crochet
- tr
- treble (US)
- dtr
- double treble (US)
- puff
- puff stitch (see stitch note)
- sl st
- slip stitch
- inc
- increase (2 sts in same st)
- dec
- decrease (invisible decrease)
- BLO
- back loops only
- FLO
- front loops only
- st(s)
- stitch(es)
- sp
- space
- rep
- repeat
- ( )
- work instructions in brackets as directed
- x
- times
You Ask, We Answer
What is the finished size of this bedspread?
Finished size depends on motif count. Using the stated gauge (approx 4.5-5in per motif): a 12×14 motif layout yields approximately 54in x 63in before border; add border width to final dimensions.
Can I use different yarn weights for this pattern?
Yes. If you use thinner yarn, expect smaller motifs and increase motif counts. If using thicker yarn, reduce motif counts and consider adjusting hook sizes to maintain drape. Always swatch a 3×3 block to confirm size.
Do I need to use join-as-you-go or can I sew motifs later?
Either method works. Join-as-you-go creates seamless lattice ribs and is efficient once practiced. Whip-join gives a raised seam and can be easier for beginners. Instructions for both methods are included.
How much yarn do I need?
For a queen-size bedspread in the pictured layout, plan approximately 1400-1600g of MC (cream) and 500-700g of CC (navy). Smaller sizes require proportionally less yarn.
How should I block the motifs and assembled blanket?
Block flat on a mat, pinning corners and lattice intersections, lightly wetting motifs or using steam depending on fiber. Allow to dry fully before removing pins. Blocking evens motif size and opens centers.
Can I make the lattice ribs thicker or thinner?
Yes. Use hdc for a tighter rib, dc for a chunkier rib, or use a larger hook for puffier ribs. The pattern includes reinforcement rounds to adjust rib thickness.
What hook sizes are recommended?
A 4.5mm hook is suggested for worsted weight motifs; you may use a 5.0mm hook for CC rib rounds if you want a puffier lattice. Swatch to determine final motif size.
How do I prevent gaps at joins?
Maintain relaxed joining tension; do not pull CC too tight when joining motifs. Use consistent stitch placement and work CC reinforcement rounds to even out any gaps.