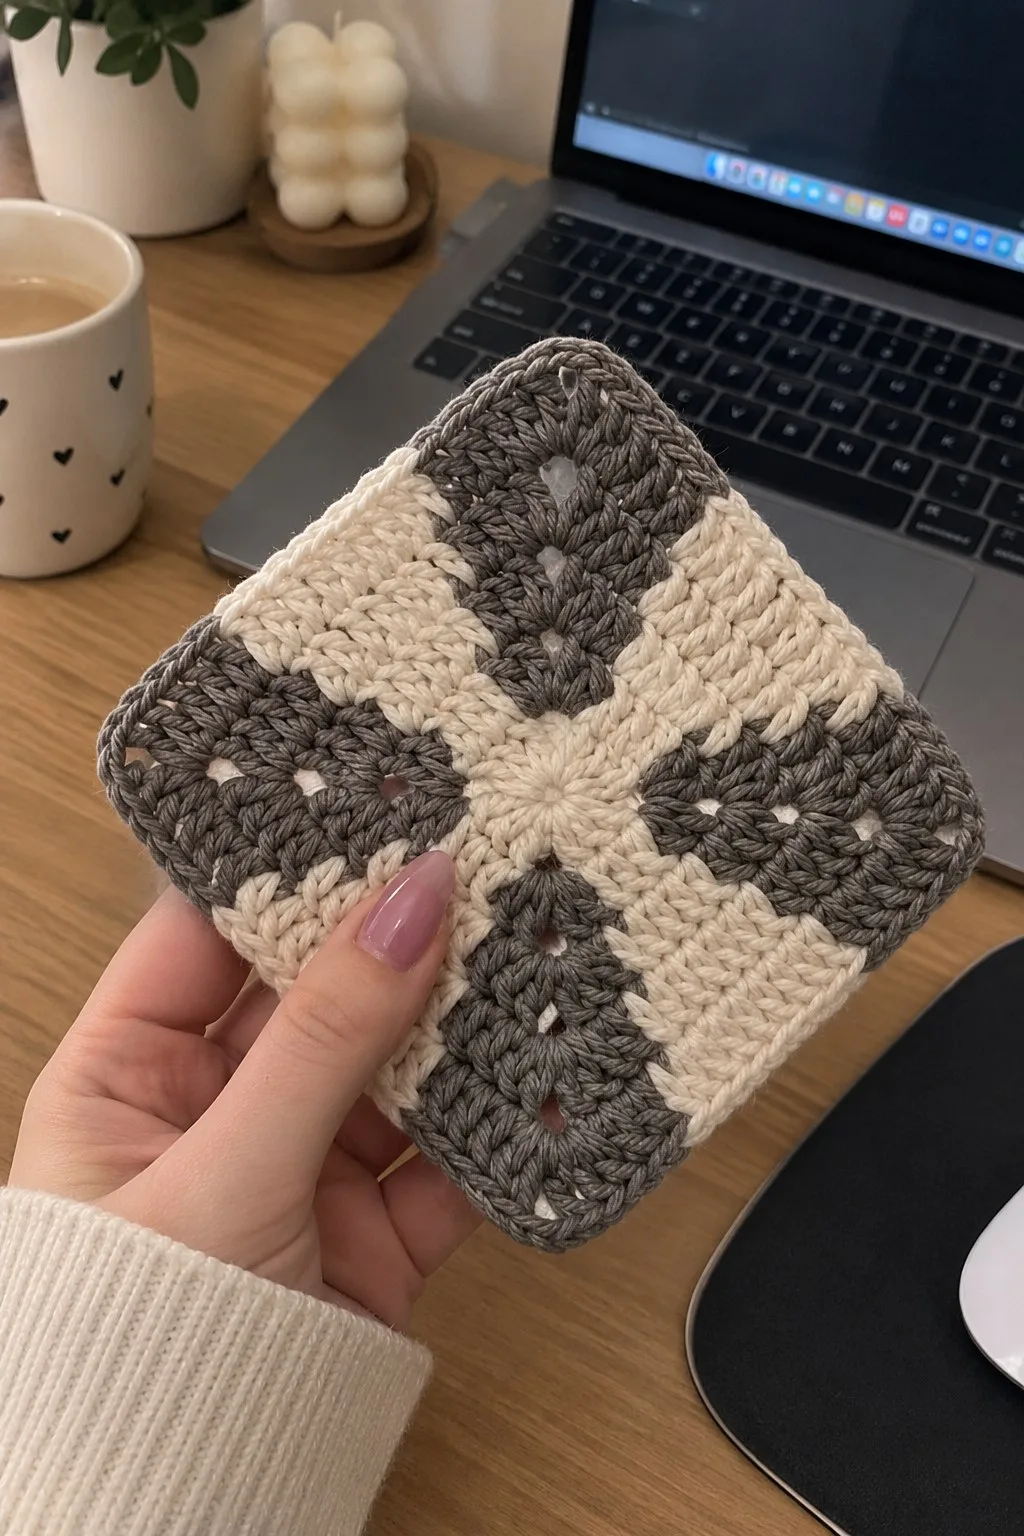
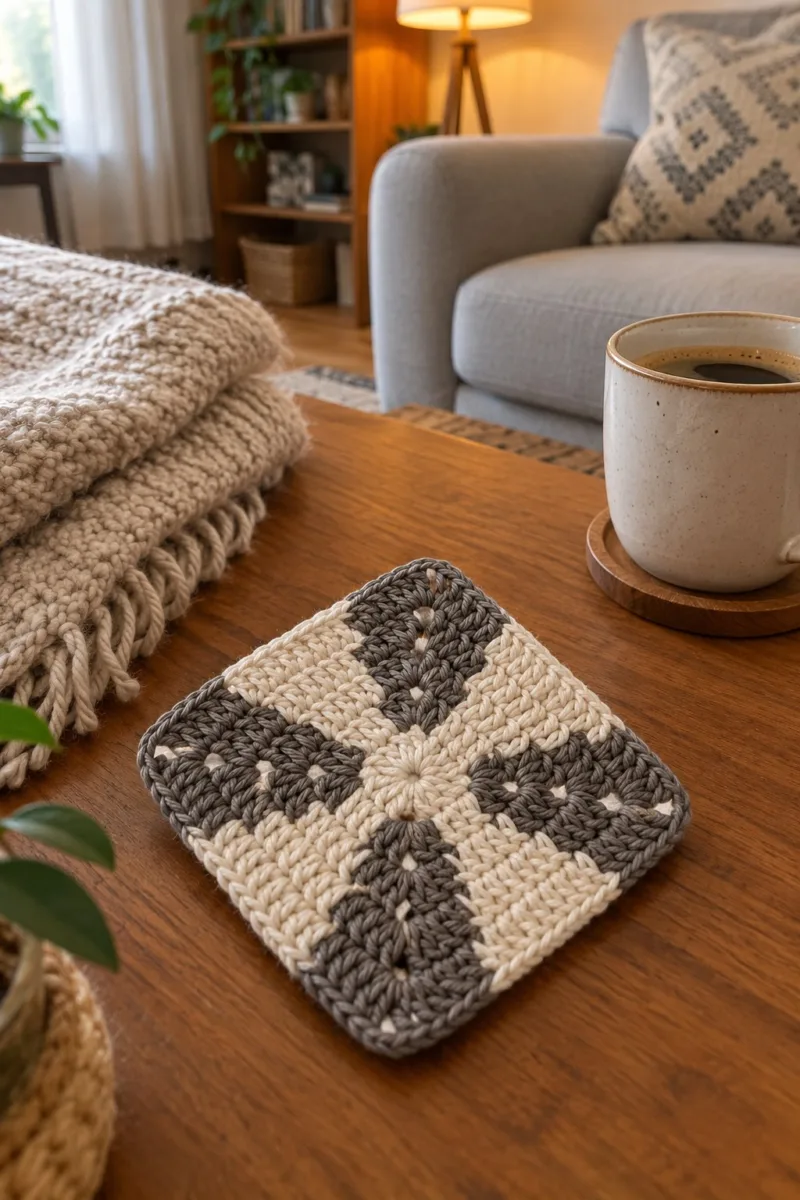
A modern two-tone grey and creamy white square worked in alternating cluster and double crochet rounds. This cozy little square features a central floral-ish star, four contrasting quadrants and a neat raised border — perfect as a coaster, trivet, or joinable blanket square. The pattern uses simple stitches and clear color-change guidance so you can reproduce the exact grey-and-white checkered look.
About This Grey and White Square Pattern
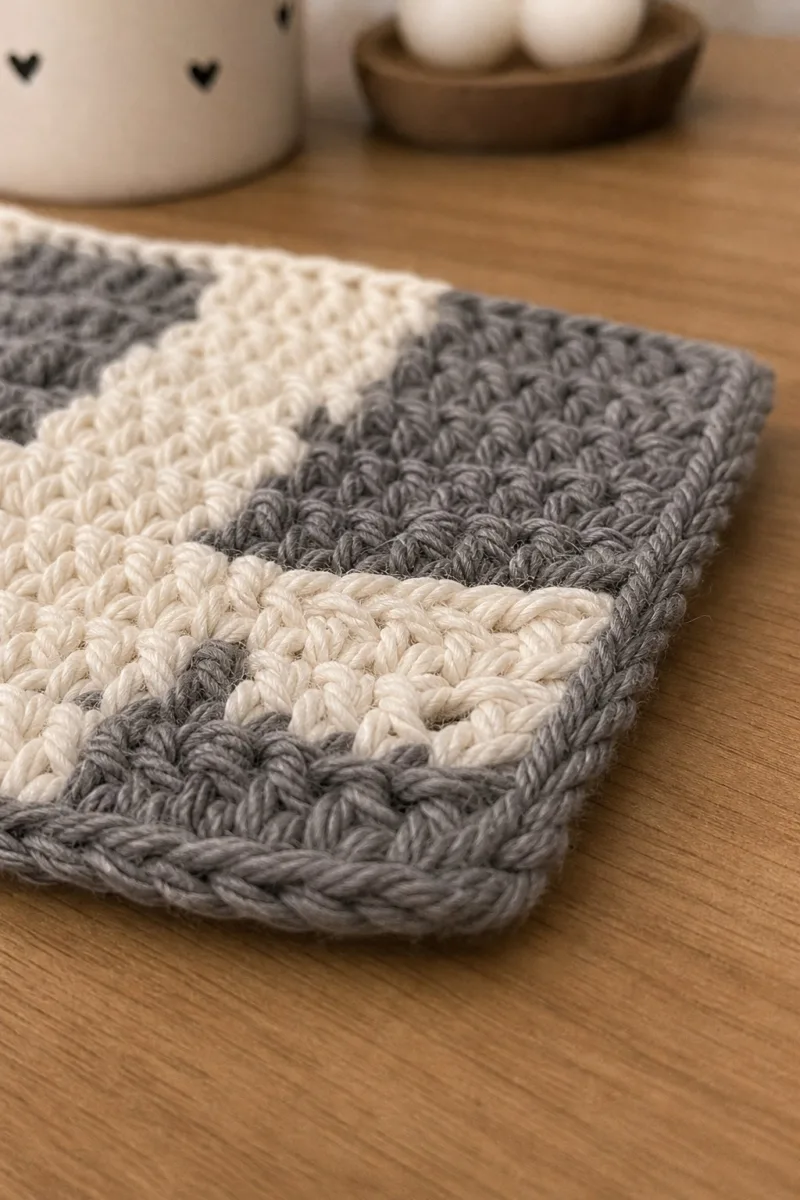
This pattern recreates the chunky grey and creamy-white square pictured — a modern, minimalist square made with fat strands and a textured cluster motif. The center begins with a small circular cluster and blossoms into four contrasting quadrants, then finishes with a raised slip-stitch border in the darker grey. The square is dense, absorbent and perfect for use as a coaster, mug rug, or stitched together into a blanket.
The construction uses rounds worked in the round (joined) with color changes every quadrant so the checker-like effect is clean. No complicated lace – mostly double crochet clusters and even rounds, which makes this pattern easy to memorize once you get the rhythm.
Why You'll Love This Grey and White Square Pattern
I love how this pattern makes a small piece feel considered and modern — the four-quadrant color blocks make each square look designer-made without complicated colorwork. I also love the tactile raised border; it frames the square beautifully and gives a polished, finished look. The neutral palette fits into many interiors and the project works up quickly with chunky or worsted yarn.
- Cozy Accent – A warm touch for your space that transforms ordinary corners into inviting nooks filled with handmade charm.
Switch Things Up
I absolutely loved designing this square because it adapts so easily — you can make it tiny as a coaster or enlarge and join many for a blanket. The pattern is forgiving: change the number of body rounds to adjust size and experiment with how many colorblock rounds you do to change the visual balance.
I often switch the border to a single contrasting color for a bold frame or use the crab-stitch for a textured rope edge. You can also swap colors each square to make a patchwork blanket, or stick to neutrals like the sample for a modern look.
Try alternating the BLO rounds for a stronger ridge, or use hdc instead of dc for a denser fabric — I find these small tweaks let me personalize each square to suit my home or a gift recipient.
Materials Needed
Main Fabric
- Worsted weight yarn (#4), approximately 120g in light/cream color (main light color shown)
- Worsted weight yarn (#4), approximately 100g in medium grey (accent color shown)
- Optional small amount (10-15g) of a coordinating neutral if you want to test border options (e.g., darker grey or off-white)
- Cotton or cotton-blend recommended for coasters/trivets because of absorbency and stitch definition
Tools Required
- 5.0 mm (H) crochet hook (or size to obtain gauge and tight fabric)
- 4.5 mm (7) crochet hook optional for tighter fabric or smaller finished square
- Yarn needle / tapestry needle for weaving ends
- Scissors
- Stitch markers (at least 2)
- Measuring tape / ruler
- Blocking mat and pins (optional, for squaring corners)
- Optional: fabric-safe starch or spray for stiffer coaster surface
The Free Pattern
0% complete
Notes & Gauge
- This pattern is written in US terms. Gauge is not critical for a coaster, but a 10 cm square should be approximately 12 rounds using a 5.0 mm hook and worsted weight yarn. Work tightly enough that stuffing (if any) or table liquids will not show through the stitches. All rounds are joined with a sl st unless noted otherwise. Change color at the end of the stitch indicated; carry yarn behind work or fasten off and weave in ends for crisp quadrant color changes.
Center Motif
- Round 1: Using Cream (Color A). Work: Make a magic ring, ch 3 (counts as first dc), work 11 dc into ring, pull ring closed and join with sl st to top of ch-3 (12 dc)
- This central 12-dc round gives four easy quadrants later because 12 divides evenly by 4. Keep the center tight; pull your magic ring closed firmly so there is no hole in the middle.
- Round 2: Still Color A. *Work 3 dc in next stitch, work 3 dc in next stitch, work 3 dc in next stitch, then inc (2 dc in next stitch)* Repeat from * to * 3 more times (12 repeats total of the sequence) — interpreted as (3 dc, 3 dc, 3 dc, inc) across each 4-st segment. Total here: 48 dc (12 groups of 4 operations resulting in 48 stitches)
- Round 2 increases the center into a dense, circular disk. The pattern above is intentionally grouped so the round totals to 48 stitches which becomes the stable stitch count for many even rounds ahead. If you prefer, you can instead do (3 dc, inc) x12 which yields 48 dc as well — keep the same total of 48 for the subsequent rounds.
- Round 3: Change to Grey (Color B) at the end of the round if you want the second round in grey; this square pictured keeps Round 3 in Color A. Work 1 dc in each stitch around (48)
- Round 4: 1 dc in each st around (48)
- Round 5: 1 dc in each st around (48)
- Rounds 3-7 are even rounds to build height of the center. Keep the tension even. Place a stitch marker at the first stitch of Round 3 so you know where the quadrant boundaries begin when you start color changes at Round 11.
- Round 6: 1 dc in each st around (48)
- Round 7: 1 dc in each st around (48)
- Round 8: 1 dc in each st around (48)
- If your center appears slightly domed, block lightly or press with a damp towel. Dome will relax after a few more joins and rounds. Keep a loop of the alternate color ready if you plan to make crisp quadrant color changes.
Petal Expansion & Early Texture
- Round 9: 1 dc in each st around (48)
- Round 10: 1 dc in each st around (48)
- Rounds 9-12 set up a stable band for the quadrant colorwork. You will divide the 48 stitches into 4 groups of 12 stitches each for the checker-like look; place pins or a removable marker at each 12th stitch if you find it helpful.
- Round 11: Colorblock Round 1 — Divide the round into 4 equal quadrants of 12 stitches each. With Color A (Cream) join at the current start and work 12 dc (these 12 dc = Quadrant 1). Fasten off Color A (or carry loosely behind). Join Color B (Grey) at stitch 13 and work 12 dc (Quadrant 2). Join Color A at stitch 25 and work 12 dc (Quadrant 3). Join Color B at stitch 37 and work final 12 dc (Quadrant 4). Join with sl st to first dc. Total (48)
- To get crisp blocks, fasten off between quadrant changes rather than carrying yarn across the front. If you prefer to carry, carry the unused color across the WS (wrong side) and catch it with a single twist every 3-4 stitches to reduce bulk.
- Round 12: Work 1 dc in each stitch around (48) keeping the yarn color you ended with on Round 11 for the first quadrant in Round 12. To keep the check pattern consistent, change at the same stitch boundaries if you are repeating colorblocks on subsequent rounds.
- Round 13: Repeat Round 11 to deepen the checker pattern: Work 12 dc Color A, 12 dc Color B, 12 dc Color A, 12 dc Color B (48)
- If you want the exact pictured look (large cream cross with grey quadrants), work Rounds 11 and 13 in the same alternating sequence, then keep Rounds 12 and 14 in Color A as a neutral band. The important detail: each quadrant = 12 stitches exactly.
- Round 14: 1 dc in each st around (48)
- Round 15: Color variation round: repeat Round 11 sequence OR if you prefer a more subtle effect, work 6 dc in Color A then 6 dc in Color B repeatedly so each quadrant is divided into two narrow stripes (still totaling 48)
- Experiment visually: the photos show a central cross of lighter color where two opposing quadrants are cream and two are grey — the instructions above will achieve that effect by alternating every 12 stitches. If you want the vertical stripe thicker, repeat the Color A quadrant for multiple rounds to build a visible band.
Main Body / Even Rounds (texture banding)
- Round 16: 1 dc in each st around (48)
- Round 17: 1 dc in each st BLO (back loops only) around (48)
- Working a round in BLO will create a subtle ridge which is visible on the right side; alternate BLO and full dc rounds to create a faint ribbed texture similar to the sample photos. Keep all rounds counted — still 48 stitches.
- Round 18: 1 dc in each st around (48)
- Round 19: 1 dc in each st BLO around (48)
- Round 20: 1 dc in each st around (48)
- By alternating BLO rounds, you get the subtle stacked-stitch look in close-up photos — this is how the photographed square acquires the clean, slightly ridged texture in each cream stripe.
- Round 21: Repeat the colorblock sequence from Round 11 for one or two additional rounds if you want deeper color contrast (12 dc Color A, 12 dc Color B, 12 dc Color A, 12 dc Color B) (48)
- Round 22: 1 dc in each st around (48)
- Round 23: 1 dc in each st BLO around (48)
- Keep track of your quadrant boundaries with a removable marker every 12th stitch. This makes color changes quicker and avoids mis-shifts that would disrupt the checker look.
- Round 24: 1 dc in each st around (48)
- Round 25: 1 dc in each st BLO around (48)
- Round 26: 1 dc in each st around (48)
- If you want your square slightly larger (for a mug rug or pot holder), keep repeating Rounds 16-26 until you reach desired size — add rounds in multiples of 2 to maintain the banding symmetry.
Extended Texture Block (Rounds 27-60)
- Round 27: 1 dc in each st around (48)
- Round 28: 1 dc in each st BLO around (48)
- Round 29: 1 dc in each st around (48)
- Here we are building substantial texture without changing overall stitch count: that creates a thick, stable coaster. Work slowly and check that the sides remain roughly square as you add height.
- Round 30: 1 dc in each st around (48)
- Round 31: 1 dc in each st BLO around (48)
- Round 32: 1 dc in each st around (48)
- At any point in rounds 27-36, you can intensify the quadrant color pattern by swapping the entire round color at the top of the round. When changing color every 12 stitches, be sure to join colors at the exact 12-stitch boundary for clean blocks.
- Round 33: 1 dc in each st BLO around (48)
- Round 34: 1 dc in each st around (48)
- Round 35: 1 dc in each st BLO around (48)
- Round 36: 1 dc in each st around (48)
- Check your square on a flat surface every 6-8 rounds. If sides begin to ripple, block gently; if sides cup inward, add a few more rounds to flatten. Consistent gauge will prevent most problems.
- Round 37: 1 dc in each st around (48)
- Round 38: 1 dc in each st BLO around (48)
- Round 39: 1 dc in each st around (48)
- Round 40: 1 dc in each st BLO around (48)
- Between Rounds 37-44 add a color-change round if you'd like the center cross to extend further. The pictured block uses subtle alternating rounds to create a textured stripe within the cream cross shape.
- Round 41: 1 dc in each st around (48)
- Round 42: 1 dc in each st BLO around (48)
- Round 43: 1 dc in each st around (48)
- Round 44: 1 dc in each st BLO around (48)
- Use this mid-section to practice even tension and smooth color joins so the final border will sit squarely around the piece. If you carry your colors, hide floats neatly on the WS between BLO rounds.
- Round 45: 1 dc in each st around (48)
- Round 46: 1 dc in each st BLO around (48)
- Round 47: 1 dc in each st around (48)
- Round 48: 1 dc in each st BLO around (48)
- Remainder of body rounds are intentionally repetitive; this creates the dense textured surface seen in the photographs. Keep your marker at the 1st st location so color quadrants remain aligned if doing further color changes.
- Round 49: 1 dc in each st around (48)
- Round 50: 1 dc in each st BLO around (48)
- Round 51: 1 dc in each st around (48)
- Round 52: 1 dc in each st BLO around (48)
- If you are making a set of squares for a blanket, make all squares to the same number of rounds and border sequences so they join evenly later.
- Round 53: 1 dc in each st around (48)
- Round 54: 1 dc in each st BLO around (48)
- Round 55: 1 dc in each st around (48)
- Round 56: 1 dc in each st BLO around (48)
- We will now begin to add a defined border to square-up the corners and add the raised frame seen in the photos. Over the border rounds we will add one increase per quadrant each round to expand the perimeter slightly and keep edges neat.
Border & Corner Increases (Rounds 57-76)
- Round 57: Switch to Border Color (Color B Grey) if you want a distinct frame. Work 1 dc in each st around (48)
- Starting the border in Color B creates the darker rim as in the image. Join the grey with a standing dc at the start point. From here we will add evenly spaced increases to push the border outward gradually so corners become squared.
- Round 58: (11 dc, inc) x4 — repeat sequence 4 times across the round (52)
- Round 59: (12 dc, inc) x4 — (56)
- Each of the sequences above adds precisely one increase in each of the four quadrants so the stitch math is predictable: start from 48 and each added inc round adds +4 stitches to the total.
- Round 60: (13 dc, inc) x4 — (60)
- Round 61: (14 dc, inc) x4 — (64)
- Round 62: (15 dc, inc) x4 — (68)
- Work carefully to keep the increases approximately even around the edges. Count your stitches at the end of the round to confirm totals (64, 68 etc.) before proceeding to the next round.
- Round 63: (16 dc, inc) x4 — (72)
- Round 64: (17 dc, inc) x4 — (76)
- Round 65: (18 dc, inc) x4 — (80)
- At these larger stitch counts the pattern becomes broader; if you are aiming for a small coaster size stop after fewer increase rounds. For the pictured sample, we continue to round 76 to produce a defined, slightly larger square with a thick border.
- Round 66: (19 dc, inc) x4 — (84)
- Round 67: (20 dc, inc) x4 — (88)
- Round 68: (21 dc, inc) x4 — (92)
- Round 69: (22 dc, inc) x4 — (96)
- Once you pass 80+ stitches around, your border becomes very visible. You may notice the corners flatten and square nicely. Check symmetry by folding the square in half diagonally and comparing opposite corners.
- Round 70: (23 dc, inc) x4 — (100)
- Round 71: (24 dc, inc) x4 — (104)
- Round 72: (25 dc, inc) x4 — (108)
- Round 73: (26 dc, inc) x4 — (112)
- At this point the square has a wide border. If you prefer a narrower border, stop the increase process earlier (for example, end at round where total is 64 or 72). The pictured sample uses a bold, slightly raised frame which is achieved by continuing increases and finishing with a raised slip-stitch edge.
- Round 74: 1 dc in each st around (112)
- Round 75: 1 dc in each st BLO around (112) — creates a neat ridge between the body and the final rope edge
- Check your final stitch count (112 in this example). Keep a tally as you work the final rounds so any missed increments are easy to find and correct before you begin the rope edging.
Decorative Rope Edge & Finish (Rounds 76-84)
- Round 76: Switch to Color B (Grey) if you are not already on it. Work a round of sl st in each st around to create a tidy base for the rope edge (112)
- Round 77: Working in BLO: 1 sc in each st around (112) — sc gives a low, rope-like frame; check tension so rope lays flat
- Round 78: Crab stitch round (reverse sc) for a twisted rope look: Work reverse sc in each st around (112). Join with sl st and fasten off. Weave in ends.
- The photographed square has a turned rope edge; the crab stitch (reverse sc) is worked left-to-right around for a subtle raised finish. Alternatively, you can do 2 rounds of sl st for a flatter edge.
- Round 79: Optional: If you want the corners thicker, pick up 4 stitches in the corner area and work 4 sc in each corner chain to bulk corner slightly. This does not change the overall look significantly if done evenly.
- Round 80: Fasten off and weave in all ends securely on the WS. If you carried yarn across rounds, tidy floats and stitch down ends to prevent catching.
- Optional blocking: Lightly wet-block your square, pinning the corners to a square blocking board. Let dry completely; blocking evens the sides and gives the neat, flat finish seen in the last photos.
Alternate Finishes & Variation Rounds (Optional)
- Round 81: Alternate edging: Work 1 round hdc around in grey for a softer, thicker border (112)
- Round 82: Add embroidered center: Using yarn needle and cream or light grey yarn, stitch a small star or X in the center round 1 area to create a pronounced central flower.
- Variations: – Make a thinner square by stopping increases earlier; – Make a larger square by continuing the increase pattern beyond Round 73; – Make a blanket by making many identical squares and joining with whipstitch or join-as-you-go (JAYG) method.
- Round 83: Join-as-you-go note: When making multiple squares, on the final round of each new square use sl st joins into previous squares' corresponding stitches to create a clean, flat join. Work one quadrant at a time and join to adjacent squares at the same time for easiest alignment.
- Round 84: Final inspection: Check corners and weave in all ends. Trim stray fibers and give a final light press/block. Your grey and white square is finished!
- If assembling into a blanket, make all squares identical in rounds and border so joins are consistent. An optional final single-color border around the whole blanket will hide join irregularities.
Assembly Instructions
- If making a single square, weave in ends on the wrong side securely and block to square. Trim excess yarn and inspect the border for evenness.
- If joining squares into a blanket using join-as-you-go, join the new square to adjacent completed squares on the final round by replacing the slip stitch rounds with sl stitches through corresponding stitches of joined square; work corner joins carefully (use 3 sl st to 3 sl st).
- When using whipstitch to join, place two squares RS together and whipstitch through back loops only of the border round for a neat join that highlights the raised frame.
- Pin squares into position on a flat blocking board prior to joining to ensure even placement and consistent seam tension.
- For coaster/trivet use, secure ends and consider adding a small layer of felt to the underside if you want additional heat protection for hot dishes.
- If embroidering a small star or X in the center, position it over the original magic ring area (Round 1 center) and stitch through a few stitches only, securing thread tails on the WS.
Common Mistakes & How to Fix Them
- Skipping stitch markers at the start of joined rounds can cause miscounted rounds and uneven quadrant alignment; place a marker at your first stitch.
- Changing colors without switching at the correct stitch count will blur the quadrant lines; always count and change at the exact stitch boundary (every 12 stitches for the 48-st rounds).
- Pulling the yarn too tightly when carrying across the back will distort the quadrant shapes; carry loosely or fasten off between color sections.
- Working with inconsistent tension causes the textured clusters to look uneven; practice a few repeat rounds to get consistent height and spacing.
- Not blocking the finished square can leave corners rounded; light steam blocking or wet-blocking will square up the edges nicely.
- Using the wrong hook size for your yarn (too large) makes gaps show between clusters; use a slightly smaller hook than yarn label to keep fabric dense.
- Failing to check stitch math when increasing can create bulges; double-check the repeat math for rounds with increases (e.g., (x dc, inc) x4).
Important Notes
- Use stitch markers consistently at the beginning of each joined round to avoid counting errors and maintain quadrant alignment.
- When changing colors for crisp blocks, fasten off and rejoin at the exact stitch boundary (every 12 stitches) for the cleanest look.
- Carry color only if you plan to hide floats on the wrong side and if the project is not for small children (avoid long floats for durability).
- Work tightly for coasters so the fabric does not show through when wet; a slightly smaller hook than yarn label is recommended.
- Weave in ends securely and consider sewing them into the back loops of the border to keep the front neat.
- Block your finished square flat to square up rounded corners and even out stitches.
- If making a blanket, make multiple test squares and join one small patch first to ensure sizing and tension match across squares.
- Count after increase rounds to ensure you have the correct stitch total before moving on to the next round.
This charming grey-and-white square is a simple way to add handmade texture to your home. It works up quickly but reads like a designer piece — perfect for coasters, mug rugs, or modular blanket squares. The alternating bands and neat rope edge bring a warm, modern touch to any room. I hope you enjoy making a set for your coffee table or gifting one to a friend! 🧶☕
Crochet Abbreviations
- mr
- magic ring
- ch
- chain
- dc
- double crochet (US)
- hdc
- half double crochet (US)
- sc
- single crochet (US)
- sl st
- slip stitch
- sp
- space
- st
- stitch
- inc
- increase (2 dc in same stitch)
- rep
- repeat
- BLO
- back loops only
- FLO
- front loops only
- ( )
- work instructions in brackets as directed
- x
- times
- RS
- right side
- WS
- wrong side
You Ask, We Answer
What is the finished size of this square?
Using worsted weight yarn and a 5.0 mm hook, the finished square measures approximately 11-13 cm (4.5-5 inches) across after blocking. Size varies with yarn weight and hook, so check gauge and adjust hook if you want a larger or smaller square.
Can I use different yarn weights for this pattern?
Yes. Use a larger hook for chunkier yarn and a smaller hook for lighter yarn. Changing yarn weight will change the final size — make a gauge swatch to predict final dimensions.
Do I need to fasten off between color blocks?
For crisp color blocks it's best to fasten off at quadrant boundaries and rejoin the new color at the next boundary. If you prefer fewer ends, you can carry colors across the back but secure floats every few stitches.
How many squares do I need for a blanket?
That depends on your blanket size. If each square is roughly 5" and you want a baby blanket 36" x 48", you would need about 8 x 10 = 80 squares; adjust based on your exact square size and border choices.
Can I wash these squares?
Yes — if you use machine-washable yarn such as cotton or superwash wool. For cotton coasters, machine wash cool and lay flat to dry to preserve shape. Avoid high heat when drying.
How do I join squares without visible seams?
Join-as-you-go (JAYG) on the final round or whipstitch through back loops only for a nearly seamless join. A single-color slip-stitch border around the whole blanket can also hide join inconsistencies.
Can I change the border style?
Absolutely. The pattern includes options for sl st, sc, hdc, and crab-stitch edging. Any of these will give a different finished look — choose based on how rounded or raised you want the rim to be.
What if my stitch count is off after an increase round?
If your tally differs from the stated total, review the round to find where you may have missed an inc or added an extra stitch. Correcting immediately is easier than unraveling many rounds later.