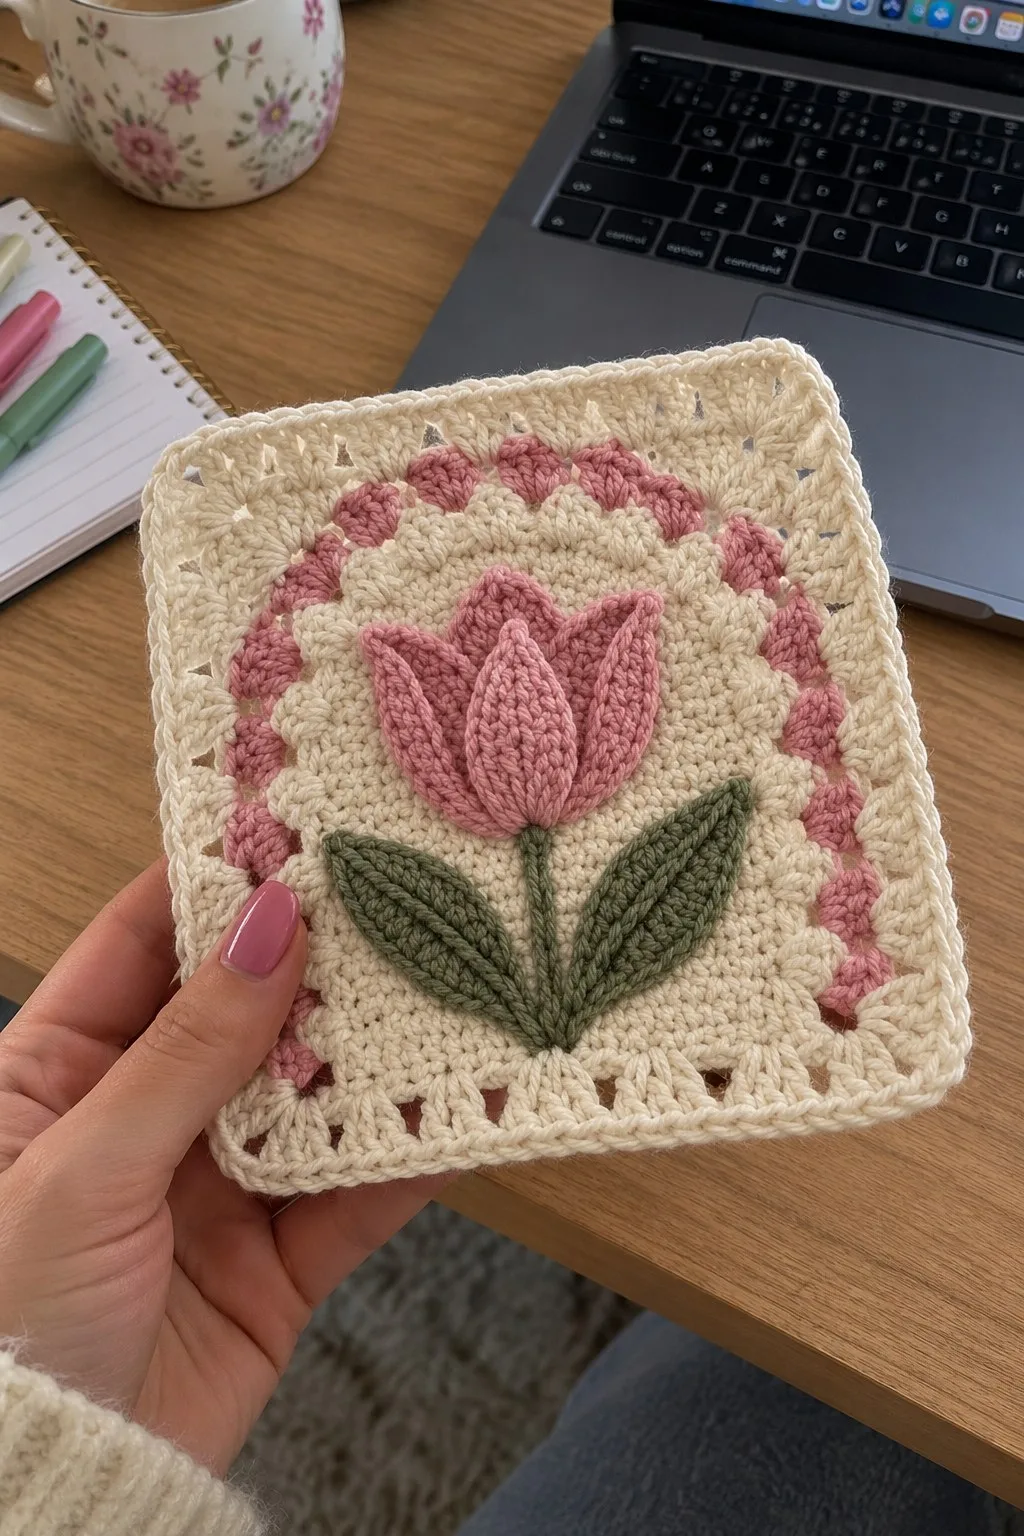
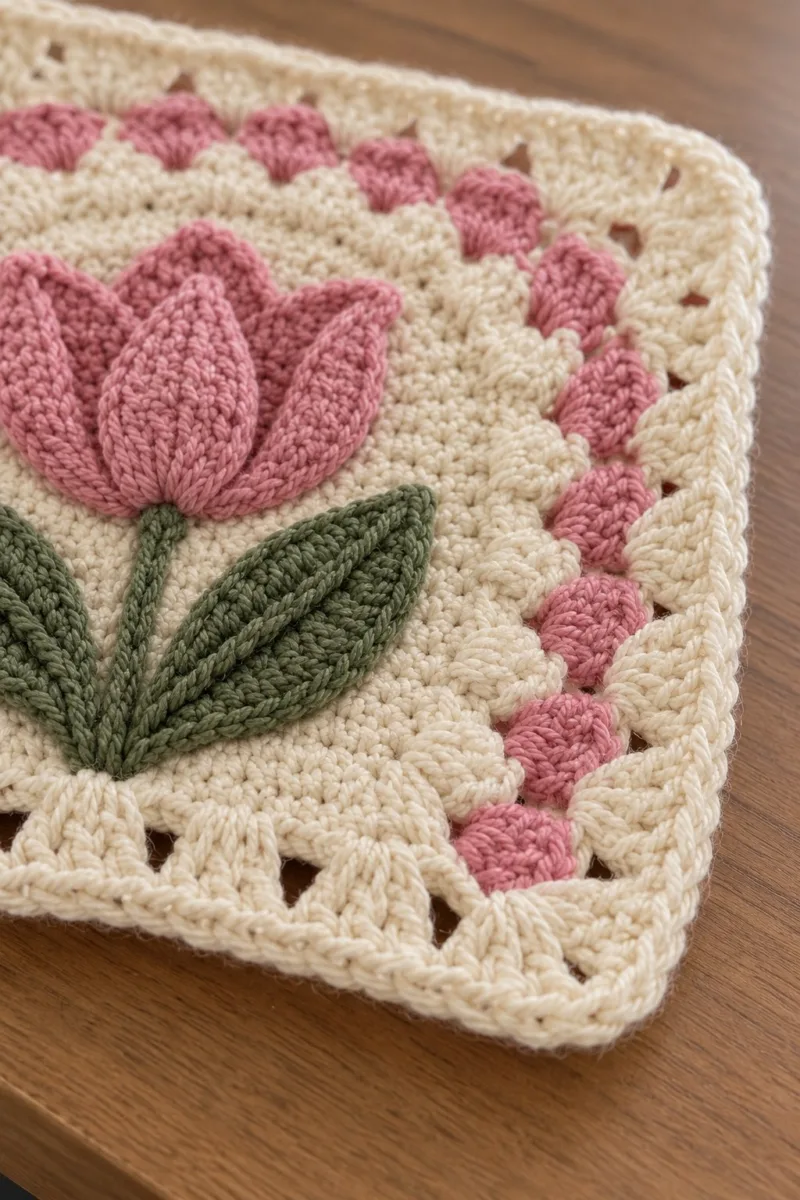
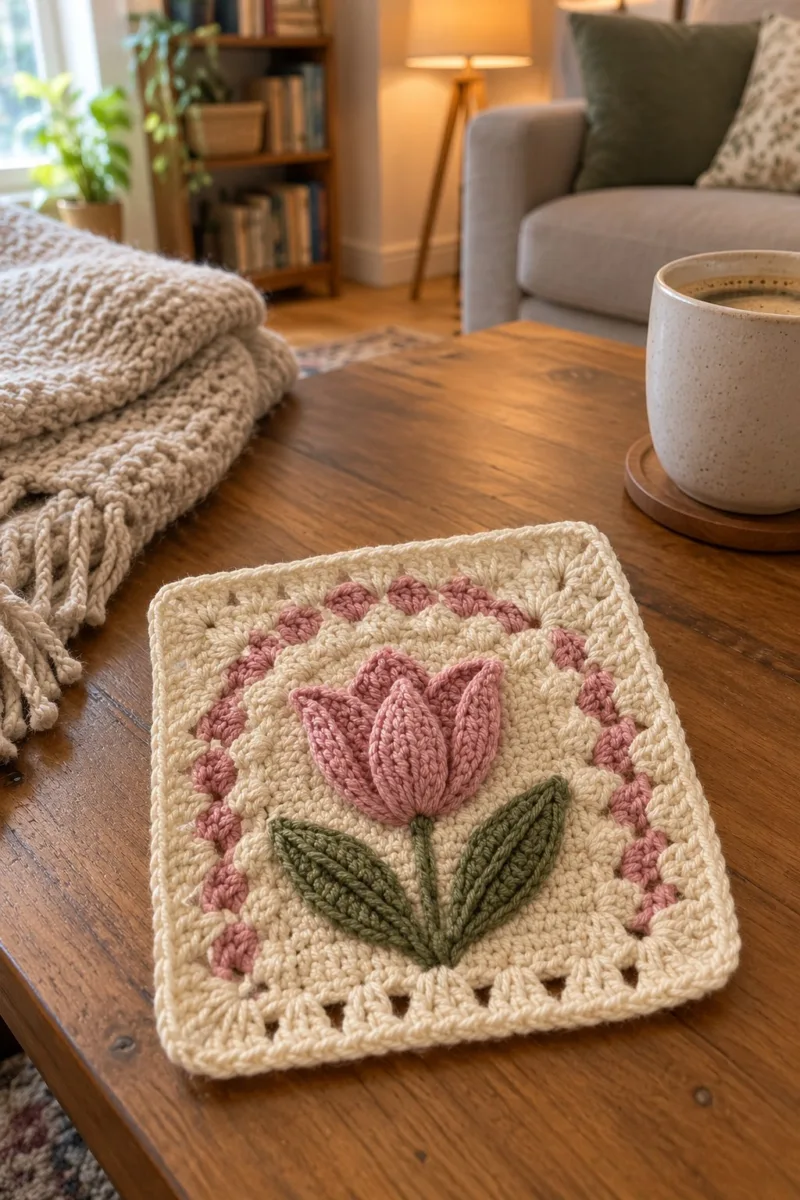
A delicate textured granny square featuring a raised 3D tulip blossom and leaves on a soft cream background. This square uses bobbles, front-post petals, and crisp shell borders in dusty pink and sage green for a vintage-inspired floral motif. Perfect for blankets, cushions, or framed wall art, each square is richly textured and stitches together cleanly for beautiful finished projects.
About This Pink Tulip Granny Square Pattern
This pattern reconstructs the pink tulip granny square pictured: a cream background medallion with a raised dusty-pink tulip bloom and olive-green leaves. The textured petals are worked separately and applied as 3D applique petals. A bobble ring in pink frames the flower, and a fan-shell square border completes the piece with clean corners and delicate openwork.
Designed to stack into blankets or to be used individually as coasters or framed art. The square uses basic post stitches, bobbles, shells and applique techniques to create depth without complicated colorwork.
Why You'll Love This Pink Tulip Granny Square Pattern
I love how this square balances texture and simplicity — the raised tulip petals give a sculptural, vintage feel while the surrounding scallops and bobbles bring a soft, feminine frame. The color palette is soothing and lends itself to so many home styles; I always find myself reaching for projects like this when I want a slow, satisfying make.
- Spring Bloom – Light and fresh designs for warmer days, capturing the renewal and brightness of the season.
Switch Things Up
I absolutely loved redesigning this pink tulip granny square because it offers so many room for personal touches. You can change the petal color to a brighter coral for a modern twist or a deep raspberry for contrast. The shell border is a great place to add metallic or variegated yarn for a subtle shimmer.
I often experiment with petal size by changing the hook for applique: a tighter petal gives sturdier 3D petals that stay upright, while a looser petal looks soft and romantic. You can also alter the square size by adding more rounds of shells or by switching to DK yarn and a smaller hook if you’d like a more delicate look.
Try rotating petal placement or adding an extra central bullion stitch for an alternate flower center. The stem could be braided, or replaced with a tiny crocheted rope for a thicker textured stem. These small adjustments let the same basic structure create a whole range of styles.
Materials Needed
Main Fabric
- Worsted weight yarn (#4), approximately 120g in main cream/ivory (background)
- 50-60g dusty pink (petals and bobble ring)
- 40-50g sage/olive green (leaves and stem)
- Small amounts (10-15g) in accent/contrast colors if desired for extra detailing
Tools Required
- 4.0mm (G) crochet hook for main work
- 3.5mm (E) hook for tighter applique petals and leaves
- Yarn needle for sewing applique pieces
- Scissors
- Stitch markers (at least 3-4)
- Blocking pins and a blocking mat
- Tape measure or ruler
- Optional: small amount of craft glue or Fray Check to secure ends
The Free Pattern
0% complete
Center Medallion
- Round 1: 6 sc in magic ring (6)
- Round 2: 6 inc (12)
- Round 3: (1 sc, inc) x 6 (18)
- Round 4: (2 sc, inc) x 6 (24)
- Round 5: (3 sc, inc) x 6 (30)
- Work these initial rounds in cream/ivory. Keep your tension even so your medallion lays flat; if it ruffles then slow your increases (work an extra even round before next increase)
- Round 6: (4 sc, inc) x 6 (36)
- Round 7: (5 sc, inc) x 6 (42)
- Round 8: (6 sc, inc) x 6 (48)
- Round 9: 1 sc in each st around (48)
- Place a removable marker at the first stitch of Round 9 to track round starts; this round establishes the stable base for petals and later bobbles
- Round 10: 1 sc in each st around (48)
- Round 11: 1 sc in each st around (48)
- Round 12: *sc2tog over next 2 sts, sc in next 10* rep 4 times (40)
- Round 12 begins subtle shaping to prepare for the scallop ring. Check your round is smooth and flat; this row reduces to 40 stitches to create easier spacing for the bobbles later
- Round 13: 1 sc in each st around (40)
- Round 14: 1 sc in each st around (40)
- Round 15: 1 sc in next 4, ch1, sk1, 1 sc in next 30, ch1, sk1, 1 sc in last 4 (40)
- Round 15 uses small chain spaces to give room for the petal base to attach later. Mark the two ch1 spaces — these will align vertically with the tulip stem location
- Round 16: 1 sc in each st and ch1 space around (40)
- Round 17: 1 sc in each st around (40)
- Round 18: *(sc, hdc, dc) in next st, 1 sc in next 4* rep around to create a subtle textured arc (40)
- If your medallion is cupping, press flat with blocking pins; the square rounds will help flatten later. Keep tail long to sew center later if you wish to secure petals through the reverse side.
Petal (Make 3 identical petals)
- Round 1: With dusty pink and 3.5mm hook: ch7, sc in 2nd ch from hook, sc next, hdc next, dc next, tr next, dc in last (creates tapered chain base) (7)
- Round 2: Turn, ch1, sc in each st across (7)
- Round 3: Ch1, sc in first, (hdc, dc, tr, dc, hdc) in next 5 sts as clustered increase to form center height, sc last (7)
- Round 4: Ch1, sc in first, (sc, inc) over next 2 sts, (hdc, dc, tr, dc, hdc) in center 3 sts, (inc, sc) over next 2 sts, sc last (10)
- Work petals on smaller hook to keep them firm. Keep stitches tight; each petal is worked flat then joined along its base to create the 3D petal shape.
- Round 5: Ch1, sc in each st across (10)
- Round 6: Ch1, sc in first 2, (hdc, dc, tr, dc, hdc) in next 6 sts, sc in last 2 (12)
- Round 7: Ch1, sc 2, (sc dec) 2 times, sc 2, (sc inc) 2 times, sc 2 (12)
- Round 8: Ch1, fold petal lengthwise, working through both layers at fold: sc around the fold edge with 10 sc to create a finished lip (10)
- Folding and working through both layers creates the plump, 3D petal. Adjust the number of stitches folded to match your tension; you should end with a smooth, rounded petal approximately 6-7cm tall when using worsted yarn and 3.5mm hook.
- Round 9: Sl st to close through last st, fasten off leaving 20cm tail for sewing. Repeat to make 3 identical petals (3 petals total)
- Sew each petal so inner edges meet neatly; keep tails long for invisible mattress-seam attachment to the medallion base.
Leaf (Make 2 identical leaves)
- Round 1: With sage green and 3.5mm hook: ch10, sc in 2nd ch from hook, sc next 7, sl st to join (8)
- Round 2: Ch1, turn, sc across in back loops only (8) to create a ridge for the center vein
- Round 3: Ch1, sc dec over first 2 sts, sc next 4, sc dec over last 2 (6)
- Round 4: Ch1, sc in first 2, hdc in next 2, sc in last 2 (6)
- Round 5: Ch1, fold lengthwise and sl st through both layers along the long edge to create a neat pointed leaf tip and raised center (6)
- Leaves are worked narrow and then folded to create the distinct ribbed mid-vein visible in the photos. Use slightly tighter tension on the leaf edges to hold shape.
- Round 6: Fasten off leaving 30cm tail for secure sewing to medallion. Repeat to make 2 leaves.
Stem and Applique Attachment
- Round 1: With sage green and 3.5mm hook: ch30 (or ch long enough to run from center base of petals down to leaf join), sl st to beg ch to create a thin cord. Fasten off leaving long tail for sewing
- Make the stem length proportionate to your square. The stem in the image is a slim twisted or i-cord like slip-stitch chain; you can also braid three ch cords for a tactile stem if you prefer a thicker look.
- Round 2: Secure stem by sewing into the center base of petal cluster and then down into the medallion to the point where leaves sit; stitch through the medallion back to front for a neat finish
Petal & Leaf Placement Info
- Position the three petals as a fan: one central petal upright and two side petals slightly angled. Center the bottom of the petal cluster at the top of the pre-marked ch1 spaces on Round 15 of the medallion. Leaves attach symmetrically below the stem at the base of the medallion so their points angle outward.
- Pin petals and leaves in place before sewing. Use the long tails to sew through the medallion firmly, catching multiple rounds so the applique sits flat and secure. Bury tails by weaving them back through several stitches on the reverse.
Pink Bobble Ring (worked into medallion, refer to marked spaces)
- Round 1: Change to dusty pink. Join in one of the evenly spaced spots on Round 13 and ch2 (counts as hdc), *bobble in next 2 sts, hdc in next 3* repeat around to create a ring of bobbles (keep total stitches consistent with medallion — 40)
- Bobble technique: [yo, insert hook, pull up loop] x3, yo and draw through all loops on hook — counts as bobble. After each bobble ch1 to separate from the next if you want defined spacing. The pattern above spaces bobbles every 3 stitches — adjust to 10-12 bobbles evenly around depending on your stitch count.
- Round 2: 1 sc in each st and ch1 space around (40). If you used ch1 separators between bobbles, sc into each ch1 to even the ring.
- Ensure the bobbles are distributed symmetrically around the medallion. If you have fewer or more than 10 bobbles, adjust spacing by adding or removing filler sc between bobbles.
Scalloped Shell Rounds (Creates the scalloped circular frame)
- Round 1: Change to cream and 4.0mm hook: *sk next st, (3 dc, ch1, 3 dc) in next st, sk next st, sc in next 3* rep around creating scallop clusters (40 scallop anchor points)
- Round 2: 1 sc in each st and ch1 space around to tidy the row (40)
- Round 3: *in the top of each shell work (sc, hdc, 3 dc, hdc, sc), sk 2* rep around (40)
- These shell rounds build a nice textured circle that will be squared off later. Keep the increases regular so the circle remains flat; if it waves outwards then add a tightening round (sc in BLO) to pull it slightly inward.
- Round 4: 1 sc in each st around (40)
- Round 5: (sc in next 3, 3 dc in next, sc in next 3, sk 1) repeat around to start building points for later square corners (40)
- If your medallion measures approximately 10cm after these rounds, you are on track. The pictured square is about 13-15cm finished using worsted yarn and 4.0mm hook; measure and adjust if you want larger or smaller squares.
Square Formation Rounds
- Round 1: Change to cream if not already. Working into scallop shell edge, identify four equidistant points to become corners. At each corner: (2 dc, ch2, 2 dc) into the shell peak. Between corners work 1 dc in each of the next 8 sts to form sides. Repeat for all four sides (total stitch count will vary by how many fillers you use; aim for even side counts)
- Mark your four corner points with stitch markers. The corners will transform the round into a square by creating ch-2 corner spaces large enough to expand later rounds into clear straight sides.
- Round 2: Ch3 (counts as dc), dc in same corner ch-2 space, (2 dc, ch2, 2 dc) in each corner space, dc in each side st across between corners. Maintain even numbers of dc across each side; typical count: 2 corner shells + 10 dc per side (adjust to match your stitch number)
- Round 3: Work 1 dc in each dc across sides. At corners work (2 dc, ch2, 2 dc) into ch-2 space. Repeat for 4 corners. This creates a stout square foundation.
- Check the square for flatness. If it puffs at corners then add a tightening round of sc across the sides in BLO; if sides ripple add another dc round with more dc in side spaces to increase.
- Round 4: 1 sc in each st around including corner dcs and ch-2 spaces (work 1 sc, ch2, 1 sc in each corner ch2 to maintain corner gap)
- Round 5: *(ch3, sk1, dc) in side spaces to create tall openwork then 1 sc in next st* rep around to start the decorative row used in photo where small open triangles sit along edges
- The square formation section converts the circular medallion into a square by distributing extra stitches into the corners. Keep notes of your stitch counts per side so subsequent border rounds align evenly.
Side Rows and Corner Stabilizers
- Round 1: Work 1 sc across the side rows evenly (approx 40-48 sc depending on your earlier increases). At corners work (sc, ch2, sc) into ch-2 space to stabilize corners
- Round 2: Work 2 rounds of 1 hdc in each st around to add thickness to the square (this helps when joining squares later)
- If making a blanket, consider adding a third reinforcement round in BLO to create a ridge that will hide seaming when squares are joined by whip stitch or mattress stitch.
Outer Shell Border (Decorative edge seen in photo)
- Round 1: Switch to cream. *Sk next st, (3 dc, ch2, 3 dc) in next st (corner), sk next st, dc in next 4* repeat around, placing shell clusters at corners and shells/spaces evenly along sides
- Round 2: 1 sc in each st and ch2 around (maintain corner sc, ch2, sc)
- Round 3: *(ch3, sk1, dc) in designated open side spaces to recreate the little triangles seen in the photo where the border has tall stitches creating open triangles* repeat across sides
- The photo shows an outer round of grouped 3-dc clusters with ch spaces between them; mimic that arrangement evenly along each side. If your square measures slightly uneven, adjust the number of dc between clusters to preserve corner symmetry.
- Round 4: 1 sc in each st around (edge smoothing round)
- Round 5: Final round: *(sc in next 2, picot in next st) rep around to give a delicate finished rim* or for a cleaner rim: 1 sc in each st, sl st to join. Fasten off and weave in ends.
- Picots are optional. The sample in the photo uses a slightly pointed shell edge — you can replicate that by working small chains and a sl st between outer shells to accentuate corner points.
Finishing Details and Optional Decorative Rounds
- Round 1: If you want the outermost tiny raised edge as in the picture, join dusty pink in the small side indentations and work a round of single bobbles placed at equal intervals along the interior of the outer shell. Work: *ch1, bobble in next shell valley, sc in next 4* repeat around.
- These extra bobbles create the dotted pink arc seen on each side of the picture. Space them to visually mimic the photo — about 6 bobbles per side for a medium square.
- Round 2: Fasten off all colors and weave ends through the reverse. Use a yarn needle to neatly bury tails under multiple stitches on the reverse; trim close but do not cut too short in case of wear and repair needs.
Blocking and Final Shaping
- Wet block the finished square to open the shells and flatten the medallion. Pin to square dimensions (e.g., 13-15cm depending on your gauge) and allow to dry completely. The petals and leaves can be lightly steamed for shaping but avoid direct heat on acrylic fibers.
- Blocking smooths the piece and ensures each square sits flat when joined into projects. Use rustproof pins and a drying board or foam pad.
Alternate Sizes and Gauge Notes
- To increase square size: use heavier yarn and larger hook, or add additional rounds of shells and side dc rows. To decrease: use lighter yarn and smaller hook or skip one of the shell rounds. Keep stitch ratios consistent so petals and bobbles remain proportionate.
- Sample gauge: 10cm square medallion (center to outer shell) = approx 20 rounds when using worsted yarn and 4.0mm hook. Your gauge will vary by tension and yarn brand.
Assembly Instructions
- Pin the three petals in a fan arrangement centered on the medallion top, aligning the bottom of the central petal with the center top ch1 space of Round 15. Sew with long tails using ladder stitch across the base, catching multiple rounds for strength.
- Attach the stem by sewing the chain cord into the medallion center directly below the petal cluster; stitch down through the medallion to where leaves will attach, and fasten securely on the reverse.
- Position the two leaves so their inner bases meet the stem at a slight angle pointing outward; sew firmly through both leaf layers into the medallion foundation to prevent lifting.
- If using multiple squares, block each square flat then join using whip stitch, mattress stitch, or join-as-you-go. When joining, align outer shell points and match bobble positions to keep pattern consistency.
- Weave all tails to the reverse of the square. For durability, anchor tails with a small knot in an inconspicuous place then weave in at least 5 cm through differing directions.
- Lightly steam or pin-shape petals so they sit upright. Insert a few tiny stitches at the base between adjacent petals to help them retain an open tulip shape.
- When assembling a blanket, place squares so tulip orientations alternate for a pleasing overall layout and to avoid all flowers facing one direction.
- Secure any loose decorative bobbles by stitching them through to the reverse and back, creating a small anchor stitch under each bobble to keep them intact over time.
Common Mistakes & How to Fix Them
- Skipping stitch markers at round starts can cause misaligned petals and a square that isn’t symmetrical; mark rounds carefully.
- Inconsistent tension between medallion rounds and square border creates puckering; keep tension steady throughout.
- Joining applique petals without pinning first often shifts placement; pin each petal and check spacing before sewing.
- Using a hook that’s too large will make the 3D petals floppy; use a slightly smaller hook for petals and leaves for crisp definition.
- Not weaving in tails securely after applique can lead to loose petals over time; weave several inches back through the stitches.
- Carrying yarn too tightly during color changes will distort the scallop edge; instead fasten off and rejoin for clean color transitions.
Important Notes
- Use stitch markers consistently at the beginning of each round to avoid counting errors and maintain proper shaping
- Work applique petals on a slightly smaller hook to create firmer textured petals that sit up from the background
- Pin all applique pieces in place before sewing to ensure symmetrical placement and even spacing
- Block each square before joining to ensure consistent size and neat joining edges
- Weave in tails securely and hide ends through several stitches on the reverse for a clean finish
- If your bobbles are loose, tighten by stitching through the center of the bobble to the reverse and securing there
- Keep a small notebook with stitch counts per side and per round when you adapt sizes to help maintain symmetry
- If using natural fibers, be mindful of washing instructions when finishing blankets or cushions
Finishing this tulip granny square is such a satisfying moment — seeing the petals lift from the background feels like magic. Each detail, from the bobbled arch to the neat shell border, adds vintage charm and handcrafted warmth. I love how versatile the square is: make one as a coaster or join many for a dreamy floral blanket. Enjoy the slow, mindful process and don’t forget to show off your finished squares! 🧶🌷
Crochet Abbreviations
- mr
- magic ring
- ch
- chain
- sc
- single crochet
- hdc
- half double crochet
- dc
- double crochet
- tr
- treble crochet (UK = double treble)
- sl st
- slip stitch
- inc
- increase (2 st in same stitch)
- dec
- decrease (sc2tog or invisible decrease as preferred)
- BP
- back post (as in bpdc = back post double crochet)
- FP
- front post (as in fpdc = front post double crochet)
- FLO
- front loops only
- BLO
- back loops only
- st(s)
- stitch(es)
- rep
- repeat
- ( )
- work instructions in brackets as directed
- x
- times
- sk
- skip
You Ask, We Answer
What is the finished size of this square?
Using worsted weight yarn and a 4.0mm hook, each finished square measures approximately 13-15cm (5-6in). Size will vary with gauge and yarn weight.
Can I use different yarn weights?
Yes. Use a hook 1-2 sizes smaller than the yarn label recommends for crisp applique work if you choose a heavier yarn. Lighter yarns will create smaller, more delicate squares.
Do I need to sew the petals on, or can they be crocheted in place?
For the exact 3D look pictured, sew petals on as appliques. You can crochet petals in place by working post stitches from the medallion, but this will change the texture and placement control.
How much yarn should I buy for a blanket?
Estimate about 120g of cream and 50-60g each for pink and green per 8-10 squares. For a full blanket, multiply by number of squares and add 10% for join/edging waste.
How do I keep the petals from flopping over time?
Work petals on a smaller hook and use firmer yarn or a tight stitch. You can also lightly starch or use a small strip of interfacing sewn inside the folded petal base for extra structure.
Can this square be machine washed?
Follow yarn manufacturer instructions. Acrylic or superwash wool squares are generally machine washable on a gentle cycle; always block and reshape while damp.
How many bobbles should I place per side?
In the pictured square there are roughly 6 bobbles per side. Space them evenly and adjust depending on your stitch counts so they form a symmetrical ring.
What joining method gives the neatest finish?
Mattress stitch or whip stitch with matching yarn gives a tidy look. For a decorative join, use a contrasting slip-stitch join or a lace join to emphasize the shell edges.