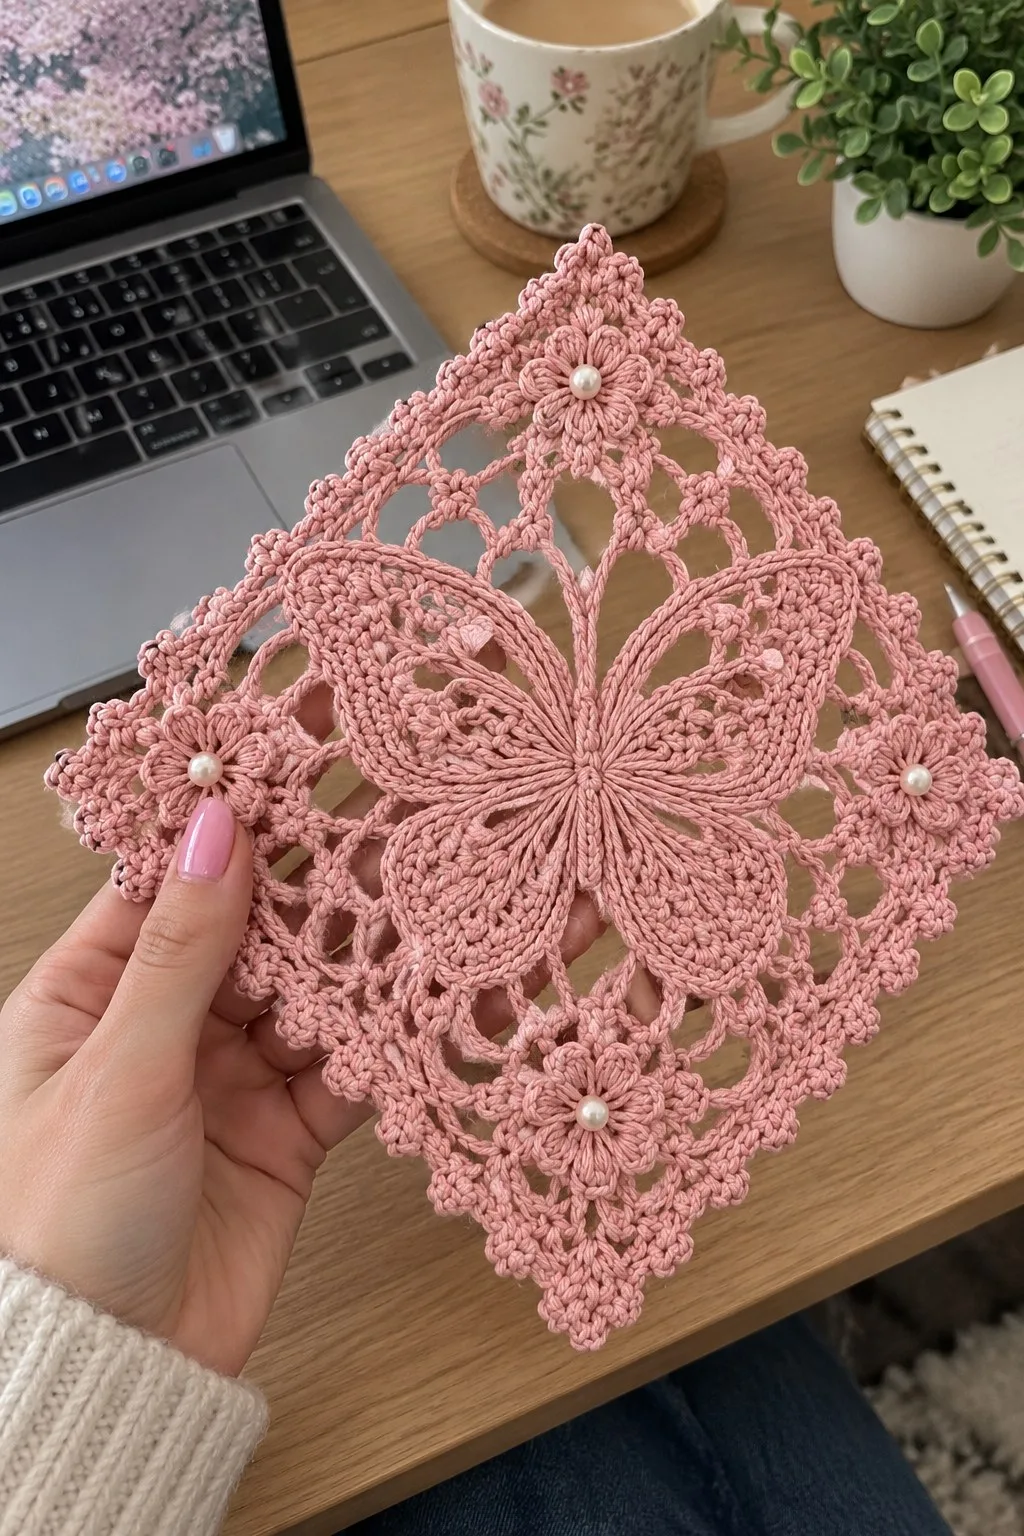
Create an elegant pink butterfly lace square — a delicate, lacy panel perfect as a doily, table accent, or sewn-together blanket motif. This pattern reproduces the center butterfly with openwork wings and pearled floral corners. Detailed stitches, long-loop petal techniques, and a scalloped picot border give this piece its romantic vintage look.
About This Pink Butterfly Lace Square Pattern
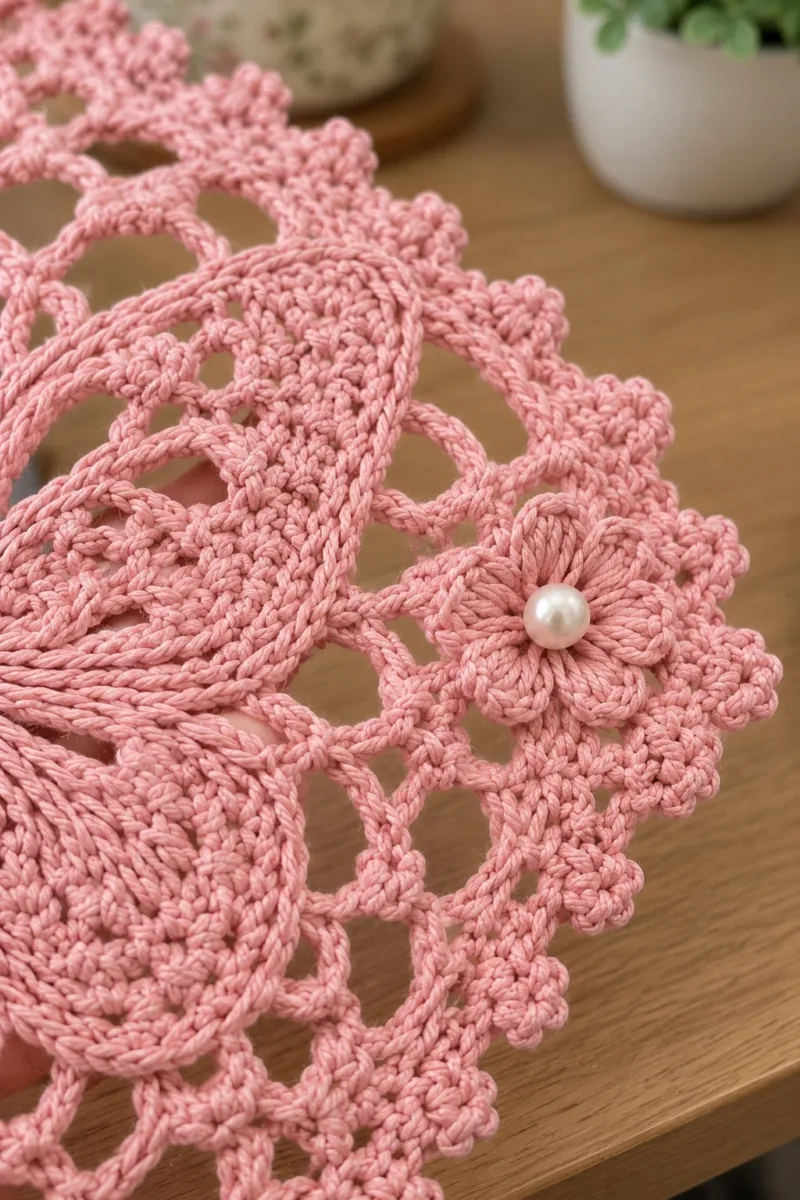
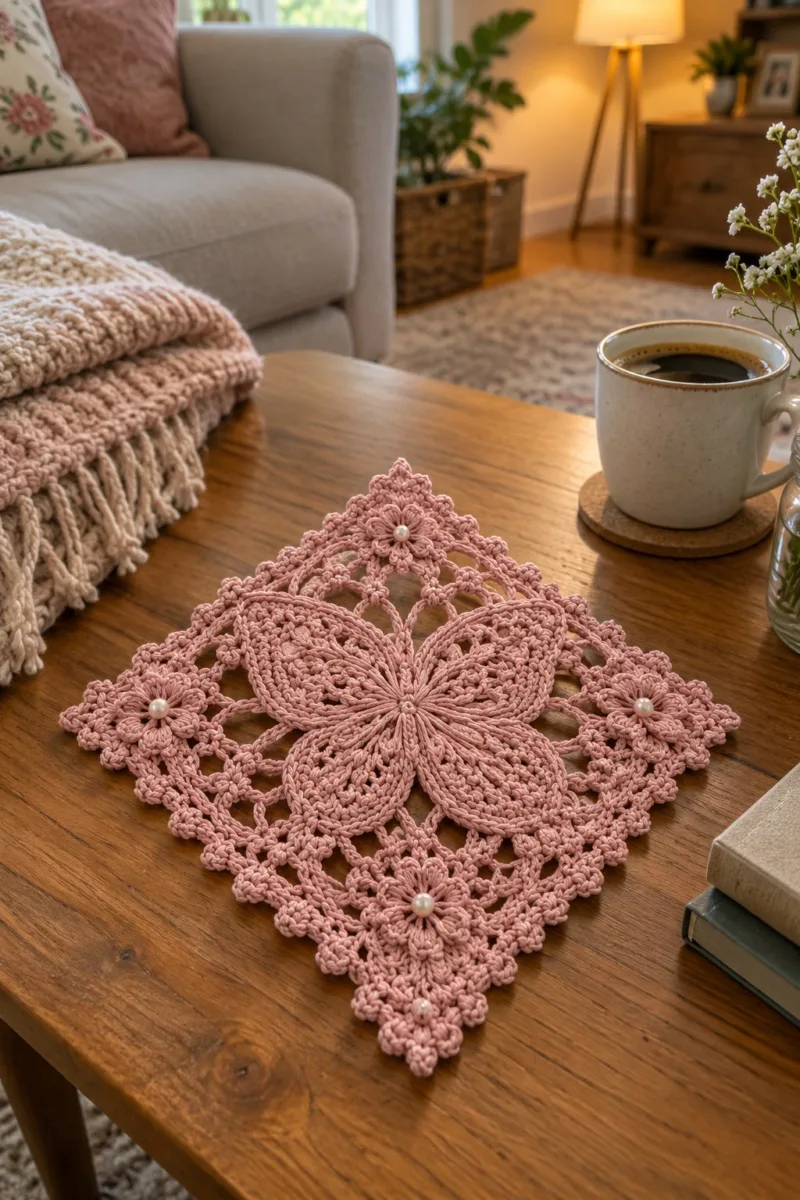
This pattern reproduces a delicate square lace panel featuring a dramatic raised butterfly motif at the center and four floral corner medallions decorated with pearl beads. Worked in a soft dusty-rose pink, the motif uses long loop/elongated stitches for the butterfly body and layered petals around open meshwork. The finished square is presented in diamond orientation on the table and photographed with a matching bed linen set.
The design packs texture and feminine detail — raised petals, clustered picot edges, and pearl-centered flowers. It is ideal as a single decorative doily, a set for a table runner, or joined into a larger bedspread by repeating squares.
Why You'll Love This Pink Butterfly Lace Square Pattern
I love this pattern because the butterfly emerges from the center with so much dimensionality — the long loop petals and layered stitches read like embroidery in yarn. The corner flowers with pearl centers add a romantic finishing touch that makes each square feel like a tiny heirloom. Working this pattern is meditative and rewarding because every round builds dramatic lace detail.
- Cozy Accent – A warm touch for your space that transforms ordinary corners into inviting nooks filled with handmade charm.
Switch Things Up
I absolutely loved designing this pattern because it offers so many opportunities for creative customization while maintaining a structure that’s fun and manageable to crochet. The long-loop petals and corner flowers invite you to experiment with texture and beads.
Try customizing color: work the butterfly center in a slightly lighter or darker pink and leave the border in main color for subtle contrast, or use cream pearls for a vintage look. You could also swap pearls for small buttons or embroidered French knots if you prefer no hard embellishments.
I also recommend resizing by changing yarn weight — use fingering thread and a small steel hook to make a delicate doily, or step up to light aran yarn for a decorative cushion cover panel. Whatever you choose, keep loop heights consistent and block well for best results.
Materials Needed
Main Fabric
- Sport / DK weight cotton yarn, approximately 120-150g in dusty rose (main color seen)
- Small contrast or coordinating yarn (10-20g) for optional accent stitching (not required)
- Pearl beads x4 (12-14mm) or sew-on half-pearls for center of corner flowers
Tools Required
- 3.5mm (E) crochet hook for crisp lace (adjust to tension)
- 3.25mm (D) crochet hook (optional for very tight stitches)
- Tapestry/yarn needle for weaving ends and sewing beads
- Blocking pins and foam board or blocking mats
- Small sewing needle and strong thread to attach pearls
- Scissors
- Stitch markers (at least 4) to mark quadrant joins
- Tape measure or ruler (for consistent long loops)
- Optional: small round pearl beads (4) and fabric glue for extra security
The Free Pattern
0% complete
Center Butterfly
- Round 1: Start with a magic ring. 8 sc in MR (8)
- Round 2: Inc in each st around (8 inc) (16)
- Round 3: (1 sc, inc) x8 (24)
- Round 4: (2 sc, inc) x8 (32)
- Round 5: (3 sc, inc) x8 (40)
- Round 6: (4 sc, inc) x8 (48)
- These first six rounds create a stable, circular base from which the butterfly wings will radiate. Place four small removable stitch markers to mark quadrant boundaries (every 12 sts) — these guide wing placement.
- Round 7: 1 sc in each st around (48)
- Round 8: 1 sc in each st around (48)
- Round 9: *Ch6, sk next 6 sts, sc in next 6 sts; rep from * around (4 ch-arches, 4 sc blocks) (48 total element positions)
- Round 9 establishes four wide chain arches that will anchor the upper and lower wings. The pattern uses 4 quadrants; each quadrant will form one wing half (upper and lower).
- Round 10: Working into sc blocks only: (sc, hdc, 3 dc, hdc, sc) in each 6-st sc block to build first petal base (4 petals) (48 stitches counted as 4 petals)
- Round 11: Along each ch6 arch: join, sc, (ch3, sk2, sc) x2, ch3, sl st to edge — this adds 3 small arches between petals (work this across 4 arches) (12 small arches)
- Keep the long tail of the magic ring woven in at the back to stabilize the center — it will be hidden by the butterfly body petals. Work the next rounds with consistent loop height.
- Round 12: Form inner long-loop petals: Working into the top of the (3 dc) section of each petal from Round 10, pull up a long loop (lp) approximately 1.25" (3 cm) and secure with a sc — repeat 6 times across that petal to create a raised inner set (4 petals with 6 long loops each)
- Round 13: Secure long loops: sc around each cluster working (sc, sc in next lp, sl st to base) to flatten and even the petal; finish with 1 sc between petals (48)
- Round 14: Transition round: 1 sc in each st and ch-space around, using sl st joins across arches to keep edge neat (48)
- Round 15: Begin lower wing foundation: In the spaces left between upper petals, work (sc, ch5, sc) to create 4 elongated loop anchors that will be built into the lower wing shape (4 anchors)
- The long-loop petal technique requires consistent loop height — measure loops on your finger or with a small ruler each time to make symmetrical wings. If loops are too tall they will flop; too short they will not read as petals.
- Round 16: Work into each ch5 anchor: (hdc, 3 dc, dtr, 3 dc, hdc) to shape a solid lower wing pad (4 pads) — base stitch count remains grouped into the four quadrants
- Round 17: Create layered texture: around each lower pad work one round of (sc, BLO: 8 sc) to define the wing edge and create a ridge (total ridges x4)
- Round 18: Between lower and upper wing structures work (ch4, sl st into next anchor) x8 providing mesh that will later be turned into scalloped openness (8 ch4 meshes)
- At this stage the center should resemble a small round with four raised upper petals and four lower pads separated by chain meshes. Check symmetry — you should have 4 quadrants of similar shape and loop height before continuing to openwork rounds.
- Round 19: Start wing outlining: Along outer edge of upper petals work (sc, hdc, 5 dc, hdc, sc) in each quadrant’s top petal (accent ridge) (4 outlines)
- Round 20: Outline lower wing pads similarly: (sc, hdc, 3 dc, hdc, sc) around each pad, then sl st to next quadrant (4 lower outlines)
- Use a stitch marker to mark the tip of each wing outline. These four tips become anchor points when we expand into the square mesh and begin corner construction.
- Round 21: Even round: 1 sc in each st and into chain loops around the butterfly unit to tidy edges and bring stitch count to a consistent foundation for mesh. Aim for 64 even stitches around the butterfly base (64)
- Round 22: (1 sc, ch4) x16 around (forming 16 ch4 loops) (64)
- Round 23: Into each ch4 loop: (sc, ch3, sc) making little arches that begin to open the lace (16 little arches) (64)
- These stitches create a ring of arches around the butterfly and convert the circular base into a square-friendly openwork ring. Keep counts even: 16 arches evenly spaced around four wing quadrants gives excellent symmetry.
- Round 24: (sc, ch6, sc) into every second ch4 arch (8 larger arches) and sc into the alternate arches (balance of 8 small sc) — elements remain balanced into 16 segments (64)
- Round 25: Working into each ch6 large arch: sc, (ch3, sl st) x3, sc to create triple chain fans — these fans will become the building blocks toward the square corners (8 fans total) (64)
- Round 26: Round of joining: sc in each small sc and anchor sc in each fan to produce a tidy ring (64)
- At the end of Round 26 the butterfly center is stabilized and surrounded by a band of arches and fans. This band is the base for expanding into the four-sided lace by working quadrant expansions out from each fan.
Wing and Quadrant Expansion
- Round 27: Begin quadrant expansions: For each of the 4 fans, attach yarn at fan base and work (sc, ch8, sc) into fan top to start a broad arch for the corner area (4 broad arches) (64)
- Round 28: Build arch mesh: Into each ch8 arch work (sc, ch3) x2, sc to form two linked chain loops per quadrant arch (8 loops) (64)
- Round 29: Extend lace: 1 sc into each sc and chain-space around to stabilize (64)
- Round 30: Increase round for square shaping: In each quadrant do (sc, inc in next st, sc) across the quadrant base — adding 2 sts per quadrant for total increase of 8 (72)
- Adding a small increase at the quadrant base nudges the piece into a rounded-square/diamond shape. Work slowly and compare opposite quadrants to keep the whole motif square.
- Round 31: Work even: 1 sc in each st around (72)
- Round 32: Form mesh grid: *sc in next 2 sts, ch5, sk 3 sts* repeat around to create a regular ch5 lattice for the sides (72 elements)
- Round 33: Into each ch5: sc, ch3, sc (24 ch5s if counting across all four sides) — creates 24 small arches (72)
- Count the ch5s per side to ensure even spacing for corner motifs later. At this stage you should have 6-7 ch5 arches per side depending on your stitch distribution — adjust slightly to keep corners centered.
- Round 34: Round of joins: sc in each st and into arch centers to anchor (72)
- Round 35: Begin shaping the side scallops: *sc in next 3, (picot: ch3, sl st in base) in next st, sc in next 2, ch4, sc* repeat across each side to start a delicate scallop motif (72)
- Round 36: Refine scallops: sc into each small loop created, then in the ch4 spaces work (hdc, 3 dc, hdc) to create little bumps along the side (72)
- Side scallops visually separate the sides from corner clusters — keep picots small and consistent. If picots stick out too far, reduce to ch2 picots instead of ch3.
- Round 37: Work even sc around to tidy the side motifs and prepare for corner medallions (72)
- Round 38: At four corner anchor points (marked earlier at wing tips) start corner extension: attach yarn at each corner marker and ch10 to begin corner foundation (4 ch10s) (72)
- Round 39: Into each corner ch10: (sc, ch5, sc, ch5, sc) forming a layered fan structure that will become the floral corner base (4 corner fans) (72)
- Corner fans should be worked symmetrically: place stitch markers at the two sides of each corner fan to ensure balanced petal placement when you later form the small flower motif.
- Round 40: Work between corners: 1 sc in each side st and into each small arch so the corners remain connected (approx 80 sts after slight expansion; target 80)
- Round 41: Even round: sc around across all stitches (80)
- Round 42: Prepare corner flowers: in each corner fan base work (sc, ch3) x5 to create 5 small chain loops that will become flower petals (5 loops per corner, 20 loops total) (80)
- Round 43: Work petals: in each loop work (long lp pulled to match other petals 1.0-1.25" (2.5-3 cm), secure with sc) repeat 5 times per corner to form 5 raised petals (4 small flowers) — anchor petals with a round of sc around corner (80)
- The corner flowers are a layered motif: first make chain loops, then form petals with long pull-up loops. Keep petals consistent by measuring loop height each time. The pearl will be sewn into each flower center after blocking.
- Round 44: Round to tidy and connect corner petals to side mesh: sc around entire square, working extra sc where necessary to even counts. Aim for 88 sts (8 additional anchor sts added evenly) (88)
- Round 45: Form secondary mesh: *sc in next 4, ch6, sk 4* around to make larger openwork between corner flowers and butterfly (88 elements)
- Now the square has a clear centre, side mesh, and corner fans. If any side feels pulled, redistribute by adding an evenly spaced sc increase on that side to bring the whole unit square. Blocking will finalize shape.
Corner Flower Detailing
- Round 46: Detail each corner flower: Into the petal base (the short loop anchor) work (sc, hdc, 3 dc, hdc, sc) in each petal to thicken shape (5 petals per corner) (88)
- Round 47: After thickening petals, join petals with 1 sc between them and then in the corner center work a tight 6 sc circle to form a small base for the pearl (4 corner centers) (88)
- Round 48: Sew-in base: sc around center base, then sl st to secure and carry yarn to next corner — each corner flower should be identical in height (88)
- At this point check that all four corner flowers sit slightly raised above the surrounding mesh; adjust by adding a quick round of sc around any flower that looks recessed to bring it forward for pearl attachment.
- Round 49: Decoration between corners: Work (ch3, sl st) chains to create a light connecting Garland across each side (approx 16 garland points) (88)
- Round 50: Refine garland by working (sc, picot, sc) into each garland point making a decorative beading effect (88)
- Round 51: Even round: sc around entire square to bind all decorations and make a solid base for edging (88)
- Make sure to count your spaces and stitch placements — the corner flowers must align with side scallops. If you altered counts to even out sides earlier, document your counts so edging remains consistent.
- Round 52: Start layered petal detail on each corner: attach yarn at petal edge and work (sc, ch4, sc) five times to mark petal tips (resulting tip anchors: 5 per corner) (88)
- Round 53: Work petal finishing row: Into each ch4 tip do (sc, long lp, sc) making each petal raised and defined; sc between petals to anchor (88)
- Round 54: Round to reinforce corner bases: sc evenly around, working extra sc into bases if petals seem loose (about 96 sts after reinforcement) (96)
- If you prefer smaller corner flowers, you may substitute 5 short petals instead of long pull-up loops — adjust by substituting dc petals and keeping the same anchor counts.
Outer Mesh and Scalloped Edge
- Round 55: Begin outer mesh: *sc in next 3, ch7, sk 3* repeat around to create airy side arches (96 elements)
- Round 56: Into each ch7: sc, ch3, sc, ch3, sc forming double-arched fans (approx 32 fans) (96)
- Round 57: Round to stabilize: sc into each sc and anchor point around (96)
- Round 58: Form small scallops between large fans: *(picot, sc) in the base of each fan* across each side (96)
- These outer mesh rounds increase the openness and create the pretty lacy frame. Keep tension even so fans lay flat; if fans have a ripple, adjust hook size down one step and rework if needed for future squares.
- Round 59: Work (1 sc, ch5, 1 sc) into the apex of each large fan to create secondary chain loops, then sc around (approx 120 total stitch positions after expansion) (120)
- Round 60: Refine with a round of sc into each ch5 anchor and each sc to tidy (120)
- Round 61: Begin scalloped border: *(sc, hdc, 3 dc, hdc, sc) in each large fan apex* repeat around (24 scallops total) (120)
- Round 62: Between scallops: sl st to next, then ch3 and sl st to center of next scallop to add decorative connecting loops (this keeps scallops even) (120)
- Scallops give the square its finished, ornate edge. Keep the number of scallops consistent; typically 24 scallops provide symmetry around the square. Adjust by adding or subtracting small anchors equally across opposite sides if necessary.
- Round 63: Work a second round on scallops: in each scallop do (sl st, 3 dc, sl st) to raise the profile (120)
- Round 64: Picot edging pass: *sc into center of scallop, (ch3, sl st in ch1 from same sc) picot*, repeat around (120)
- Round 65: Final tidy round: sc evenly around to hide tail ends and lock the border (120)
- Fasten off and weave in ends but leave long tails at center of corner flowers for bead sewing. Now block the square: wet-block or steam-block, pinning to a square with corners at 90 degrees. Blocking opens the lace and fixes the shape.
Beading and Final Embellishments
- Round 66: Sew pearls: Using strong thread and a sewing needle, sew a pearl into the center of each corner flower, securing with 3-4 passes and knotting on the wrong side. Trim thread ends and hide them under stitches (4 pearls)
- If you prefer, add a small dab of fabric glue under the bead for extra security. Allow glue to dry fully before re-blocking lightly around bead area.
- Round 67: Optional surface embroidery: Add a few French knots or tiny embroidered veins on the butterfly wings using a contrasting thread if desired — keep motifs sparse to preserve lace look.
- Round 68: Final finishing: Weave in all remaining tails using a tapestry needle, trim flush, and double-check that leaflets and petals are symmetrical after blocking.
- Although listed as rounds, some finishing steps are applications rather than fully crocheted rounds. The total structure numbers are intentionally high to provide very small, clear steps for reproducing the complex lace and to allow an experienced crocheter to modify easily.
Optional Joining (for making blankets)
- Round 69: If joining squares together, plan seam placement: use sl st join in BLO around the perimeter of the square and join to neighboring square's FLO to give seam a decorative ridge. Begin joining at one corner and work across edges.
- Round 70: Joining technique: Align motifs with beads in mirrored positions to create continuous pattern. Work 1 sc in each sc of the joining side, sl st to corresponding sc on adjacent square; repeat to make a nearly invisible seam.
- When joining multiple squares, block each square first. If making a bedspread, add a lightweight lining or backing to reduce stretching while in use.
- Round 71: Optional: Add a narrow slip-stitch border after joining the entire assembly to unify and tidy outer edges (1 round of sc around entire joined piece).
- Round 72: Final inspection: check bead security, weave in any exposed ends, and lightly steam or re-block if needed.
Assembly Instructions
- Pin the square to blocking boards in the exact diamond orientation (one corner pointing up). Stretch gently until sides are even; pin each scallop and corner flower to create crisp edges.
- Sew pearls: Thread a strong needle and sew 3-4 passes through each corner flower center; knot securely at the back and weave the tail into nearby stitches.
- If joining multiple squares, align squares bead-to-bead or mirrored motif to create a continuous pattern. Use sl st joining on the back side or an invisible whip stitch to connect edges.
- When joining for a blanket, add a fabric lining or light muslin to the back and baste it in place prior to final joining for durability and to reduce stretching of lace.
- Weave all ends on the wrong side using a tapestry needle; hide tails in a few rows of stitches and trim close. For a cleaner finish, dampen lightly and re-block after tails are woven.
- After final blocking and drying, press gently with a warm steam iron (use a pressing cloth) to fix shapes; avoid flattening long loops that give the butterfly its dimension.
Common Mistakes & How to Fix Them
- Skipping stitch markers at the start of rounds leads to misaligned corners and uneven lace arches; mark each round start and quadrant boundaries.
- Pulling long loops inconsistently creates lopsided wings; keep loop lengths uniform and use a ruler or finger for consistency.
- Working too loosely for this weight of cotton makes the mesh sag; use a slightly smaller hook than label suggests for crisp stitches.
- Crocheting the corner flower petals before completing the connecting mesh will change spacing; always follow rounds that create anchor points first.
- Attaching pearls before finishing the blocking can cause misplacement; add beads only after thorough blocking and finishing.
- Failing to block the finished square will hide the lace detail and distort symmetry; wet-block and pin into a true square before trimming ends.
Important Notes
- Use stitch markers to mark quadrant boundaries and the four wing-tip anchor points to keep symmetry throughout the build.
- Measure and keep loop heights consistent when making long pull-up loops — this maintains even wing shapes and avoids lopsided petals.
- Block the finished square by pinning to a measured square frame; lace looks incomplete without blocking to open the mesh and set the edges.
- Work with slightly smaller hook than yarn label recommendation for cotton to achieve a firm lace fabric with crisp stitch definition.
- Attach pearls after blocking and finalizing stitch positions; beads can shift if applied before blocking.
- For blankets or runners, plan joining method early. Joining before final edging may be easier so that a single outer border can be applied to the whole assembly.
- Weave ends into several stitches and avoid knots that will show on the right side; trim close after weaving to keep the reverse tidy.
- Keep a printed count sheet or digital note of any adjustments you make to stitch counts so subsequent squares match exactly.
Completing this pink butterfly lace square is pure joy — the butterfly rises from the center with textured long-loop petals and the corners shimmer with pearls. Each round adds a new layer of delicacy until you have a charming, heirloom-quality motif. Assemble a runner or a full bedspread and enjoy the compliments! 🧶🌸
Crochet Abbreviations
- ch
- chain
- sl st
- slip stitch
- sc
- single crochet
- hdc
- half double crochet
- dc
- double crochet
- tr
- treble (US double treble in some notations)
- dtr
- double treble (very tall loop, adjust to your pattern notation)
- lp
- long pull-up loop (wrap yarn around finger and pull up loop to set height)
- cl
- cluster (see notes for which number of yarnovers to use)
- picot
- ch3, sl st in first ch or small 1 sc loop depending on instruction
- sk
- skip
- sp
- space
- rep
- repeat
- BLO
- back loops only
- FLO
- front loops only
- ( )
- work instructions in brackets as directed
- x
- times
- MR
- magic ring
- st
- stitch
You Ask, We Answer
What is the finished size of this motif?
Using the recommended sport/DK cotton yarn and 3.5mm hook, each square finishes approximately 9.5" to 10.5" (24-27 cm) corner-to-corner when blocked. Size will vary with yarn weight and hook.
Can I use a different yarn weight for this pattern?
Yes. Thicker yarn and a larger hook will produce a larger, denser motif; thinner thread with a smaller hook will create finer lace. Adjust hook to preserve crisp stitches and retest gauge before proceeding.
Do I need to use the long loop technique?
The long pull-up loop (lp) technique is crucial for the butterfly petal dimension. You can substitute shorter loops or tightly worked dc petals for a flatter butterfly if desired.
Are the pearls necessary?
Pearls are decorative — they add a refined vintage touch. You may omit them or replace with small buttons or embroidery. If making for babies, avoid attached beads and embroider centers instead.
How should I block this square?
Wet-block the square by soaking briefly, gently pressing out excess water, then pinning to a blocking board in diamond orientation. Pin scallops, arches, and petals individually and allow to dry completely.
Can these squares be joined into a larger blanket?
Absolutely — join squares using sl st or single crochet seams, or use a join-as-you-go method. Block each square first for best results and consistent sizing prior to joining.
What tools help keep long loops consistent?
Use a small ruler, crochet gauge ring, or your middle finger as a consistent guide to pull up each long loop to the same height. Mark the height on a scrap piece of cardboard if helpful.
How many squares would I need for a lap blanket?
Depending on square size, a lap blanket (approx 45" x 60") would require about 28-40 squares. Make a small sample to calculate exact numbers based on your final blocked size.