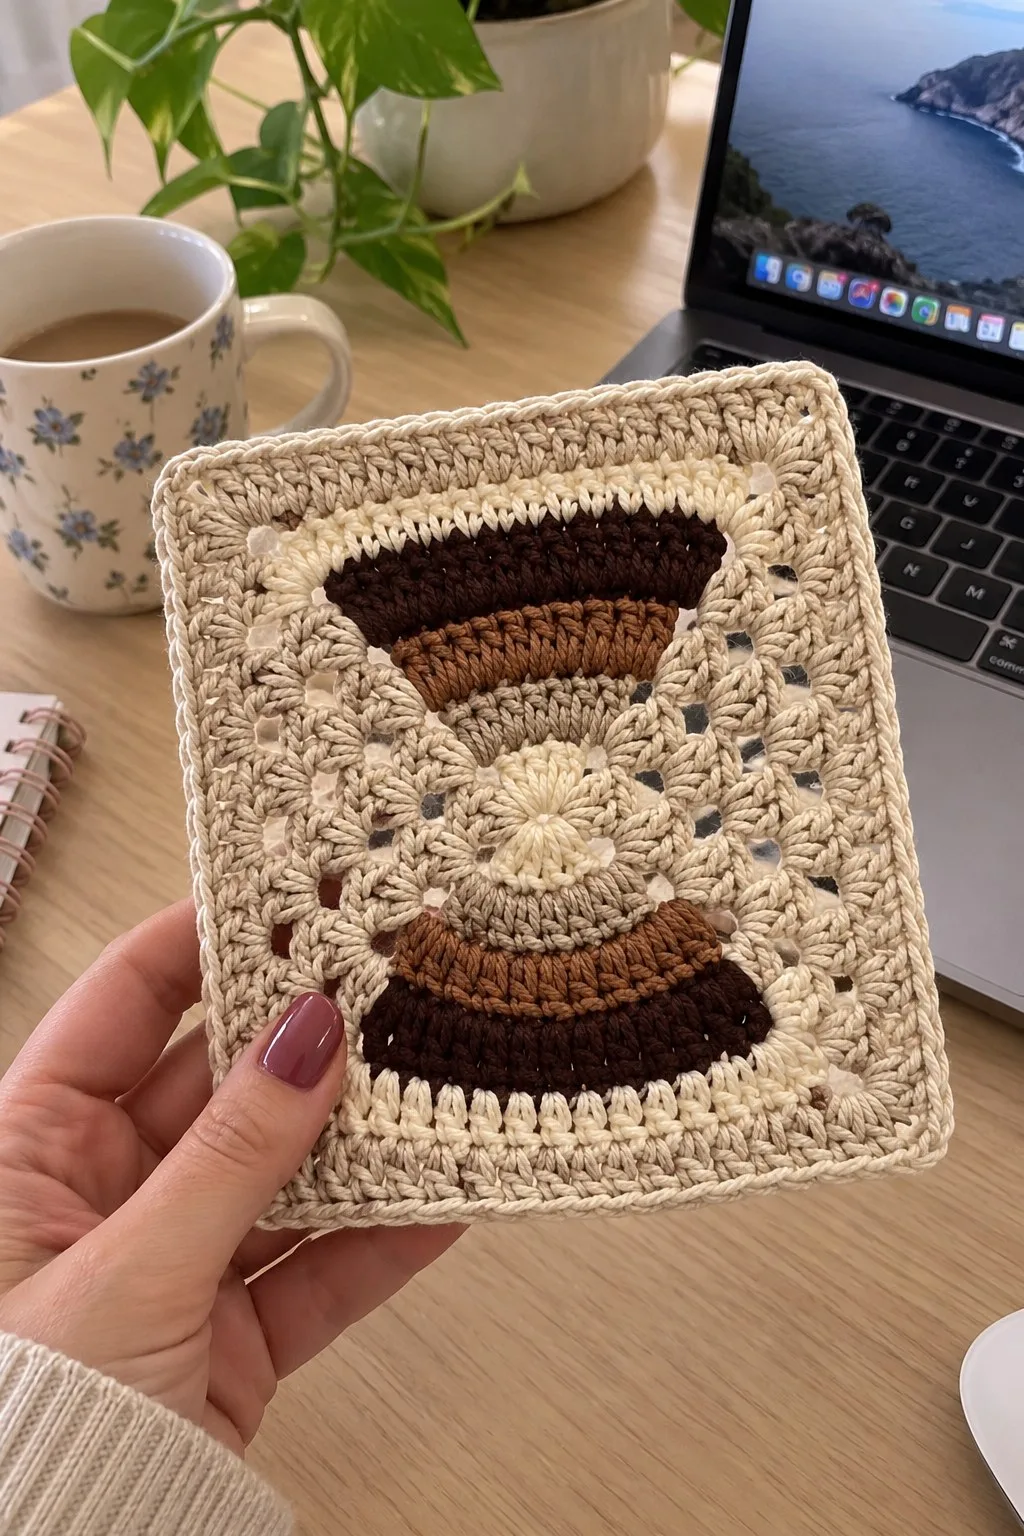
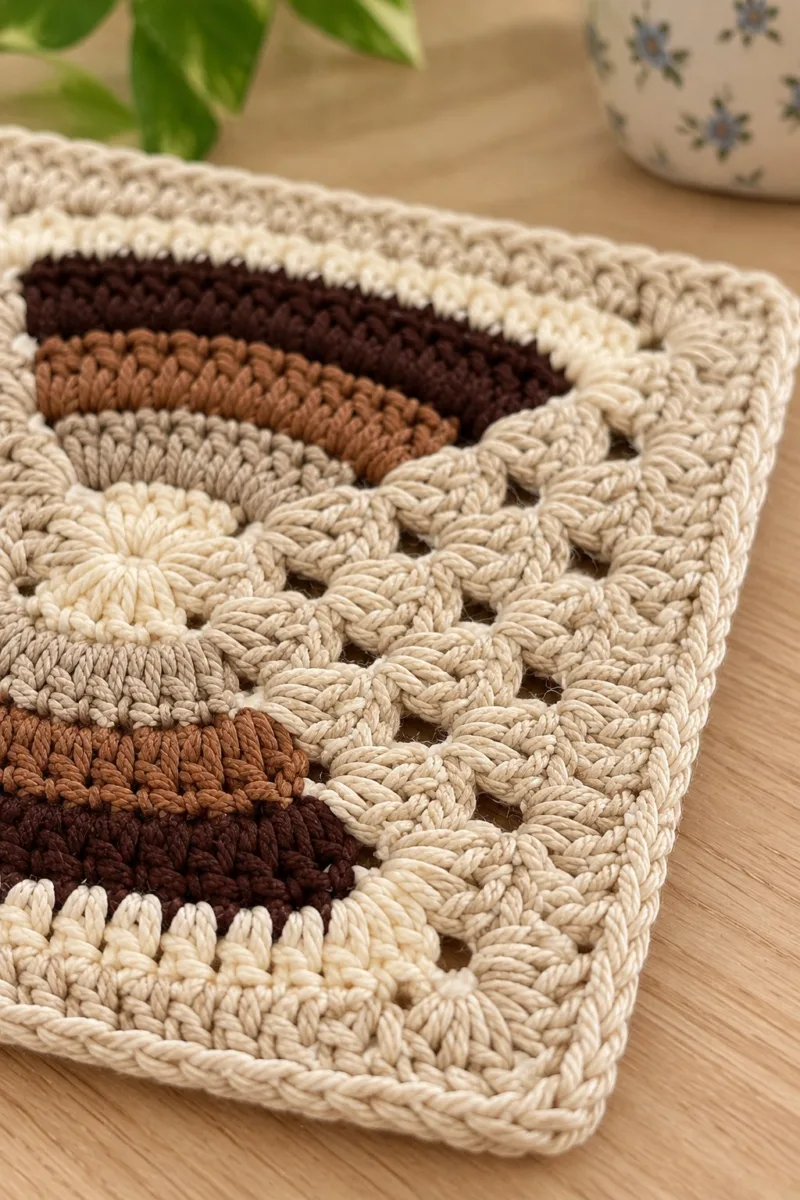
A cozy, neutral-toned geometric square that mixes classic granny stitch texture with stacked semicircle colorwork. This square features a central radiating medallion, two stacked rainbow-style arches in warm browns, and an airy shell/granny background finished with a clean single-colour border. Perfect for blankets, cushions or framed wall panels — it looks beautiful alone or joined into a larger afghan.
About This Brown and White Geometric Square Pattern
This pattern recreates a textured, geometric square in warm neutrals — creamy off-white background with concentric semicircles in mocha, caramel and deep espresso. The design uses a centered medallion, short-rowed semicircles for the top and bottom color bands, and a classic granny-style lacy field finished with a tidy single-colour border. The stitches are worked in the round and in partial rounds (short rows) to create the curved stacked motif inside a square frame. The overall look is modern, cozy, and highly versatile.
Unique features include semi-circular colorwork built into rounds (no separate appliques) and a raised medallion center created with puff-style clusters. Works beautifully in cotton or cotton-blend yarns for drapey, home-friendly texture.
Why You'll Love This Brown and White Geometric Square Pattern
I love how the warm browns sit against the soft cream — it feels both modern and comforting. The stacked arcs add an unexpected geometric rhythm that looks designer-made. I also enjoy how the lacy granny stitches keep the square light and textured rather than flat; it’s a satisfying mix of structure and airiness that photographs beautifully and joins seamlessly into larger projects.
- Cozy Accent – A warm touch for your space that transforms ordinary corners into inviting nooks filled with handmade charm.
Switch Things Up
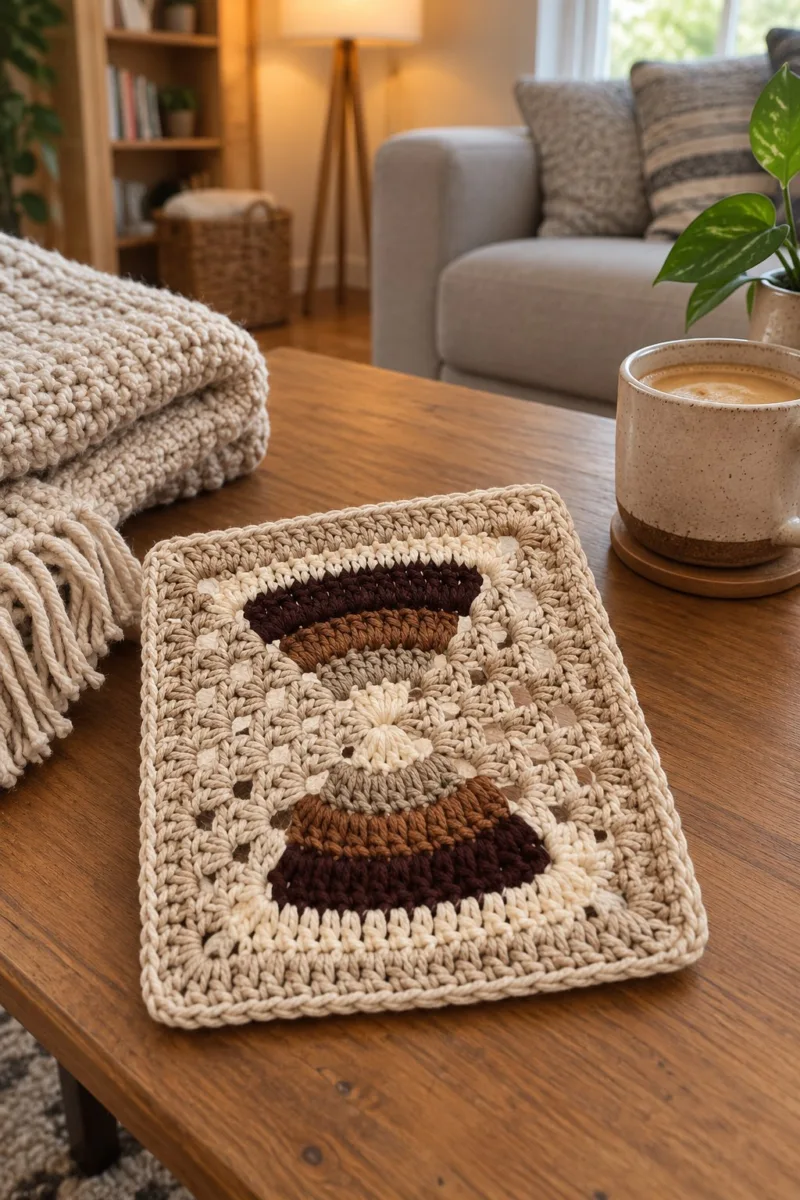
I absolutely love how this square lets you customize color and contrast — switch the brown tones for any tonal set you love, like cool blues or sunset pinks, and the geometric arc still reads beautifully. You can experiment by using a thicker yarn and larger hook to make this into a striking oversized motif for a pillow front.
I also like changing the center medallion: try a totally flat sc center instead of clusters for a subtler look, or work extra puff clusters for more texture. If you want an even airier version, swap the worsted cotton for a DK-weight cotton and a smaller hook and add extra rounds to reach the same finished size.
For joining, I often prefer a visible contrasting join for a graphic look, or a seamless whip-stitch in the same cream for a calm, uninterrupted field. Either way the construction is forgiving and very satisfying to tweak.
Materials Needed
Main Fabric
- Worsted weight yarn (#4) cotton or cotton blend, approximately 120g in background cream (e.g., Ivory or Natural)
- 50-60g in dark brown (espresso) for the deepest arc
- 40-50g in warm medium brown (caramel) for middle arc
- 30-40g in light taupe/beige for the inner arc and small medallion
- Small amount (10-15g) in accent off-white/ivory for center puff detail and transition rows
Tools Required
- 5.0mm (H) crochet hook for main work (adjust to yarn and tension)
- 4.0mm (G) crochet hook for slightly tighter border or detail (optional)
- Yarn needle for weaving ends and seaming
- Scissors
- Stitch markers (at least 4)
- Measuring tape or ruler to check gauge
- Blocking pins and mat for finishing
- Optional: tapestry needle and small amount of matching thread for secure color joins
The Free Pattern
0% complete
Notes & Gauge
- This pattern is written in rounds and short-row partial rounds. Gauge is not critical but target approximately 14 dc and 8 rows = 10cm/4in using 5.0mm hook in worsted cotton. Work loosely enough to create soft texture but tightly enough to avoid large holes in colorwork arcs.
- Always use stitch markers to mark the beginning of rounds. The square is worked from the center outward. Color changes are done by completing the last yarn over of the last stitch in the old color with the new color, carrying short tails to weave in, or by fastening off and sewing in ends if preferred.
Center Medallion
- Round 1: Make a magic ring. Ch 2 (counts as first dc). Work 7 dc into ring. Join with sl st to top of ch-2. (8)
- Round 2: Ch 2, dc inc in each st around (work 2 dc in each stitch). Join with sl st to top of ch-2. (16)
- Round 3: Ch 2, (1 dc, inc) x 8 around. Join. (24)
- Round 4: Ch 2, (2 dc, inc) x 8 around. Join. (32)
- Round 5: Ch 2, (3 dc, inc) x 8 around. Join. (40)
- Round 6: Ch 2, (4 dc, inc) x 8 around. Join. (48)
- Check that your medallion lays flat. If there is cupping add one more increase round: (5 dc, inc) x 8 = 56 sts. I used 48 sts to keep a compact center that allows stacked semicircles to sit inside.
- Round 7: Ch 2. Work 1 dc in each st around. Join. (48)
- Round 8: Ch 1, switch to accent off-white for a small puff detail: Make 8 cluster-puffs spaced evenly around center. To make a cluster-puff: *Yarn over, insert hook, pull up loop (3 loops on hook), yo, insert same st, pull up loop (5 loops), yo, insert same st, pull up loop (7 loops), yo and draw through 7 loops, ch 1 to close cluster*. Work total 8 clusters, placing them in every 6th stitch approximately. Join. (visual placement; stitch count remains 48)
- The puff clusters create a raised medallion look. Keep tail ends tucked and weave in later. If you prefer a flat center, skip cluster round and work one round of sc instead.
Inner Arc (lower semicircle)
- We will work a partial round across the lower half of the square to create a semicircle. Place a removable marker at the start point on Round 7 of the medallion to denote the centre-bottom position. The semicircle will use 24 stitches of the 48 total — i.e., half the circumference — and be worked in short rows (joined rows) to build height. Start with the darkest arc color (espresso).
- Round 9: Change to dark brown (espresso). From the centre-bottom stitch, work turning-row: ch 1, sc in same st and in next 23 sts across the lower half of the medallion (work across 24 stitches). Do NOT join into a full round; leave a tail or removable marker at the end. (24)
- Round 10: Turn work. Ch 2 (counts as first hdc), hdc across in back loops only (BLO) in each of the 24 stitches. (24)
- Round 11: Ch 2, hdc inc across: (3 hdc, inc) x 6 to shape the arc slightly (increase in 6 evenly spaced places across the 24 stitches) resulting in 30 stitches. This creates a slight bulge to the semicircle while staying attached to the round medallion at the base. (30)
- Working in BLO for one of the arc rounds creates a defined ridge and helps the arc stand forward. Keep short rows even and use stitch markers at the ends of the turning rows to maintain stitch counts.
- Round 12: Ch 2, hdc across all 30 sts. Turn. (30)
- Round 13: Ch 2, (4 hdc, inc) x 6 = 36 sts. Work across to create gentle flare. (36)
- Round 14: Ch 2, work 1 hdc in each st across (36). Fasten off dark brown if changing color to caramel for next arc. Leave an approx 8cm tail for weaving. (36)
- If you prefer the arc to be deeper, add one more increase round: (5 hdc, inc) x 6 = 42 sts. The pattern as written uses 36 for a moderate semicircle depth.
Middle Arc (caramel)
- Round 15: Join caramel color at the right-hand edge stitch of the latest turning row. Ch 1, sc across the same turning-row edge stitch and continue sc across the 36 stitches of the arc foundation (36). This creates a tidy transition edge. (36)
- Round 16: Ch 2, dc across in each stitch across the 36 sts. Turn. (36)
- Round 17: Ch 2, (5 dc, inc) x 6 = 42 sts. This slight increase spreads the arc to align with the later Granny field. (42)
- Round 18: Ch 2, dc in each st across (42). Fasten off caramel if changing to taupe for the inner arc. (42)
- Keep an even tension across color joins. If you prefer not to carry yarn along the back, fasten off and weave in; the join will be hidden inside the lacy field.
Inner Arc (taupe)
- Round 19: Join taupe at the right-hand edge. Ch 2, dc across 42 sts. Turn. (42)
- Round 20: Ch 2, (6 dc, inc) x 6 = 48 sts. This returns you to the medallion circumference count and helps the arc transition into the full-round granny field. (48)
- Round 21: Ch 2, dc across 48 sts. Fasten off taupe and switch to background cream on the last yarn over of the final dc (or fasten off and join cream). (48)
- At this point the lower stacked arcs are complete. The stitches around the medallion and the arcs now total approximately 48 stitches which will become the basis for the full rounds that expand into the square.
Upper Arc (mirror top semicircle)
- We will now mirror the semicircle process at the top of the square to create the stacked motif — dark brown at top, caramel in middle, taupe inner. The same short-row approach is used, starting from the centre-top stitch on Round 7 medallion.
- Round 22: Locate centre-top stitch on Round 7 (directly opposite the lower semicircle start). Join dark brown. Ch 1, sc across 24 stitches to form the first turning row for the top arc (mirror of Round 9). (24)
- Round 23: Turn, ch 2, hdc in BLO across 24 sts. (24)
- Round 24: Ch 2, (3 hdc, inc) x 6 = 30 sts. Turn. (30)
- Round 25: Ch 2, hdc across 30 sts. Fasten off dark brown. (30)
- Round 26: Join caramel at right-hand edge of the turning row. Ch 1, sc across 30 sts. (30)
- Round 27: Ch 2, dc across 30 sts. Turn. (30)
- Round 28: Ch 2, (4 dc, inc) x 6 = 36 sts. Fasten off caramel. (36)
- Round 29: Join taupe at right edge. Ch 2, dc across 36 sts. Turn. (36)
- Round 30: Ch 2, (5 dc, inc) x 6 = 42 sts. Join with sl st to the corresponding stitch on the surrounding cream round to rejoin the full-round structure. (42)
- Now both semicircles are in place, stacked top and bottom, with the center medallion visible between them. Check symmetry by folding square in half; top and bottom arcs should align visually.
Transition to Full-Round Granny Field
- Round 31: With cream background, ch 2. Dc evenly around the whole piece into each stitch and into the sides of the short-row turning rows until you return to the start. Aim for ~80 dc total across the full circumference (counts will vary where short rows created extra stitches; guide is to work 1 dc in each stitch available). Join. (approx 80)
- Round 32: Ch 3 (counts as dc). *Sk 2 sts, 3 dc cluster (shell) in next st, sk 2, dc in next st* Repeat around to create initial lacy field. Adjust spacing slightly to keep square shaping. Join. (approx equal number of shells around)
- These rounds form the lacy granny-like field that fills the square around the central motif. Keep shells evenly spaced and use stitch markers in four quadrants to help maintain symmetry for later square formation.
- Round 33: Ch 3, 2 dc in next ch-2 space, ch 2, 3 dc in same space (corner shell). *Move to next ch-2 space, 3 dc, ch 2, 3 dc* Repeat for four corners. Between corners work 3 dc clusters in each shell space. Join. (This begins making the piece square by forming corner shells)
- Round 34: Ch 3, work one shell (3 dc) in each 3-dc group from previous round, and form corner shells (3 dc, ch 2, 3 dc) in the same corner spaces. Join. (piece now clearly square-shaping)
- Round 35: Ch 3. Work around repeating pattern: 3 dc in each shell cluster, ch 1 between clusters where needed to even out the edge, and corner shells in each corner. Join. (maintain even stitch numbers on each side)
- Round 36: Ch 3. Work one round of DC in each stitch on the sides and continue to build corner shells. This round will smooth the transition between lacy shells and the next denser border. Join. (counts vary)
- At rounds 31–36 you are translating the circular motif into a square. Count shells on each side: you should have the same number of shells per side for symmetry. If one side has an extra shell, adjust by adding a ch-1 space in an adjacent section to even it out before continuing.
Square Expansion (even rounds to build size)
- Round 37: Ch 3, dc in each st and in each ch-1 space along sides and (3 dc, ch 2, 3 dc) in corner ch-2 spaces. Join. (even round across the whole square)
- Round 38: Repeat Round 37. This gives two rounds of smooth dc to stabilize shape. Join.
- Round 39: Ch 3, *3 dc in next space (forming a small 3-dc group), ch 1, skip 1* Repeat across sides, making corner shells as before. Join.
- Round 40: Work 1 dc in each st across and in each ch-1 space to tidy side spacing. Join. (use stitch counters to ensure each side matches)
- Repeat the two types of rounds (one textured/shelled and one smoothing dc round) until your square reaches desired size. The sample square measures approx 16 x 16 cm / 6.5 x 6.5 in when worked in worsted cotton and 5.0mm hook after Round 44. Continue until you reach the size you want — here we will continue to Round 44.
- Round 41: Repeat Round 39 pattern to continue texture. Join.
- Round 42: Repeat Round 40 smoothing dc round. Join.
- Round 43: Repeat Round 39. Join.
- Round 44: Repeat Round 40. Join. At this point the square body should measure approximately the target size given above. If your square is smaller, work one additional pair of texture + smoothing rounds (Rounds 45–46) to enlarge.
- Check diagonal measurements to ensure square shape. If corners are pulling in, add an extra ch-1 space on the last textured round to relax tension. If corners are flaring, omit a ch-1 gap on that side to tighten.
Decorative Open Shell Round
- Round 45: Change to cream border shade if you used the same color already. Ch 3 (counts as dc). *Sk 1, 5 dc shell in next st, sk 1, dc in next st* Repeat across each side, making corner shells (5 dc, ch 2, 5 dc) in corner spaces. Join. This creates a larger decorative shell row along the edge. (counts vary)
- Round 46: Ch 1, sc in each st and in the center of each 5-dc shell work sc, creating a neater surface. Join. (smoothing detail)
- This round helps form the chunky textured border visible in the photographs. Work carefully into shell centers to maintain even spacing.
Corner and Edge Refinement Rounds
- Round 47: Ch 3, dc in each stitch around. In each corner ch-2 space work (3 dc, ch 2, 3 dc). Join. (this evens tension across the square)
- Round 48: Ch 1, sc in each st around to produce a tidy base for final edging. Join. (counts will be roughly equal on each side; ensure corners have 3 sc in corner to preserve shape)
- At this stage the square should look like the sample. If you'd like a thicker border, work an additional round of sc in the same color before the rope border.
Final Rounded Rope Border (to mimic the lifted, tubular edge)
- Round 49: Switch to 4.0mm hook if you prefer a slightly tighter, neater final edge (optional). With cream, ch 2, hdc in each st around, putting (2 hdc, ch 1, 2 hdc) in each corner ch-2 space to maintain square corners. Join. (hdc rounds create a boxed, rope-like edge)
- Round 50: Ch 1, BLO sc in each st around to add a faint ridge along the outside edge. Join. Fasten off and weave in ends neatly into the back of the work.
- Use a tapestry needle to weave tails along the back through several stitches and trim. Use a light steam block to encourage the square to lie flat. Pin corners square while blocking.
Optional Extra Rounds for Larger Projects
- Round 51: If making a blanket panel, continue with an extra repeat of the texture + smoothing rounds: ch 3, 3 dc shells spaced, corner shells, join. Then follow with a smoothing dc round. Repeat in pairs until the square reaches the size needed for your project. Each pair of rounds adds about 0.8–1.2 cm depending on yarn.
- Round 52: Repeat smoothing dc round. Join. Maintain symmetry by keeping equal numbers of shells per side.
- When joining multiple squares, leave long tails at two adjacent edges of each square for mattress-stitch or slip-stitch join. Alternatively, join as you go with continuous crochet join for a seamless look.
Finishing Touches
- Weave all ends in on the WS with a yarn needle. Block gently: dampen and pin to square shape or use steam. Trim stray fibers. If joining into a blanket, I recommend a flat slip-stitch join in cream to let the motifs read clearly.
- For coasters or placemats, reinforce final round with a thin line of fabric glue on the back of the outermost round if extra stiffness is desired. For washability, use cotton yarn and machine-wash on gentle cycle then reshape while damp.
Assembly Instructions
- If joining multiple squares together, arrange squares so that semicircles line up in pleasing orientations then use whip stitch or slip-stitch join to connect adjacent edges for a seamless look
- When attaching squares by sewing, hold two squares with right sides facing up; mattress stitch along vertical seams using long tails left for joining to create an almost invisible seam
- For a continuous crochet join: with right sides up, join cream at a corner, sc evenly along edge while joining with the neighboring square’s edge, working into corresponding stitches to maintain alignment
- If using a decorative border across a whole blanket, join all squares first then work a 3–5 round border in cream around the entire blanket to frame the geometric motif
- Press (steam or wet-block) each square pinned to exact dimensions before joining to ensure uniformity and tidy edges
- When joining, line up center medallions and arcs so the geometric rhythm reads across the blanket; pin heavy points before stitching to avoid shifting
Common Mistakes & How to Fix Them
- Skipping stitch markers at the start of rounds causes you to lose your round start and creates lopsided edging; mark the first stitch each round
- Changing colors without fastening off or leaving long tails can lead to messy joins; weave in short tails and bury ends as you change colors
- Using a looser hook than recommended makes the arches too floppy and gaps appear; use a slightly smaller hook for a dense fabric
- Not counting your stitches after each increase/decrease round leads to mismatched corners on later rounds; check counts every 8–10 rounds
- Forgetting to work partial rounds (short rows) exactly as described will distort the semicircles; follow the stopping points and turning chains carefully
- Failing to block the finished square can leave it misshapen or curled at the corners; a light steam or wet block helps the square lay flat and neat
Important Notes
- Use stitch markers consistently at the beginning of each round to avoid counting errors and maintain proper shaping
- Stuff body parts gradually as you work rather than waiting until the end, especially for narrow openings like arms and legs
- For this flat square project, weave in color change tails as you go to avoid long tails and bulky joins
- Maintain consistent tension throughout the project; too tight creates stiff fabric, too loose creates holes
- When working short rows for the semicircles, place markers at turning points to ensure both top and bottom arcs align symmetrically
- Pin and block each square before joining a blanket for neat, even seams
- Work corners carefully: always use (3 dc, ch 2, 3 dc) to keep corners square and consistent
- If your corner shells look small, increase the ch-2 to ch-3 on the border rounds to open corners slightly
This geometric square pattern is a lovely mix of texture, contrast and airy lacy stitching — a stylish neutral piece to add to blankets, pillows, or seasonal accents. The stacked semicircles add a designer feel while staying relaxing to crochet. I hope this square finds a cozy spot in your home or becomes the start of a beautiful blanket. Happy stitching — and don’t forget to share a photo of your finished piece! 🧶🏡
Crochet Abbreviations
- ch
- chain
- st
- stitch
- sc
- single crochet
- hdc
- half double crochet
- dc
- double crochet
- tr
- treble crochet
- sl st
- slip stitch
- sp
- space
- sk
- skip
- inc
- increase (2 stitches in same stitch)
- dec
- decrease (sc2tog or dc2tog as specified)
- rep
- repeat
- ( )
- work instructions in brackets as directed
- BLO
- back loops only
- FLO
- front loops only
- RS
- right side
- WS
- wrong side
You Ask, We Answer
What is the finished size of this square?
Using worsted weight cotton and a 5.0mm hook the finished square measures approximately 16 x 16 cm (6.5 x 6.5 in). Different yarn weights or hooks will change the size proportionally.
Can I use a different yarn weight for this pattern?
Yes — you can substitute lighter or heavier yarns. Adjust your hook size accordingly (typically one or two sizes smaller than the yarn label for amigurumi-like tightness, but for this home decor piece choose a hook that gives you a drapey but stable fabric). Expect change in final measurements.
Do I need to be comfortable with short rows to make the semicircles?
Basic turning rows and working back-and-forth short rows are all that's required. The pattern gives exact stopping and turning points; practice a small sample if new to short rows to get comfortable before proceeding.
How many squares do I need for a blanket?
That depends on blanket size. For a throw ~120 x 150 cm you will need approximately 80-100 squares at the sample size. Always make a gauge swatch and calculate from there.
Can I machine wash the finished square?
If you use washable cotton yarn, the square can be machine washed on a gentle cycle. Reshape while damp and block to keep square edges neat. Avoid hot water or harsh agitation to maintain shape and colorfastness.
How do I avoid holes at the color joins?
Finish the last yarn over of the previous color with the new color and weave the tail into the back, or fasten off and join cleanly. Maintain even tension on joins and avoid pulling yarn too tightly; short tails woven in help secure transitions.
Can I adapt the motif to a circular blanket rather than a square?
Yes, by skipping the corner shell transformations and continuing in complete rounds while expanding evenly, you can create a circular medallion using the same layered arc colorwork technique.
What blocking method do you recommend?
For cotton yarn, wet block: gently soak, press out excess water with towel, pin to shape on a blocking mat, and allow to dry fully. Use steam sparingly if using plant-based fibers to avoid unwanted flattening of raised textures.