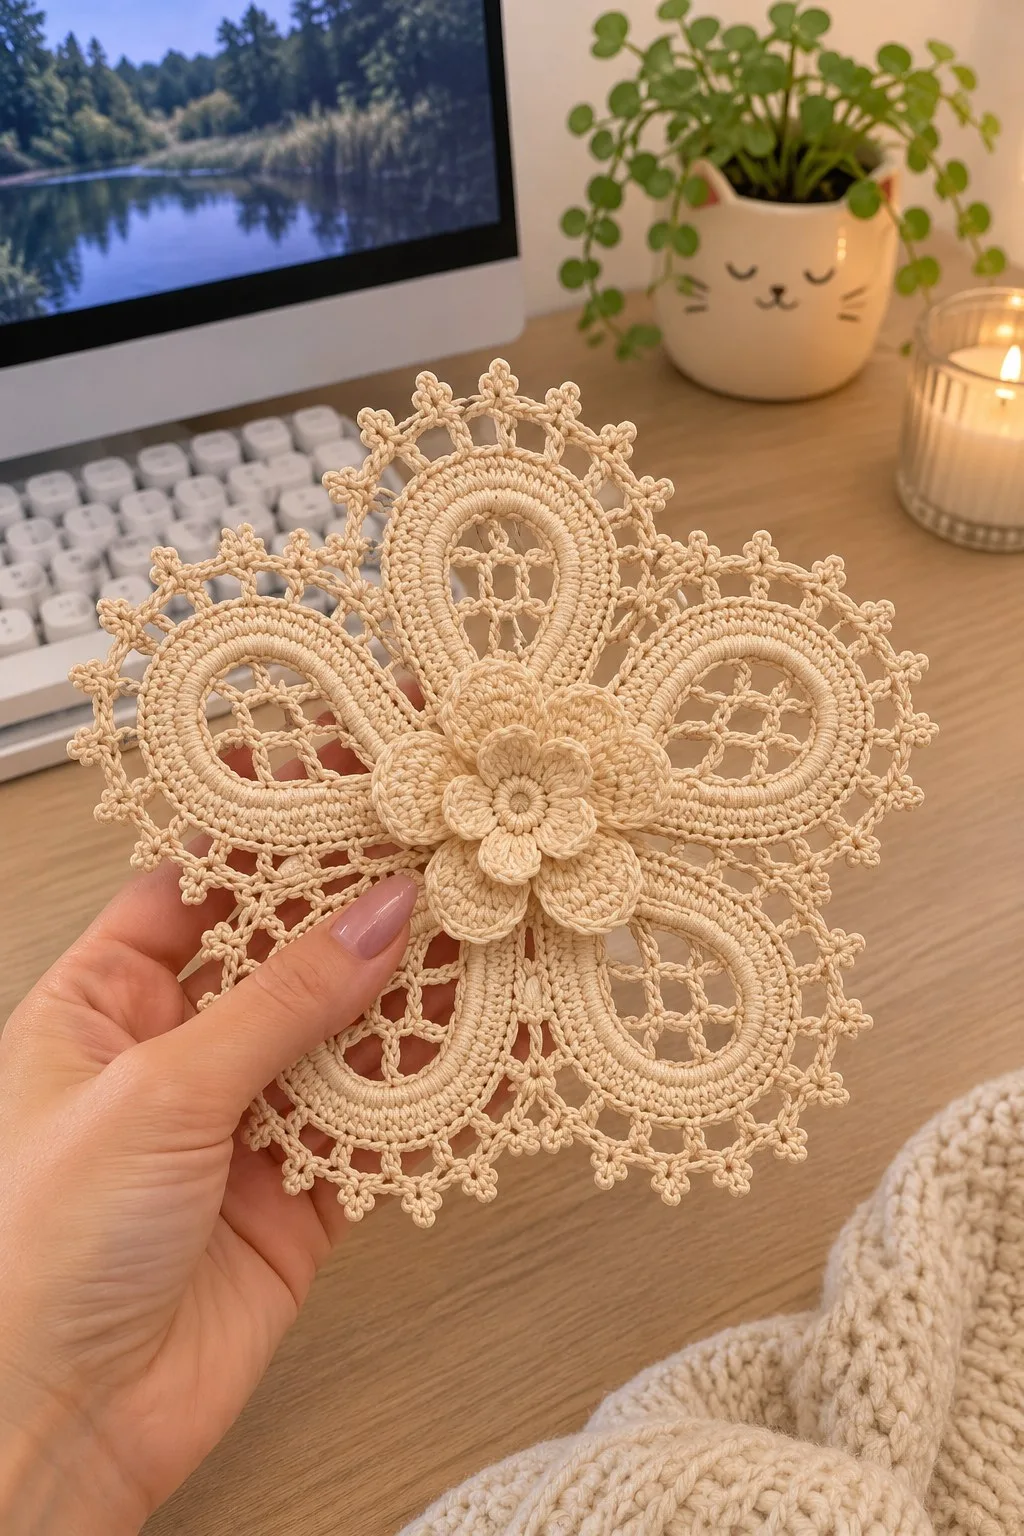
A delicate, vintage-inspired creamy lace flower motif perfect for doilies, bedspreads or table decor. This pattern recreates the layered central blossom, six raised oval petals with mesh windows, and a decorative picot edge. Worked in fine cotton with crisp stitch definition, the motif lies flat after careful blocking and makes a beautiful heirloom piece.
About This Creamy Lace Flower Doily Motif Pattern
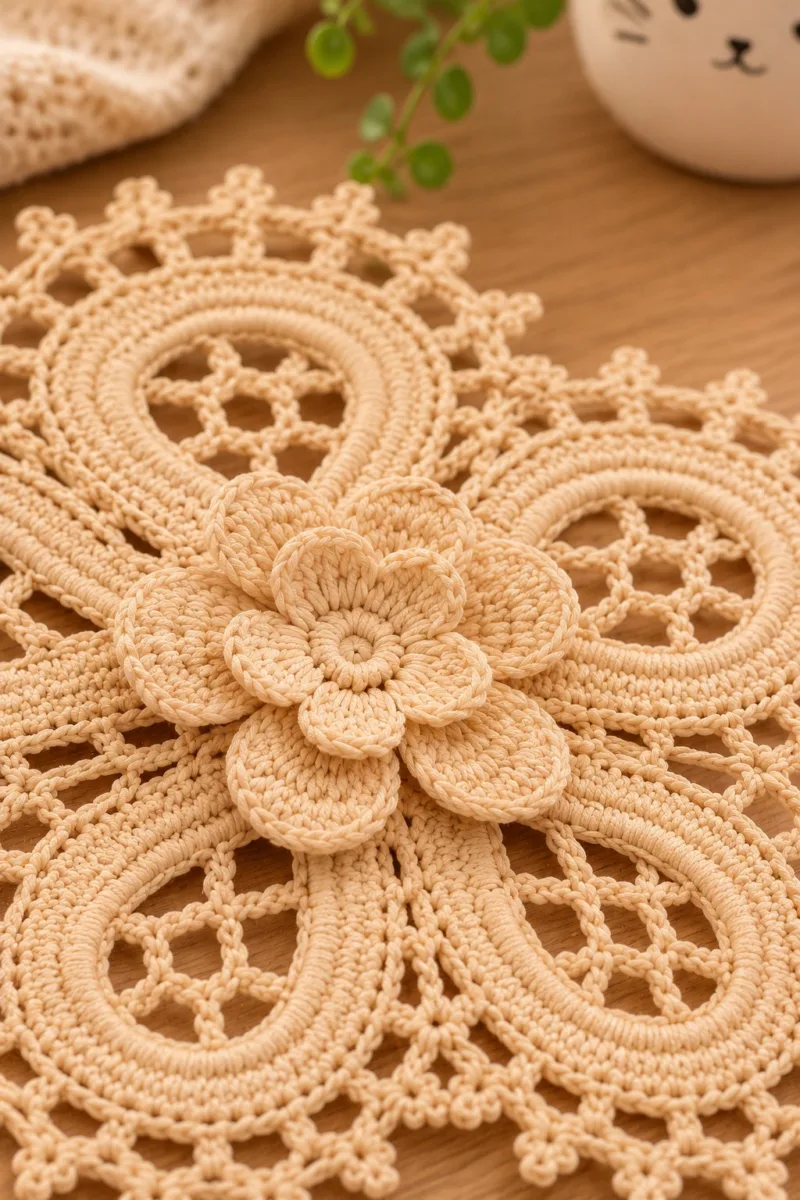
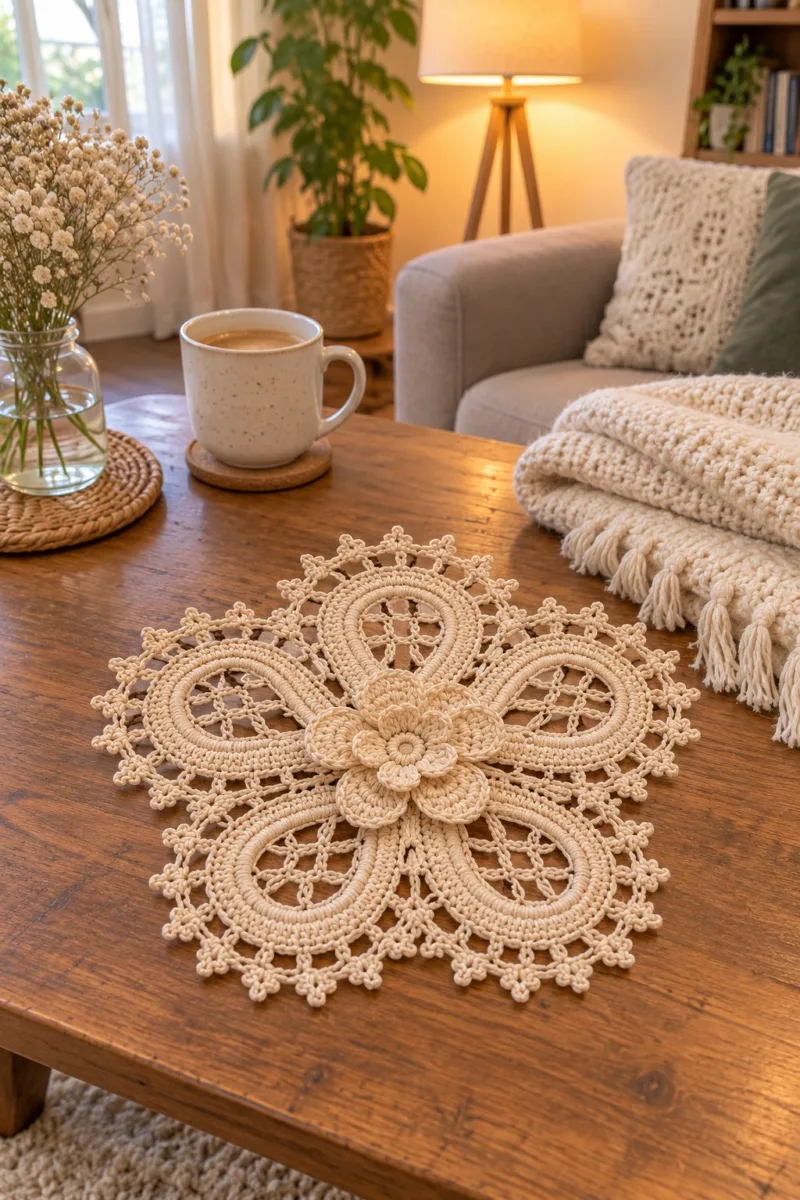
This creamy lace flower motif is a layered, sculptural doily piece that features a raised central bloom, six elongated oval petals, intricate mesh windows and a pointed picot lace outer border. The sample is made in a warm cream cotton that highlights the stitch texture and shadow lines created by raised rounds. The motif is worked flat and assembled as you crochet the outer rounds, then carefully blocked for a precise, even finish. Ideal for making single decorative accents or repeating to join into a bedspread.
The pattern focuses on textured rounds, overlay-style petals and a network of chain-mesh between the petals. The central flower is layered (two tiers) and stitched to the petal bases to create depth and a soft 3D focal point. Detailed finishing instructions and blocking tips are included.
Why You'll Love This Creamy Lace Flower Doily Motif Pattern
I love this pattern because it combines architectural lace with soft floral shaping — the raised petals and the layered center are so satisfying to crochet and create beautiful shadows on the finished fabric. The neutral cream color in the photos really shows off the textures and makes the motif suitable for both vintage-inspired and modern interiors. I also enjoy how forgiving the mesh sections are — small tension changes disappear after blocking, and the finished motif looks like a tiny work of art.
- Cozy Accent – A warm touch for your space that transforms ordinary corners into inviting nooks filled with handmade charm.
Switch Things Up
I absolutely love how this lace flower motif can be customized — you can make it dainty with size 10 thread and a 1.5 mm hook, or more bold using DK cotton and a 3.5 mm hook to create a visible statement piece.
I recommend trying different edge treatments: switch the picot round for a shell-stitch border for a softer edge, or add tiny beads to each picot to create a shimmering accent for holiday décor. You can also change the center color to highlight the layered bloom.
I also enjoy joining these motifs into larger fabrics — try alternating motifs with plain mesh squares or granny motifs to create a textured bedspread. Remember to block every motif identically before joining for the best result.
Materials Needed
Main Fabric
- Light DK-weight mercerized cotton yarn (#3), approximately 110-140 g in Cream (main color shown)
- Optional: small amounts (10-20 g) of matching cotton for layered center if you prefer two-tone contrast (not shown)
- Stiffening spray or blocking wires (small) for shaping petals if making a structural bedspread
- Thread-size cotton or crochet thread size 8 for extremely fine, lace-like finish (if substituting use hook 1.5-1.75 mm and reduce stitch counts proportionally)
Tools Required
- 3.0 mm crochet hook (recommended for sample)
- 2.5 mm crochet hook (optional for tighter center petals)
- Size 10 mercerized cotton or equivalent yarn (see yarn notes)
- Tapestry/yarn needle for weaving ends and sewing layers
- Fine pins and blocking board or thick towel
- Measuring tape or ruler
- Scissors
- Stitch markers (at least 6) to mark petal repeats and round starts
- Optional: small amount of spray starch or textile stiffener for displaying doilies
The Free Pattern
0% complete
Materials & Gauge
- Gauge is not critical for lace motif but using recommended hook and cotton will yield motif approximately 20-22 cm (8.0-8.7 in) across. Measure as you go to keep petals even. Tension should be even and slightly firm to preserve lace structure.
Note on Construction
- This motif is worked in joined rounds and in separate units that are joined during later rounds. Work the central layered flower first, then create six identical raised oval petal bases. After petals are completed, work the mesh panels between petals and the outer picot edging. Use stitch markers to mark petal centers and the junction points where mesh begins.
Central 6-Petal Flower (Layer 1 – small center)
- Round 1: 6 sc in magic ring (6)
- Round 2: Inc around (12)
- Round 3: (1 sc, inc) x 6 (18)
- Round 4: 1 sc in each st (18)
- Round 5: (2 sc, inc) x 6 (24)
- Round 6: 1 sc in each st (24)
- Round 7: (3 sc, inc) x 6 (30)
- At the end of Round 7 you will have a small disc that will become the base for the small center petals. Keep stitches evenly tensioned; place a marker at the start of each round.
- Round 8: 1 sc in each st (30)
- Round 9: (4 sc, inc) x 6 (36)
- Round 10: 1 sc in each st (36)
- Round 11: Fasten off leaving a long tail for sewing the center to Layer 2 later. Do not cut short; we will use this for attaching the first layer of petals.
Small Petals (Make 6, Layer 1)
- Work each small petal directly onto the Round 7-10 edge by attaching yarn to evenly spaced pairs of stitches. Space 6 petals around the center—approximately every 6 stitches around the Round 7 edge. Use stitch marker to mark each petal placement.
- Petal Round 1: Attach yarn, ch 1, 1 sc in base st, 2 sc in next, 1 sc in next (3 sts total across base), ch 1, sl st to next spacing stitch to turn (this secures the petal base)
- Petal Round 2: Working along ch-1 edge: (sc, hdc, 3 dc, hdc, sc) across; sl st to base to secure
- Petal Round 3: Turn to work around outer curve: ch 2, (3 dc cluster over next 3 sts), ch 2, sl st to base; fasten off and weave long tail to the back to secure petal. Repeat for 6 small petals.
- These small petals form the innermost decorative flower tier. Keep them slightly raised by placing a small dot of starch when done if you want them to remain lifted.
Layer 2: Larger Central Flower (Make 1 concentric layer)
- Round 1: Join yarn to the back of the Layer 1 center disc in a stitch between two small petals. Ch 3 (counts as dc), 2 dc in same st, ch 2, skip 1 st, (3 dc, ch 2, skip 1 st) repeat around to form 6 scallops; join with sl st to top of starting ch-3. (6 scallops)
- Round 2: Work pointed petals on each scallop: join yarn in ch-2 sp, (sc, hdc, 5 dc, hdc, sc) in each ch-2 sp; sl st to join. Fasten off leaving long tail for sewing to petal bases later.
- Position Layer 2 petals so they are slightly offset to the small inner petals to create a 3D layered effect. Sew Layer 2 to the base disc using mattress or whip stitch with the long tail; ensure stitches are hidden beneath the petals.
Petal Base / Oval Raised Petals (Make 6 identical petals)
- The six large oval petals are worked as independent units and then joined to the central round. Each petal begins with a short foundation chain closed to an oval base. All stitch counts below are for one petal. After completing one petal, repeat exact rounds five more times for uniformity.
- Petal Round 1: Ch 16, sl st to first ch to join and form a small ring (16 ch)
- Petal Round 2: Ch 1, 24 sc evenly around the ring (24)
- Petal Round 3: (1 sc, inc) x 12 around (36)
- Petal Round 4: 1 sc in each st (36)
- Petal Round 5: (2 sc, inc) x 12 (48)
- Rounds 2-5 build the oval base. The counts above yield an oval approximately 6-7 cm long with this yarn/hook. Adjust initial ch if you want longer or shorter ovals but keep increases grouped as shown for smooth shaping.
- Petal Round 6: 1 sc in each st (48)
- Petal Round 7: (3 sc, inc) x 12 (60)
- Petal Round 8: 1 sc in each st (60)
- Petal Round 9: (4 sc, inc) x 12 (72)
- Petal Round 10: 1 sc in each st (72)
- Petal Round 11: Switch to BLO for a defined ridge: 1 sc in each st BLO (72)
- Working Round 11 in BLO creates a raised ridge that will help the petal hold its oval profile. Keep tension even; this round will be visible under subsequent rounds and defines the inner oval edge.
- Petal Round 12: 1 sc in each st (72)
- Petal Round 13: Work decorative inner window setup: *ch 5, skip 4 sts, sl st in next* around across the center area of the oval to form looped windows. You should make 12 loops across the long sides and 6 across the short sides; adjust spacing so loops meet symmetrically. (approx windows established)
- Petal Round 14: In each ch-5 loop work (sc, ch 3, sc) anchoring a small laddered mesh; this forms the grid across the inner window. Work evenly across loops until the inner oval is filled with a lattice. Fasten off leaving tail for joining to center.
- The chain-loop lattice creates the airy window seen in the motif. Keep chains taut but not tight; they should form slightly flattened arches that will block flat. Repeat for all six petals. Use a stitch marker to mark the bottom center of each petal for later alignment.
- Petal Round 15: Make a decorative outer ridge: rejoin yarn to outer BLO ridge and sc around with slightly elongated stitches: *sc in BLO across the curve, every 6th st work (picot: ch 3, sl st in 3rd ch) to create small points* repeat evenly around – approx 12 picots per petal outer curve. Fasten off leaving tail for joining.
- Each petal should now appear as a raised oval with a lattice window and outer tiny picot points along the rim. Stack or pin petals to verify symmetry before joining them to the central motif.
Joining Petals to Center and Between-Petal Mesh (Join Round)
- Arrange six petals evenly around the central flower so their inner bases meet the center disc. Use stitch markers at every petal base to keep spacing even. Join them one by one using slip stitch and sc joins; join points will be at the marked bottom center of each petal and at two side points where the petal meets its neighbors.
- Join Round 1: With one petal pinned, attach yarn to center disc between two small petals where petal base will sit. Ch 1, sc across base for 4-6 sts, then sl st into the nearest petal base stitch to anchor. Continue around, joining each petal with sc and sl st anchors to the central disc until all six are attached. Join with sl st and fasten off.
- Make sure petals are equidistant. Adjust by moving the join stitches slightly if a petal appears too crowded. Weave ends through the centre and to the back to keep the front neat.
- Mesh Round 1: Starting at one junction between petals, join yarn and ch 6, skip 3 base sts, sl st into next join point, *ch 6, sl st into next join point* repeat around between all petal bases to form long chain arches connecting each petal. You will make 6 long arches between the petal bases. Fasten off and weave ends.
- Mesh Round 2: Join yarn into each ch-6 arch: *sc, ch 4, sc, ch 4, sc* across each arch to create a sablé-like net. Repeat for all 6 arches. Fasten off.
- These arches form the inward-facing mesh seen between petals. Keep chain arches evenly sized and tensioned. Pin the motif flat before proceeding to outer edging to ensure consistent shape.
Inner Oval Decorative Rounds (Worked on each petal to build raised double-ridge)
- Round 1: Re-attach yarn to inner side of petal oval next to lattice, ch 1, 1 sc in same st, sc evenly around inner rim (work into foundation sts of the earlier rounds) (approx 48 sc)
- Round 2: 1 sc in each st (48)
- Round 3: Work (1 sc, inc) x 12 (60) to build a second ridge around the oval
- Round 4: 1 sc in each st (60)
- These rounds add the raised inner ridge visible in the photos. Work in tight, consistent tension so that the ridge stands proud of the mesh. Repeat on every petal.
- Round 5: Finish with a tidy reverse single crochet (crab stitch) around the inner ridge to create a crisp inner border: work crab stitch (reverse sc) around. Fasten off and weave ends to back.
Outer Decorative Lattice and Picot Edging (Worked continuous around full motif)
- After all petals are joined and inner ridges completed, work the outer lace in continuous rounds connecting petal tips with chain-lace and picot clusters. Work with the same yarn and the same hook for consistent look.
- Outer Round 1: Join yarn at the tip of one petal's outermost picot point, ch 1, sc in same st, *ch 7, skip down to next petal outer picot point, sc to attach* repeat making a chain arc between each outer petal tip until you complete the round (6 arcs around). Fasten off.
- Outer Round 2: Join yarn in an arc chain: work (sc, ch 5, sc) in the center of each arc, then along the arc work sets of small loops: *(ch3, picot, ch3, sl st to arc) repeated 3 times* to form small bobble clusters between each arc. Finish round with sl st and fasten off.
- Outer Round 3: For the final edging, join yarn and work *sc, ch 3, picot (ch 3 sl st in base), sc* repeatedly around every small loop along the arcs to create the delicate pointed lace picot edging seen in the motif. Aim for 10-12 picot points between each petal tip to match the pictured density. Fasten off neatly and weave ends to back.
- Keep picots small (ch3 or ch4) and consistent. If your yarn wants to curl, gently steam-block each point into place rather than stretching excessively.
Final Floral Layer (Large Overlapping Petals)
- The final visible feature is the set of larger decorative petals arranged on top of the center creating the sculpted layered blossom. These are worked flat and sewn to the center with invisible stitches. Make 6 large top petals and 6 medium petals for a double-layered look as shown.
- Top Petal Round 1: Make a small disc: mr, 6 sc in mr, join (6)
- Top Petal Round 2: Inc around (12)
- Top Petal Round 3: (1 sc, inc) x 6 (18)
- Top Petal Round 4: 1 sc in each st (18)
- Top Petal Round 5: Work around petal shape: ch 2, (3 dc, ch 2, 3 dc) in next space to form a rounded petal; anchor to opposite side with sl st to create a thin petal flap. Fasten off leaving long tail for sewing.
- Make 6 of these top petals and 6 slightly larger petals (increase ch base by 4-6 to make the larger layer). Stack them—larger petals below, smaller above—and sew them carefully to the center disc so the petals overlap evenly.
Blocking & Finishing
- Pin the motif out to the desired diameter on a blocking board or towel, stretching each petal gently to an even shape. Use rust-proof pins to set the picot points and the oval curves. Lightly steam with an iron held 2-3 cm above the fabric (do not press) or use a spray starch for a stiffer finish. Allow to dry completely before removing pins.
- Final Step: Weave all loose ends to the back, trim close, and optionally attach a small non-removable felt pad if using as a table mat. If joining several motifs into a bedspread, do so after blocking to ensure uniformity; join along outer arcs using sl st or single crochet seams.
- If you plan to join many motifs into a larger project (bedspread), plan color changes and blocking order carefully. Join motifs only after all are blocked to the same size to avoid mismatch.
Assembly Instructions
- Pin all six raised oval petals evenly around the central flower before any sewing. Use the stitch markers placed during petal construction to ensure spacing is consistent.
- Attach petals to the central disc by sewing with the long tails left from the petal inner rounds. Use a hidden whip stitch around the junction, catching center disc rounds and the petal foundation for a secure seam.
- Join the chain-arch mesh between the petals by slip-stitching at each petal base; ensure chain-loop lengths are consistent by pinning into place before final joining.
- Sew the layered top flower petals to the center disc using mattress stitch through the back loops only for a neat finish. Tuck tails under petals and weave through multiple rounds to hide.
- Work the outer picot and lattice rounds last, joining arcs to petal tips with single crochet or slip stitches to avoid holes. Weave and secure ends on the back center and trim close.
- Block the completed motif pinned to a flat surface, shaping each oval petal and picot point precisely. Leave to dry fully before removing pins. If making multiple motifs, block all before joining together.
Common Mistakes & How to Fix Them
- Skipping stitch markers when starting each round can lead to twisted rounds and miscounted stitches; always mark round starts clearly.
- Using yarn that is too soft or loosely spun will reduce stitch definition; choose a smooth mercerized cotton or crisp DK for best results.
- Changing hook size mid-round without recalculating stitch counts creates uneven petals and mismatched oval shapes; keep hook changes in Info sections and adjust counts only as instructed.
- Not blocking the finished motif will leave curves and ruffles; pin and steam/block to flatten and shape each petal precisely.
- Joining petals or edges before final blocking can prevent them from lying flat; block individual motifs fully then join for best results.
- Forgetting to weave in tails securely at join points can result in unraveling after washing; weave through multiple rounds and secure with a small knot if needed.
Important Notes
- Use stitch markers consistently at the beginning of each round to avoid counting errors and maintain proper shaping
- Work petals one at a time and pin them into position to check symmetry before sewing to the center
- Stuffing is not necessary for this motif; instead use gentle blocking and optional starch to shape raised petals
- Maintain consistent tension throughout the project; small tension differences are magnified in lacework
- When using picots, keep chains very short (ch3 or ch4) to prevent them from flopping; steam-block to shape
- If converting to thinner crochet thread, reduce initial chain length and use a smaller hook; recalculate increases proportionally
- Weave in long tails through several rounds at joins to ensure they do not work free after washing
- Label and number your petals while working multiple motifs to ensure you sew matching size petals in the same order
Completing this creamy lace flower motif is such a joy — each stage builds into a beautifully textured, heirloom-quality accent. The layered center and raised oval petals give it a sculptural, vintage look perfect for doilies or joined bedspreads. Pin, block, and steam to reveal the lace details and enjoy the satisfying transformation. 🧶✨ Display alone or repeat into a stunning bedspread — either way, this motif brings warmth and charm to your home. 🌼
Crochet Abbreviations
- ch
- chain
- sl st
- slip stitch
- sc
- single crochet
- hdc
- half double crochet
- dc
- double crochet
- tr
- treble (UK tr = treble / US tr = double treble depending on region; here use US terms: tr = US treble)
- dtr
- double treble (US)
- inc
- increase (2 stitches in same st)
- dec
- invisible decrease
- blo
- back loops only
- flo
- front loops only
- sp
- space
- sk
- skip
- pic
- picot (usually ch 3, sl st in 3rd chain or sl st to base)
- rep
- repeat
- mr
- magic ring
- st(s)
- stitch(es)
- ( )
- work instructions in brackets as directed
- x
- times
You Ask, We Answer
What is the finished size of this motif?
Using DK-weight cotton and a 3.0 mm hook, the finished motif measures approximately 20-22 cm (8.0-8.7 in) across. Using thicker yarn or a larger hook will increase the size proportionally.
Can I use crochet thread size 10 instead of DK cotton?
Yes — using size 10 crochet thread will create a much smaller, more delicate motif. Reduce the hook to 1.5-1.75 mm and be prepared for much finer, slower work; you may also need to reduce chain foundation lengths to retain proportional oval shapes.
Do I need to block the motif?
Absolutely. Blocking is essential for this design as it evens the ovals, flattens the mesh windows and sets the picot points. Steam or wet block pinned to shape and allow to dry completely.
How many motifs do I need for a bedspread?
This depends on motif size and desired coverage. For example, a full twin-size bedspread typically needs 150-220 motifs at this scale when overlapped and joined with connecting mesh. Planning and swatching is recommended.
Can I join motifs as I crochet them?
You can join motifs during outer rounds, but it's recommended to block motifs first for uniform shape. Joining after blocking produces neater seams and consistent motifs.
What stitches give the raised ridges on the petals?
The raised ridges are created by a combination of working rounds in the BLO (back loops only), additional rounds of increases to puff the ridge, and a final reverse single crochet (crab stitch) to create a crisp defined edge.
How to ensure even spacing of the six petals?
Use stitch markers to mark six equal positions on the center disc before attaching petals. If necessary, count stitches and adjust the petal foundation chain to line up evenly.
Can I make the finished motif washable?
Yes. Wash gently in cool water and reshape while damp. Avoid vigorous agitation, and air dry flat. If stiffened with starch or spray, follow the product care instructions.